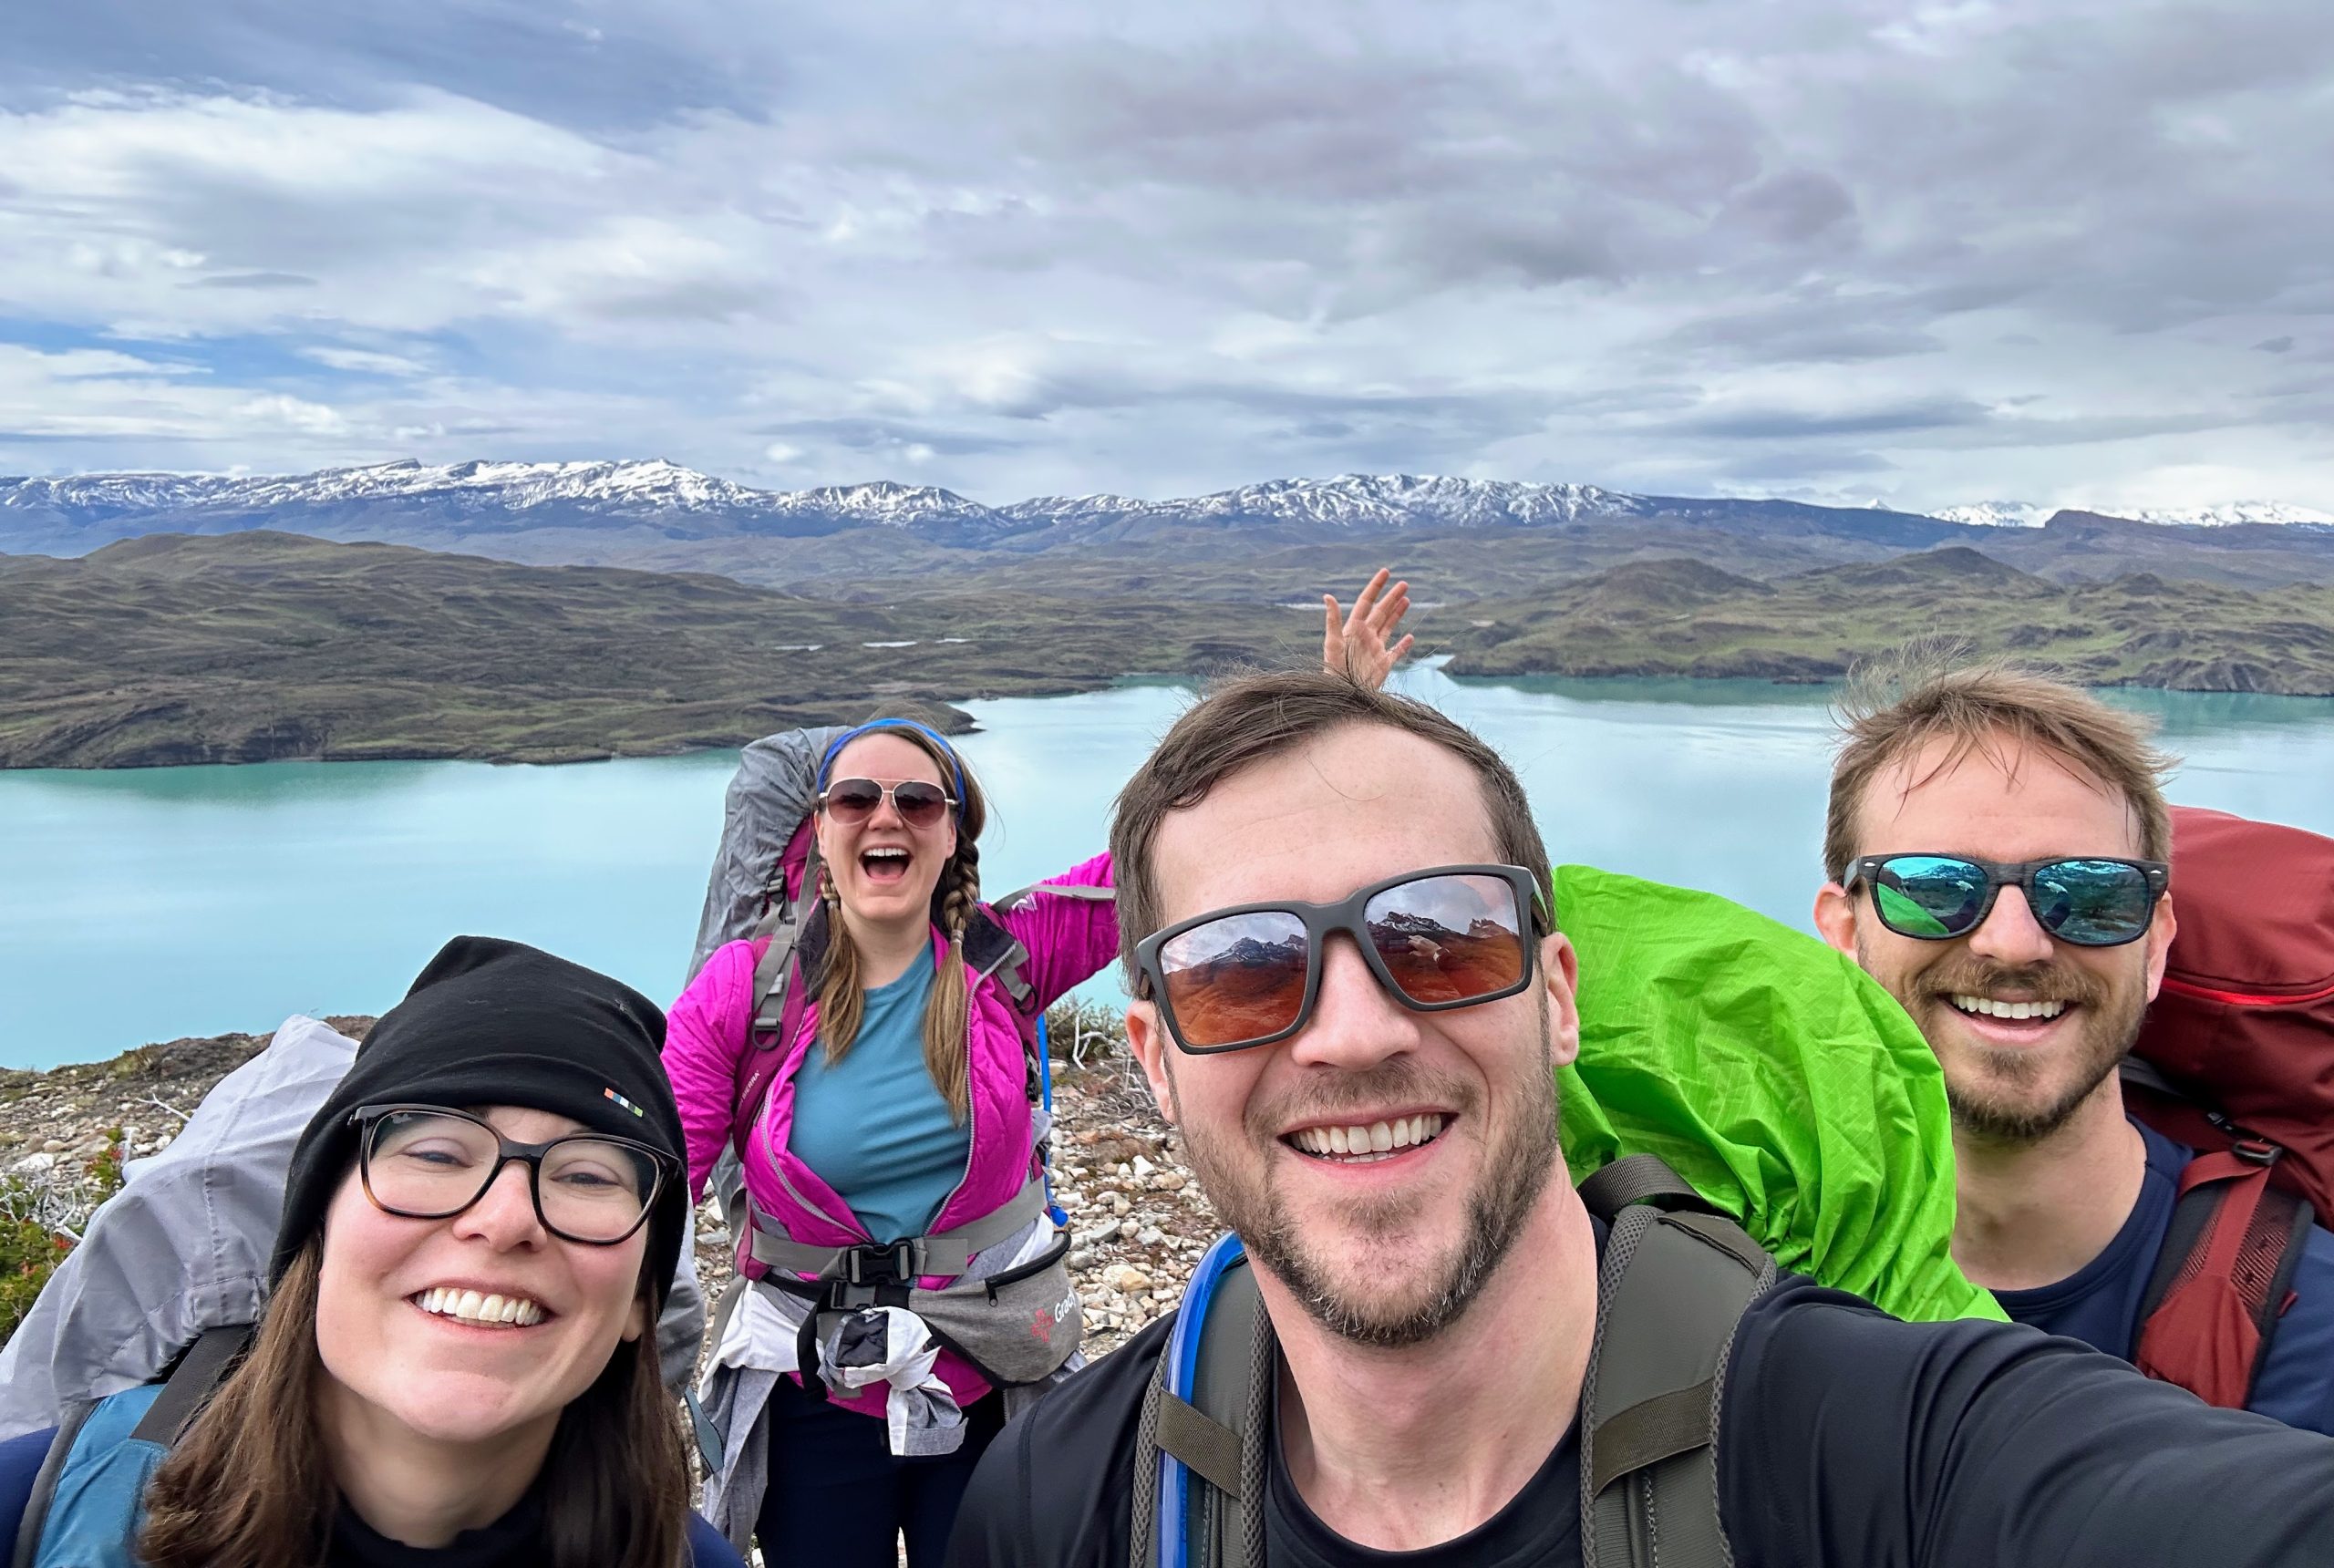
Chilean Patagonia! Torres del Paine National Park is truly breathtaking, and the best way to experience it is to embark on a multi-day hike. Across five days of trekking, you will see magnificent mountain ranges, glaciers, and lakes – all while challenging yourself and ultimately feeling a great sense of accomplishment.
The W Trek
The W Trek is arguably the iconic experience in Chilean Patagonia. This five-day hike visits the most famous landmarks in Torres del Paine National Park – all along a W-shaped trail. In total the trail is about 89 kilometers, but you may hike longer given some well-worth-it detours and out-and-back portions. If you’re feeling intense, you can opt to hike the O Trek instead, which includes the W Trek and does a full loop to connect the two endpoints.
An interesting feature of the W Trek is the availability of mountain hostels along the trail (called refugios). Personally, we really valued having a bed after each long day of hiking. These facilities do also have campsites if that is more your style (or better suited to your budget). Regardless, it is nice to have options, and it is nice for those options to include toilets. Better yet, the hostels have meals available so that you can enjoy a hot breakfast to start each day, a hot dinner to end it, and a pre-packed lunch on the trail for convenience’s sake.
Each refugio has its pros and cons, just like each day of the trail. While we learned a lot throughout the trek about things we could have done differently, the overall experience is incredible and unlike any other trip we’ve taken.
Day 1
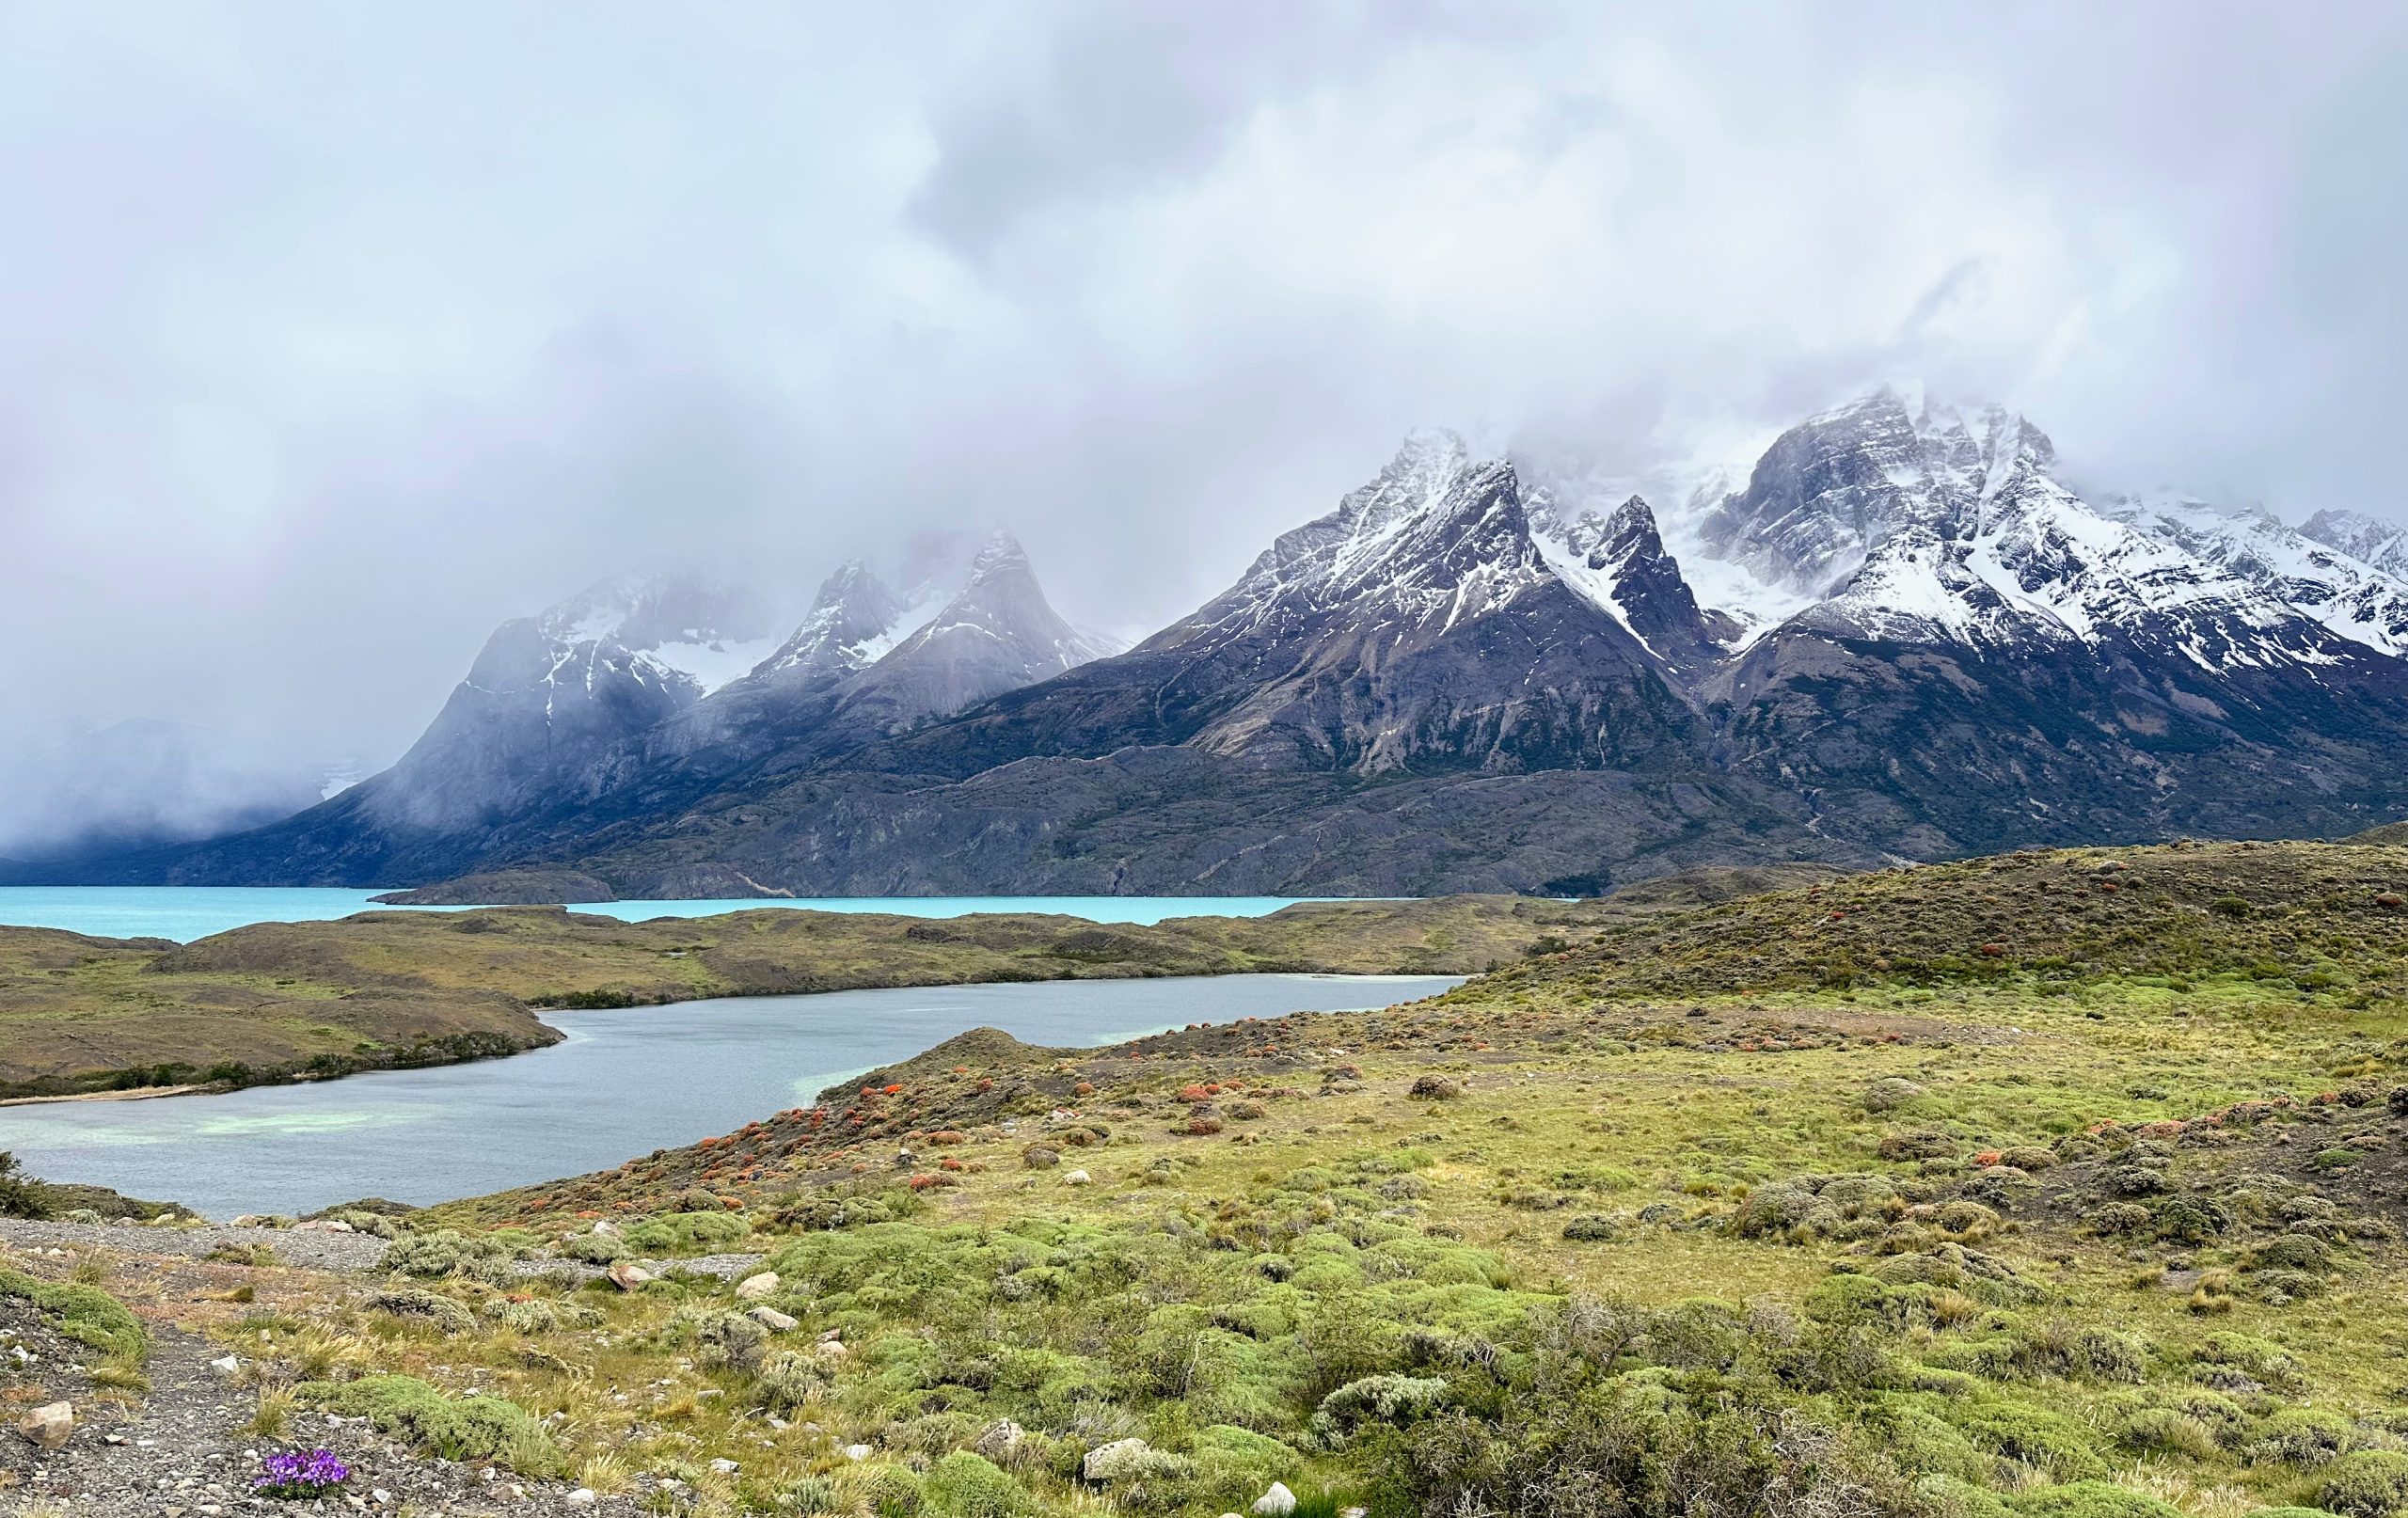
Get ready for an early start! Prior to starting the W Trek, we spent a night in the nearby town of Puerto Natales (more on that below). This required us to take a 7:00 AM bus from Puerto Natales into Torres del Paine (Pudeto stop). The drive itself isn’t too long, but we had to stop at Laguna Amarga to show our entrance tickets to the park rangers. After that, we were on to Pudeto, with a brief stop at Mirador Nordenskjöld Lake for photos.
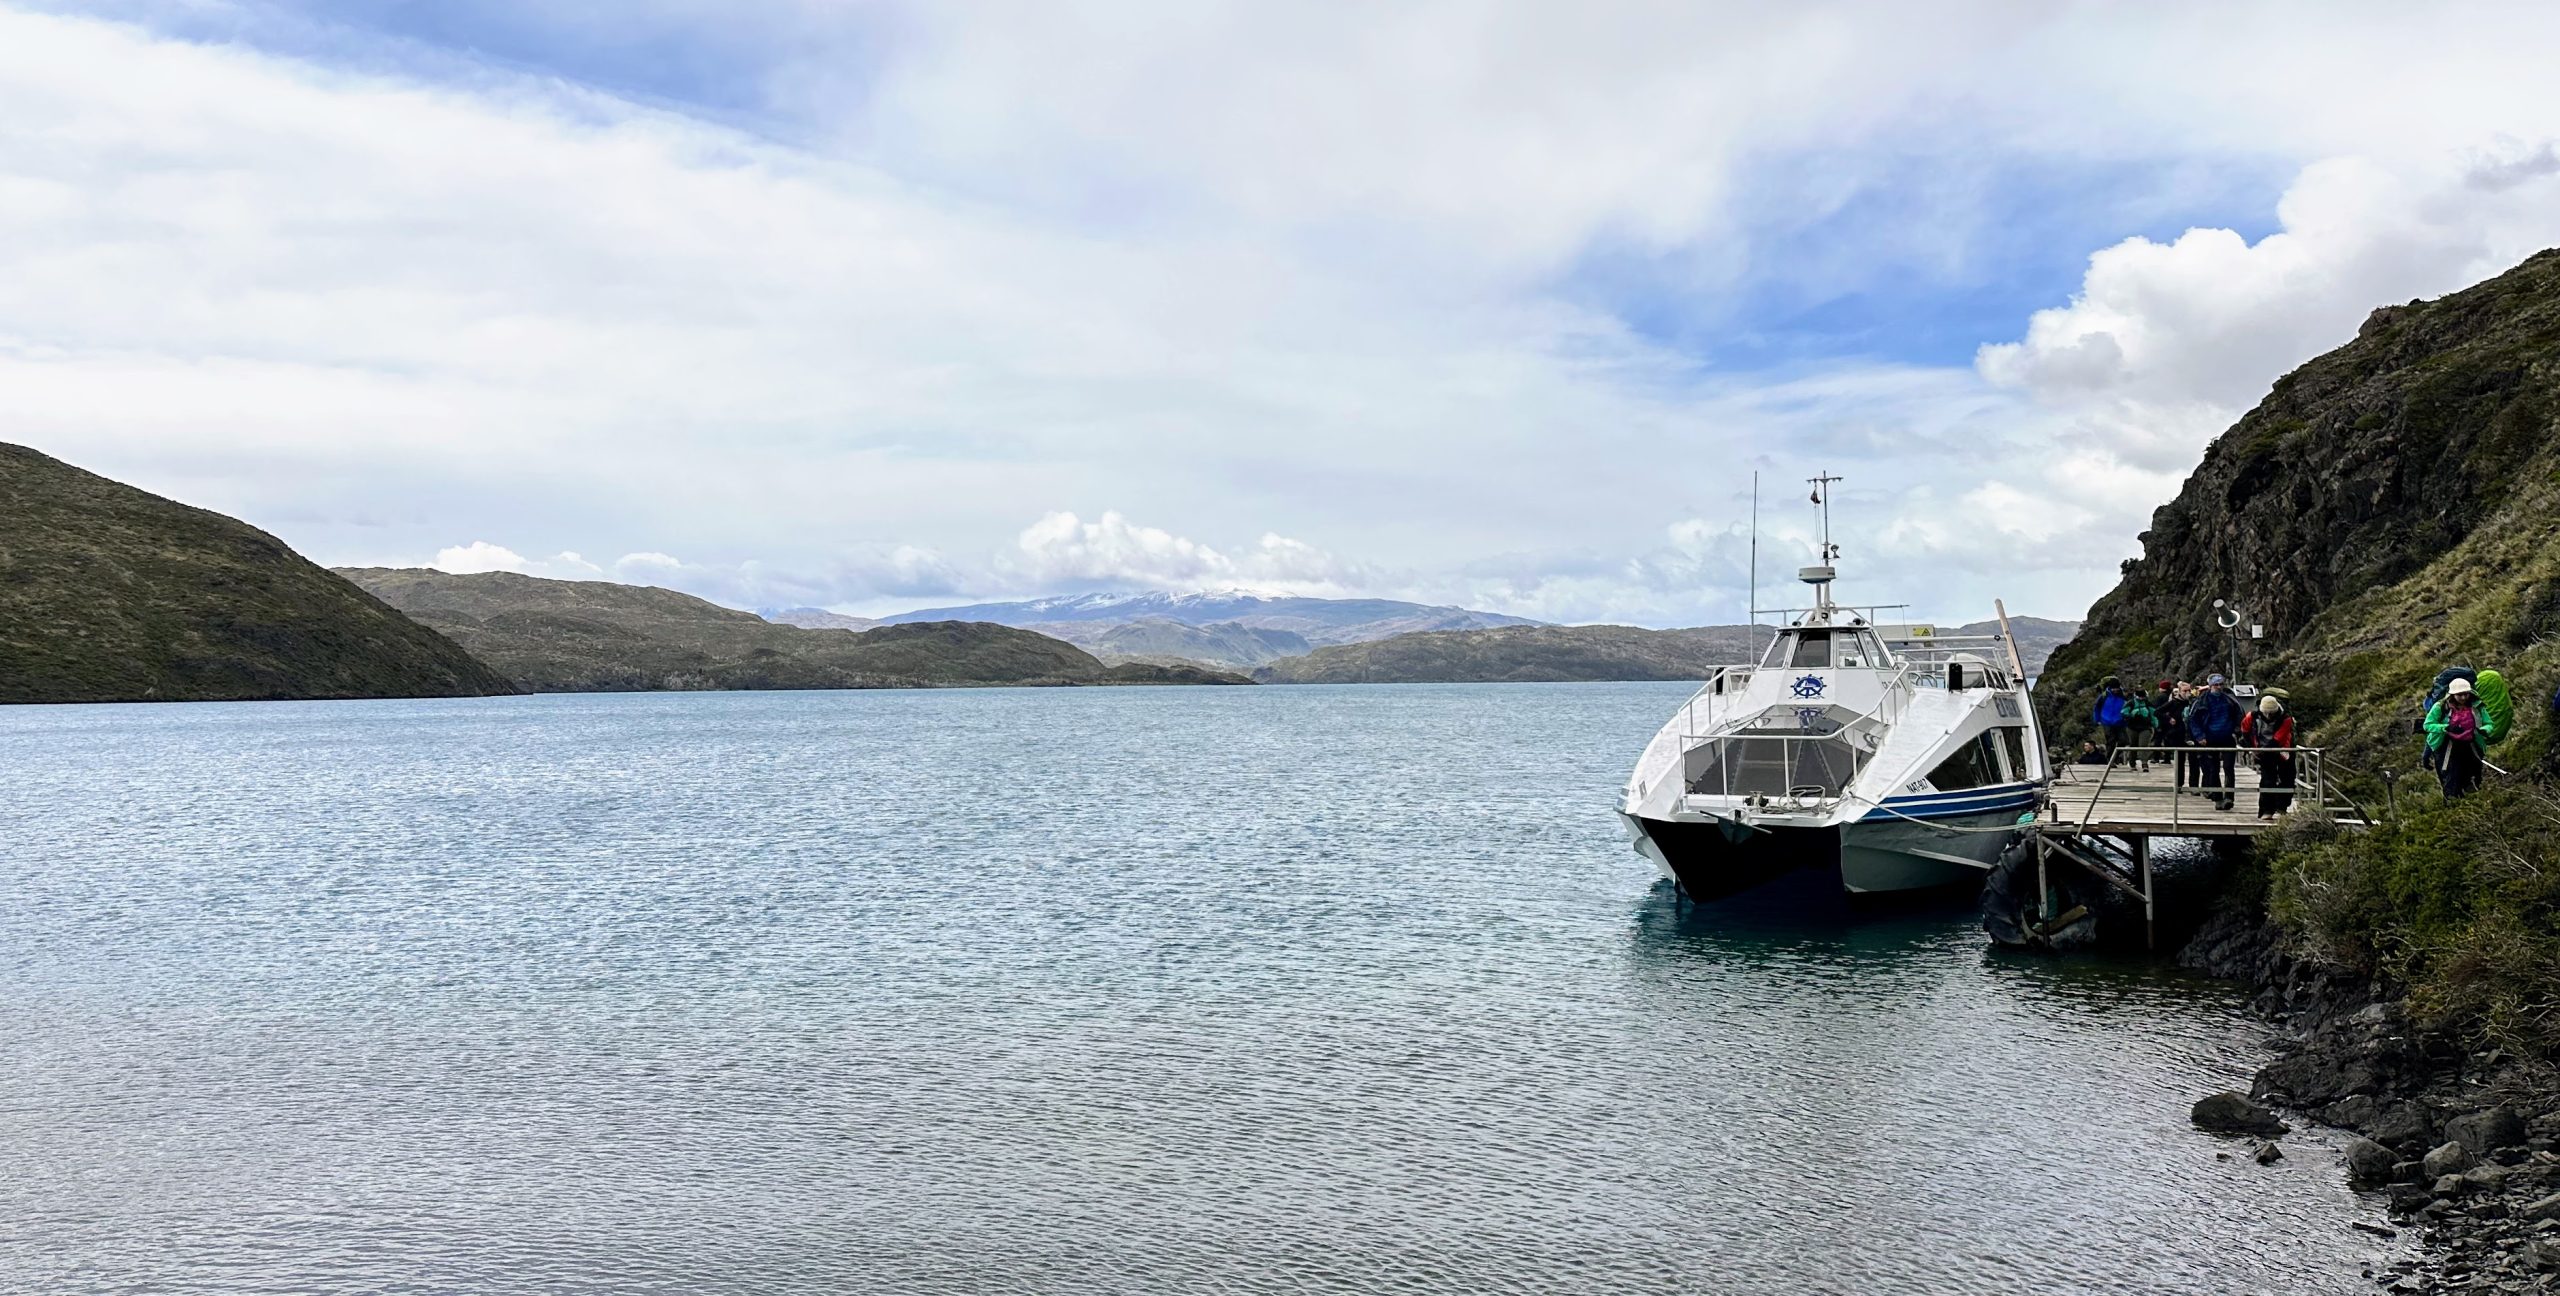
From Pudeto, the next step was to take the ferry to the Paine Grande refugio at 10:30 AM. You can’t buy tickets to the ferry in advance (bring cash for tickets on board), so we recommend heading straight from the bus to the line for the ferry once you make it to Pudeto. It seemed like the boat had plenty of room for everyone, but you don’t want to risk it. If you miss the morning ferry, it could throw a serious wrench in your planned schedule for the rest of the day.
The ferry was late, so we had part of our group run to the dockside cafe to buy sandwiches for later in the day while the rest of us waited in line. The sandwiches were nothing fancy, but they were convenient and got the job done.
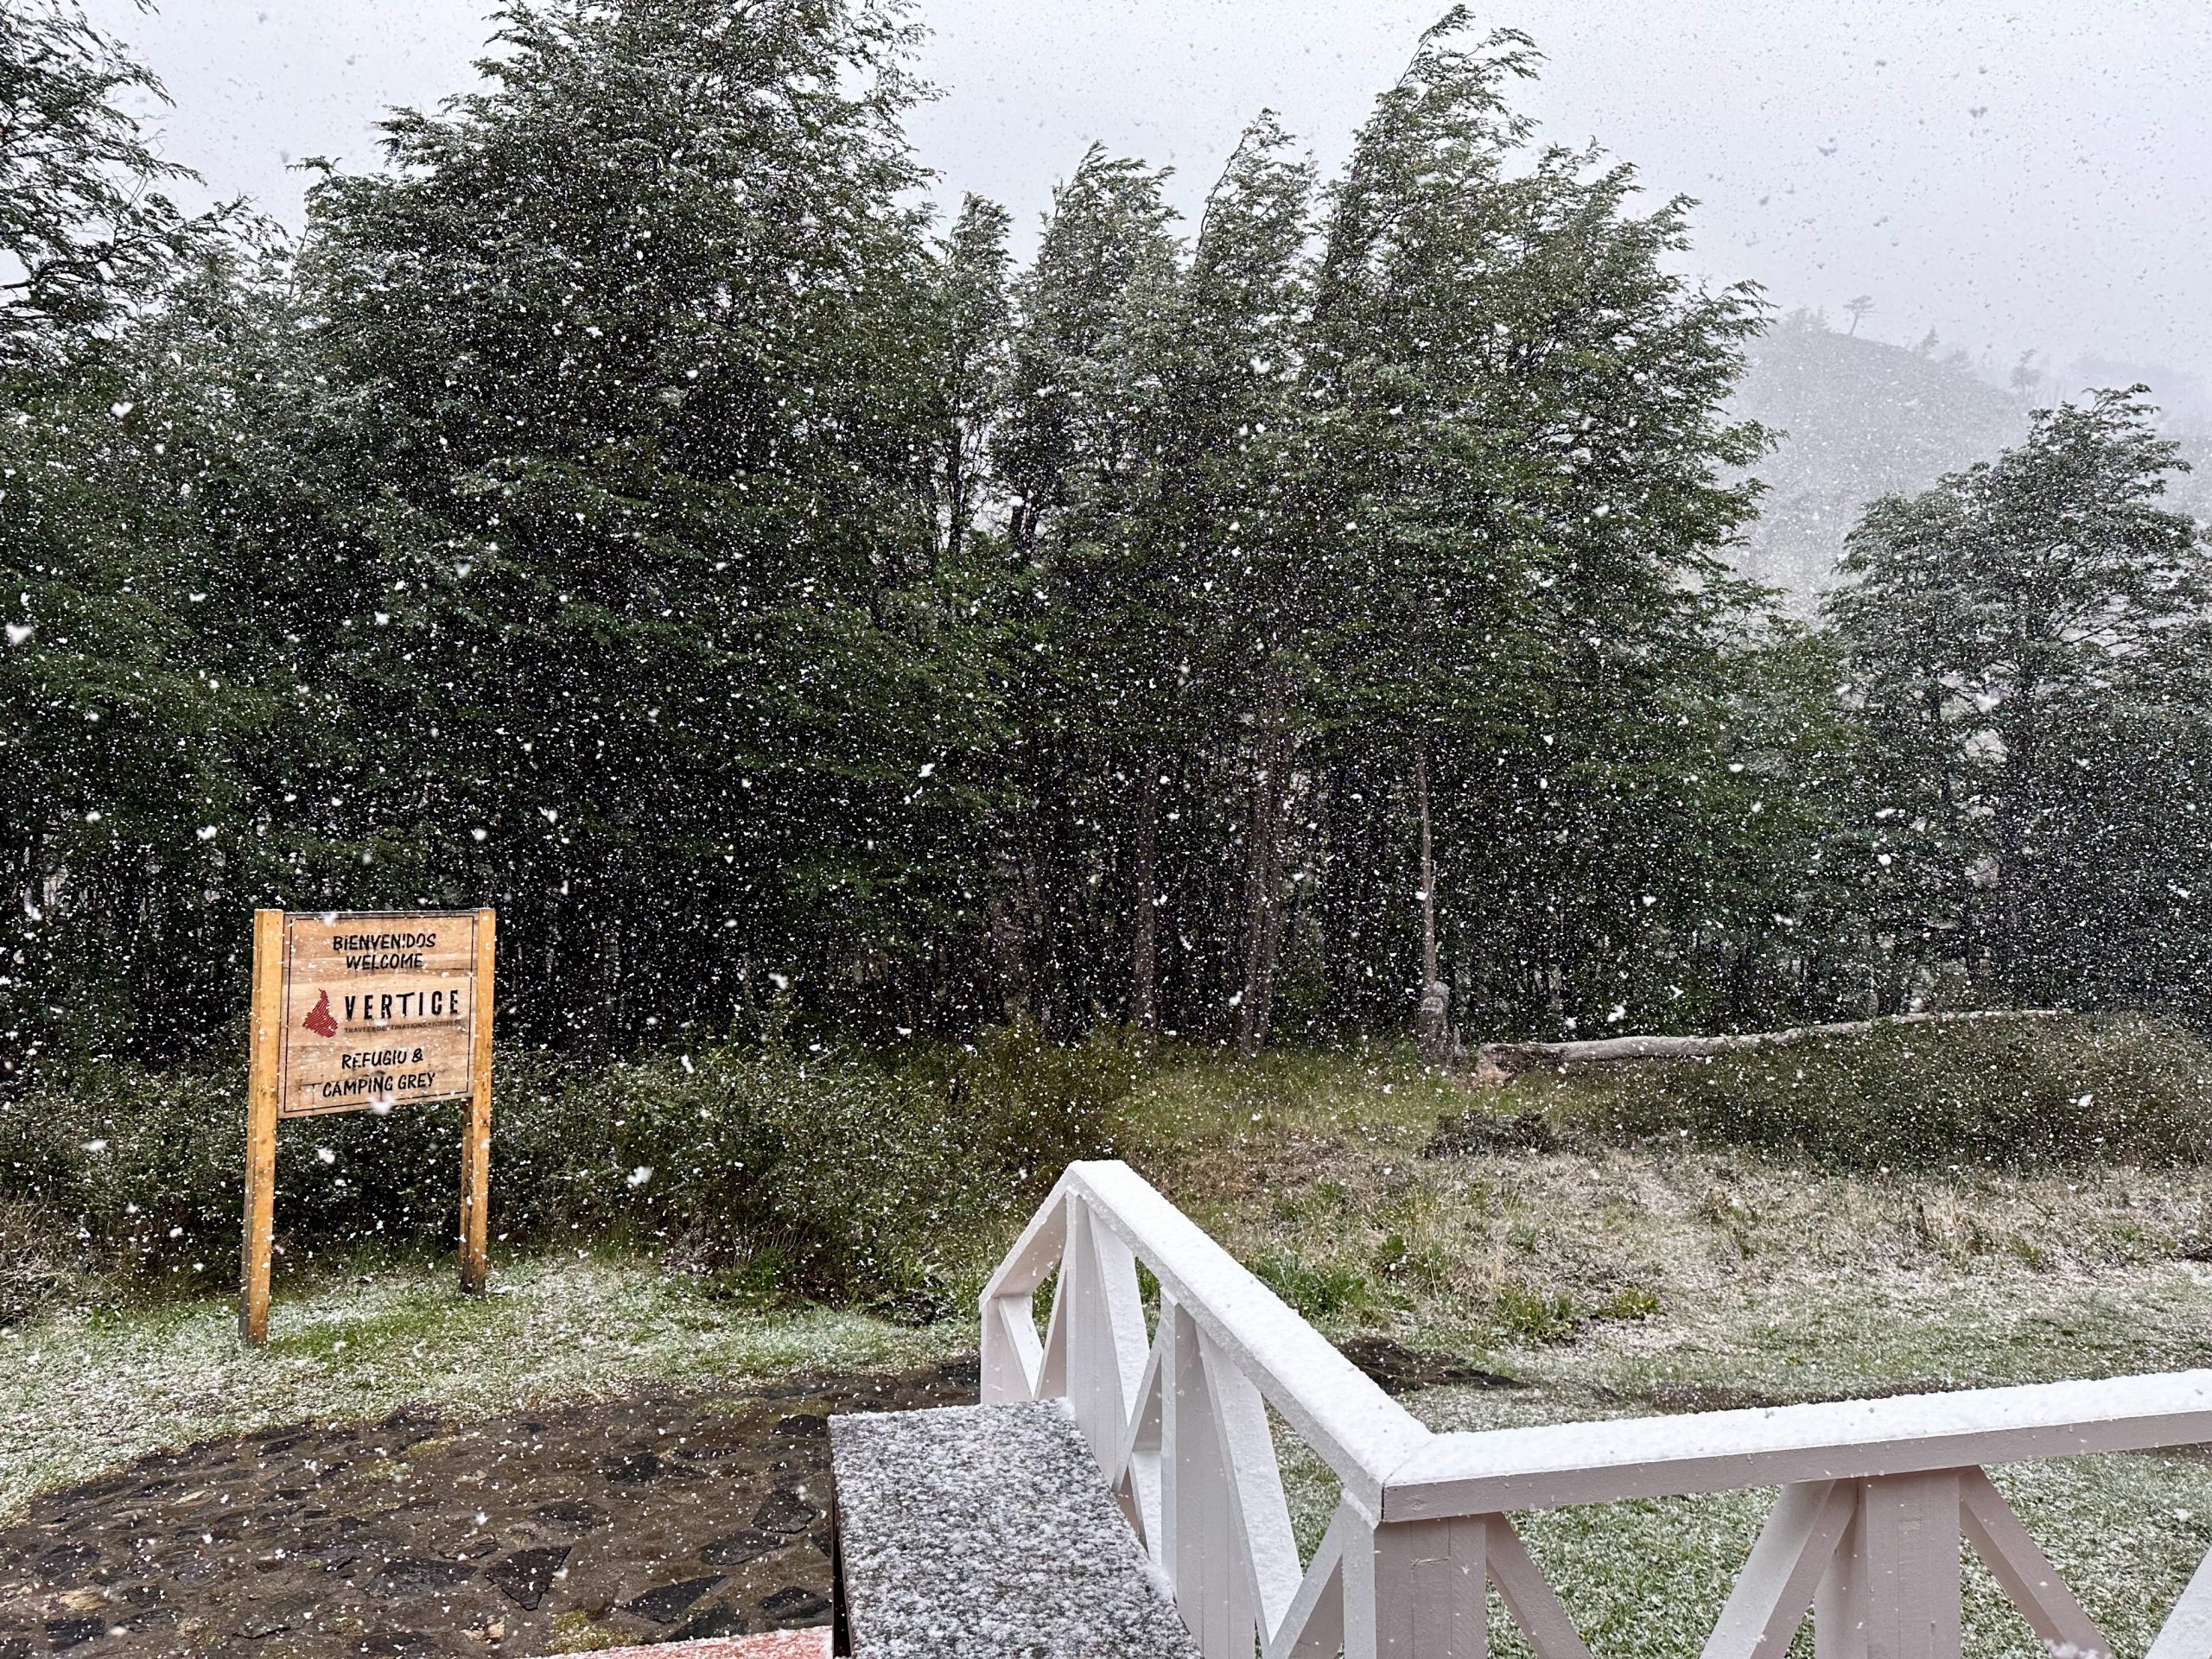
The ferry ride itself is only 25 minutes, but you can get some nice views on a clear day if you snag a window seat. After arriving at the Paine Grande refugio, it is (almost) time to start the hike! We first took a few minutes to use the last toilet for 11 kilometers and to change into our rain gear, as we had some brutal weather on Day 1. Once we finished prepping, we began our journey to Grey refugio.
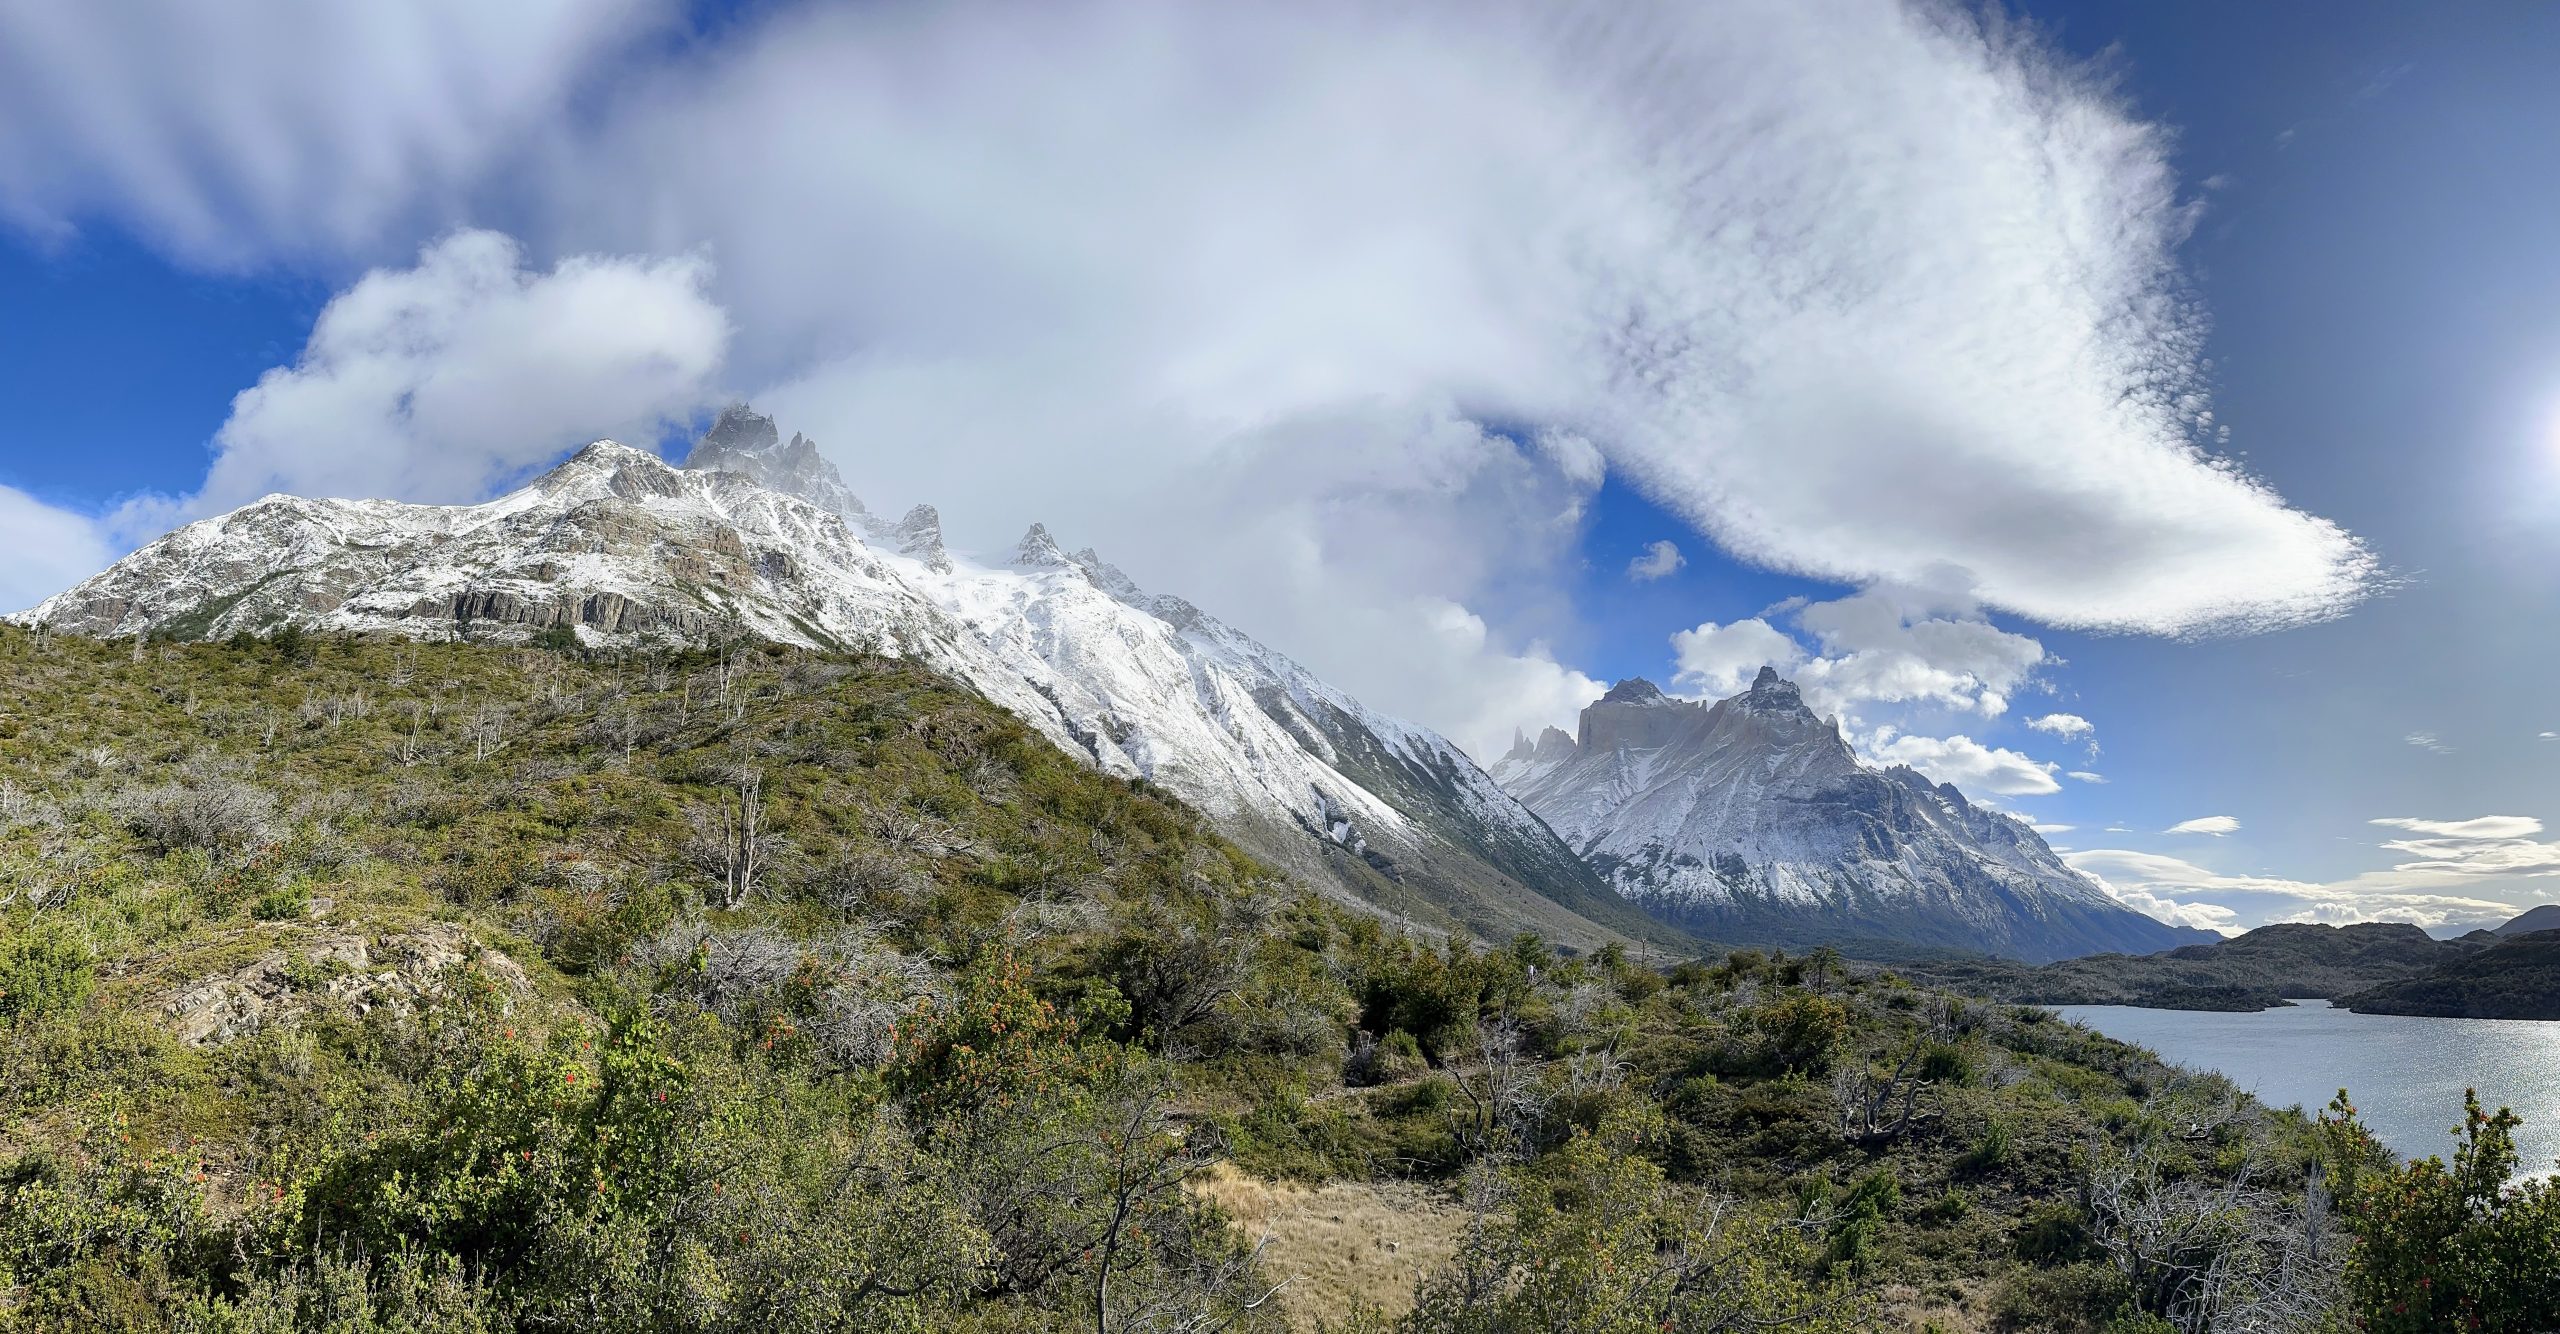
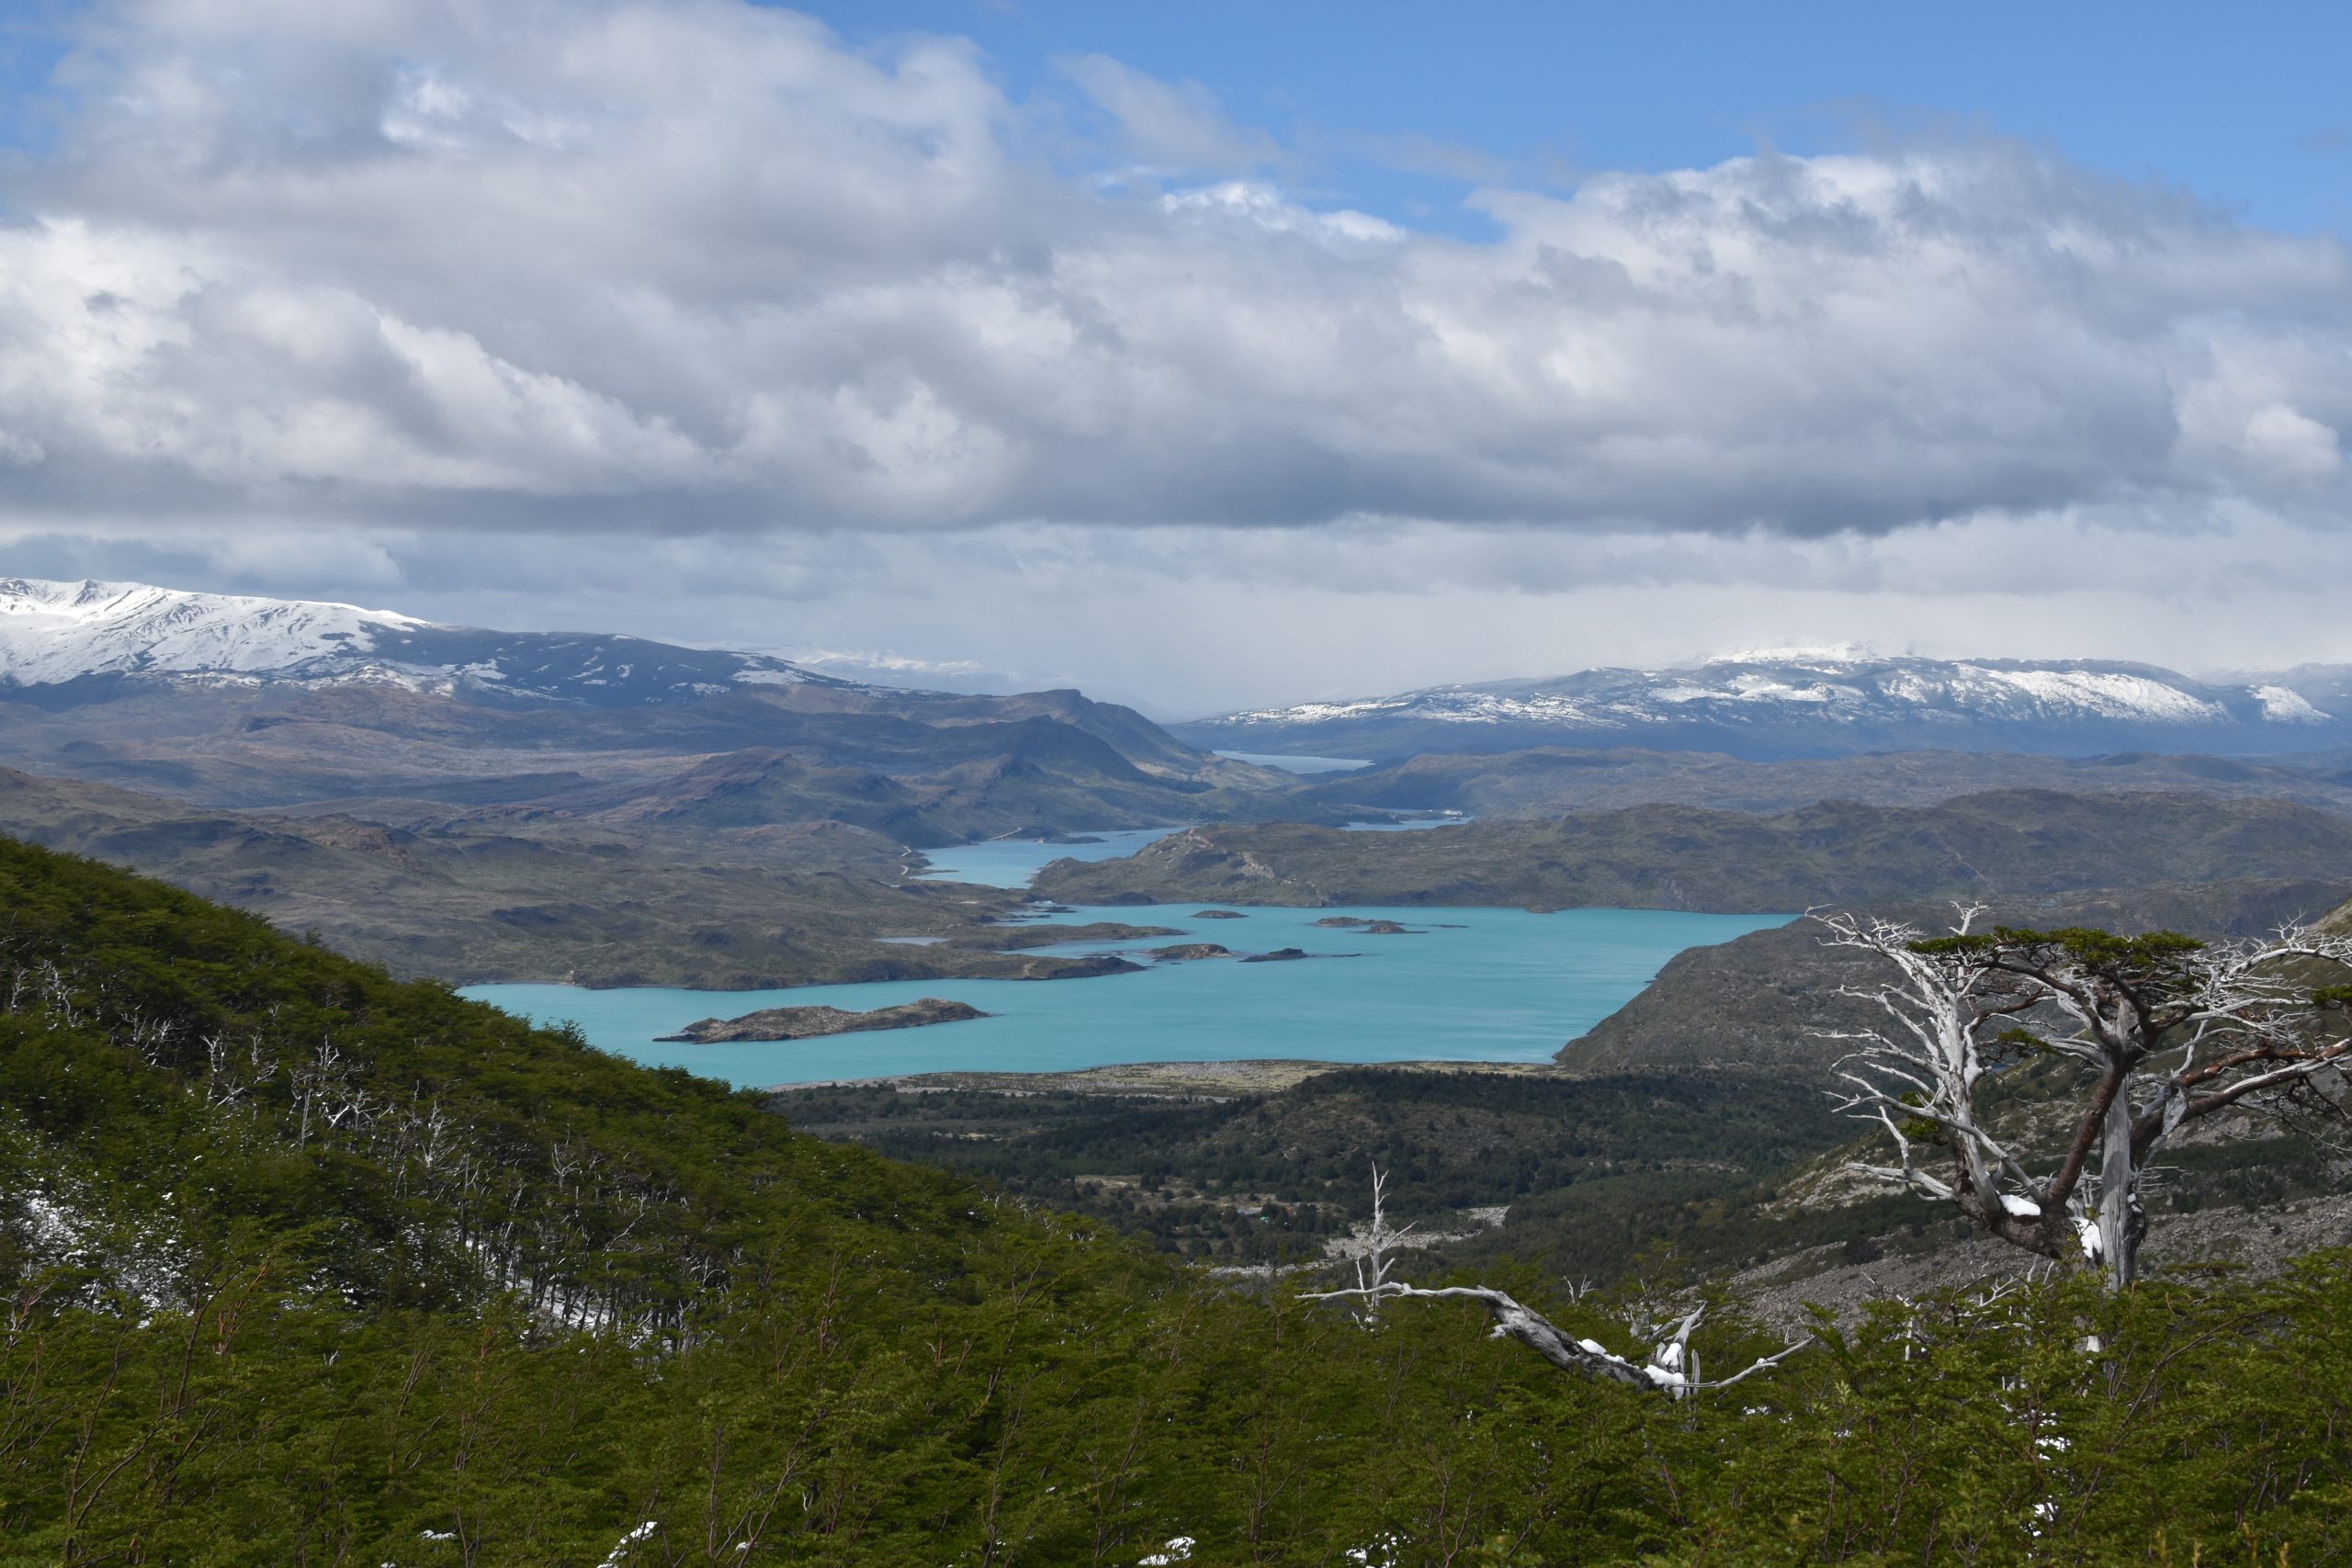
The stretch from Paine Grande to Grey is relatively flat with rolling hills. Even with the snow / rain / hail, the 11 kilometers took us about 4 hours to complete. There is not too much to see along this stretch, but we got lucky with the clouds dissipating temporarily right as we got to a nice viewpoint.
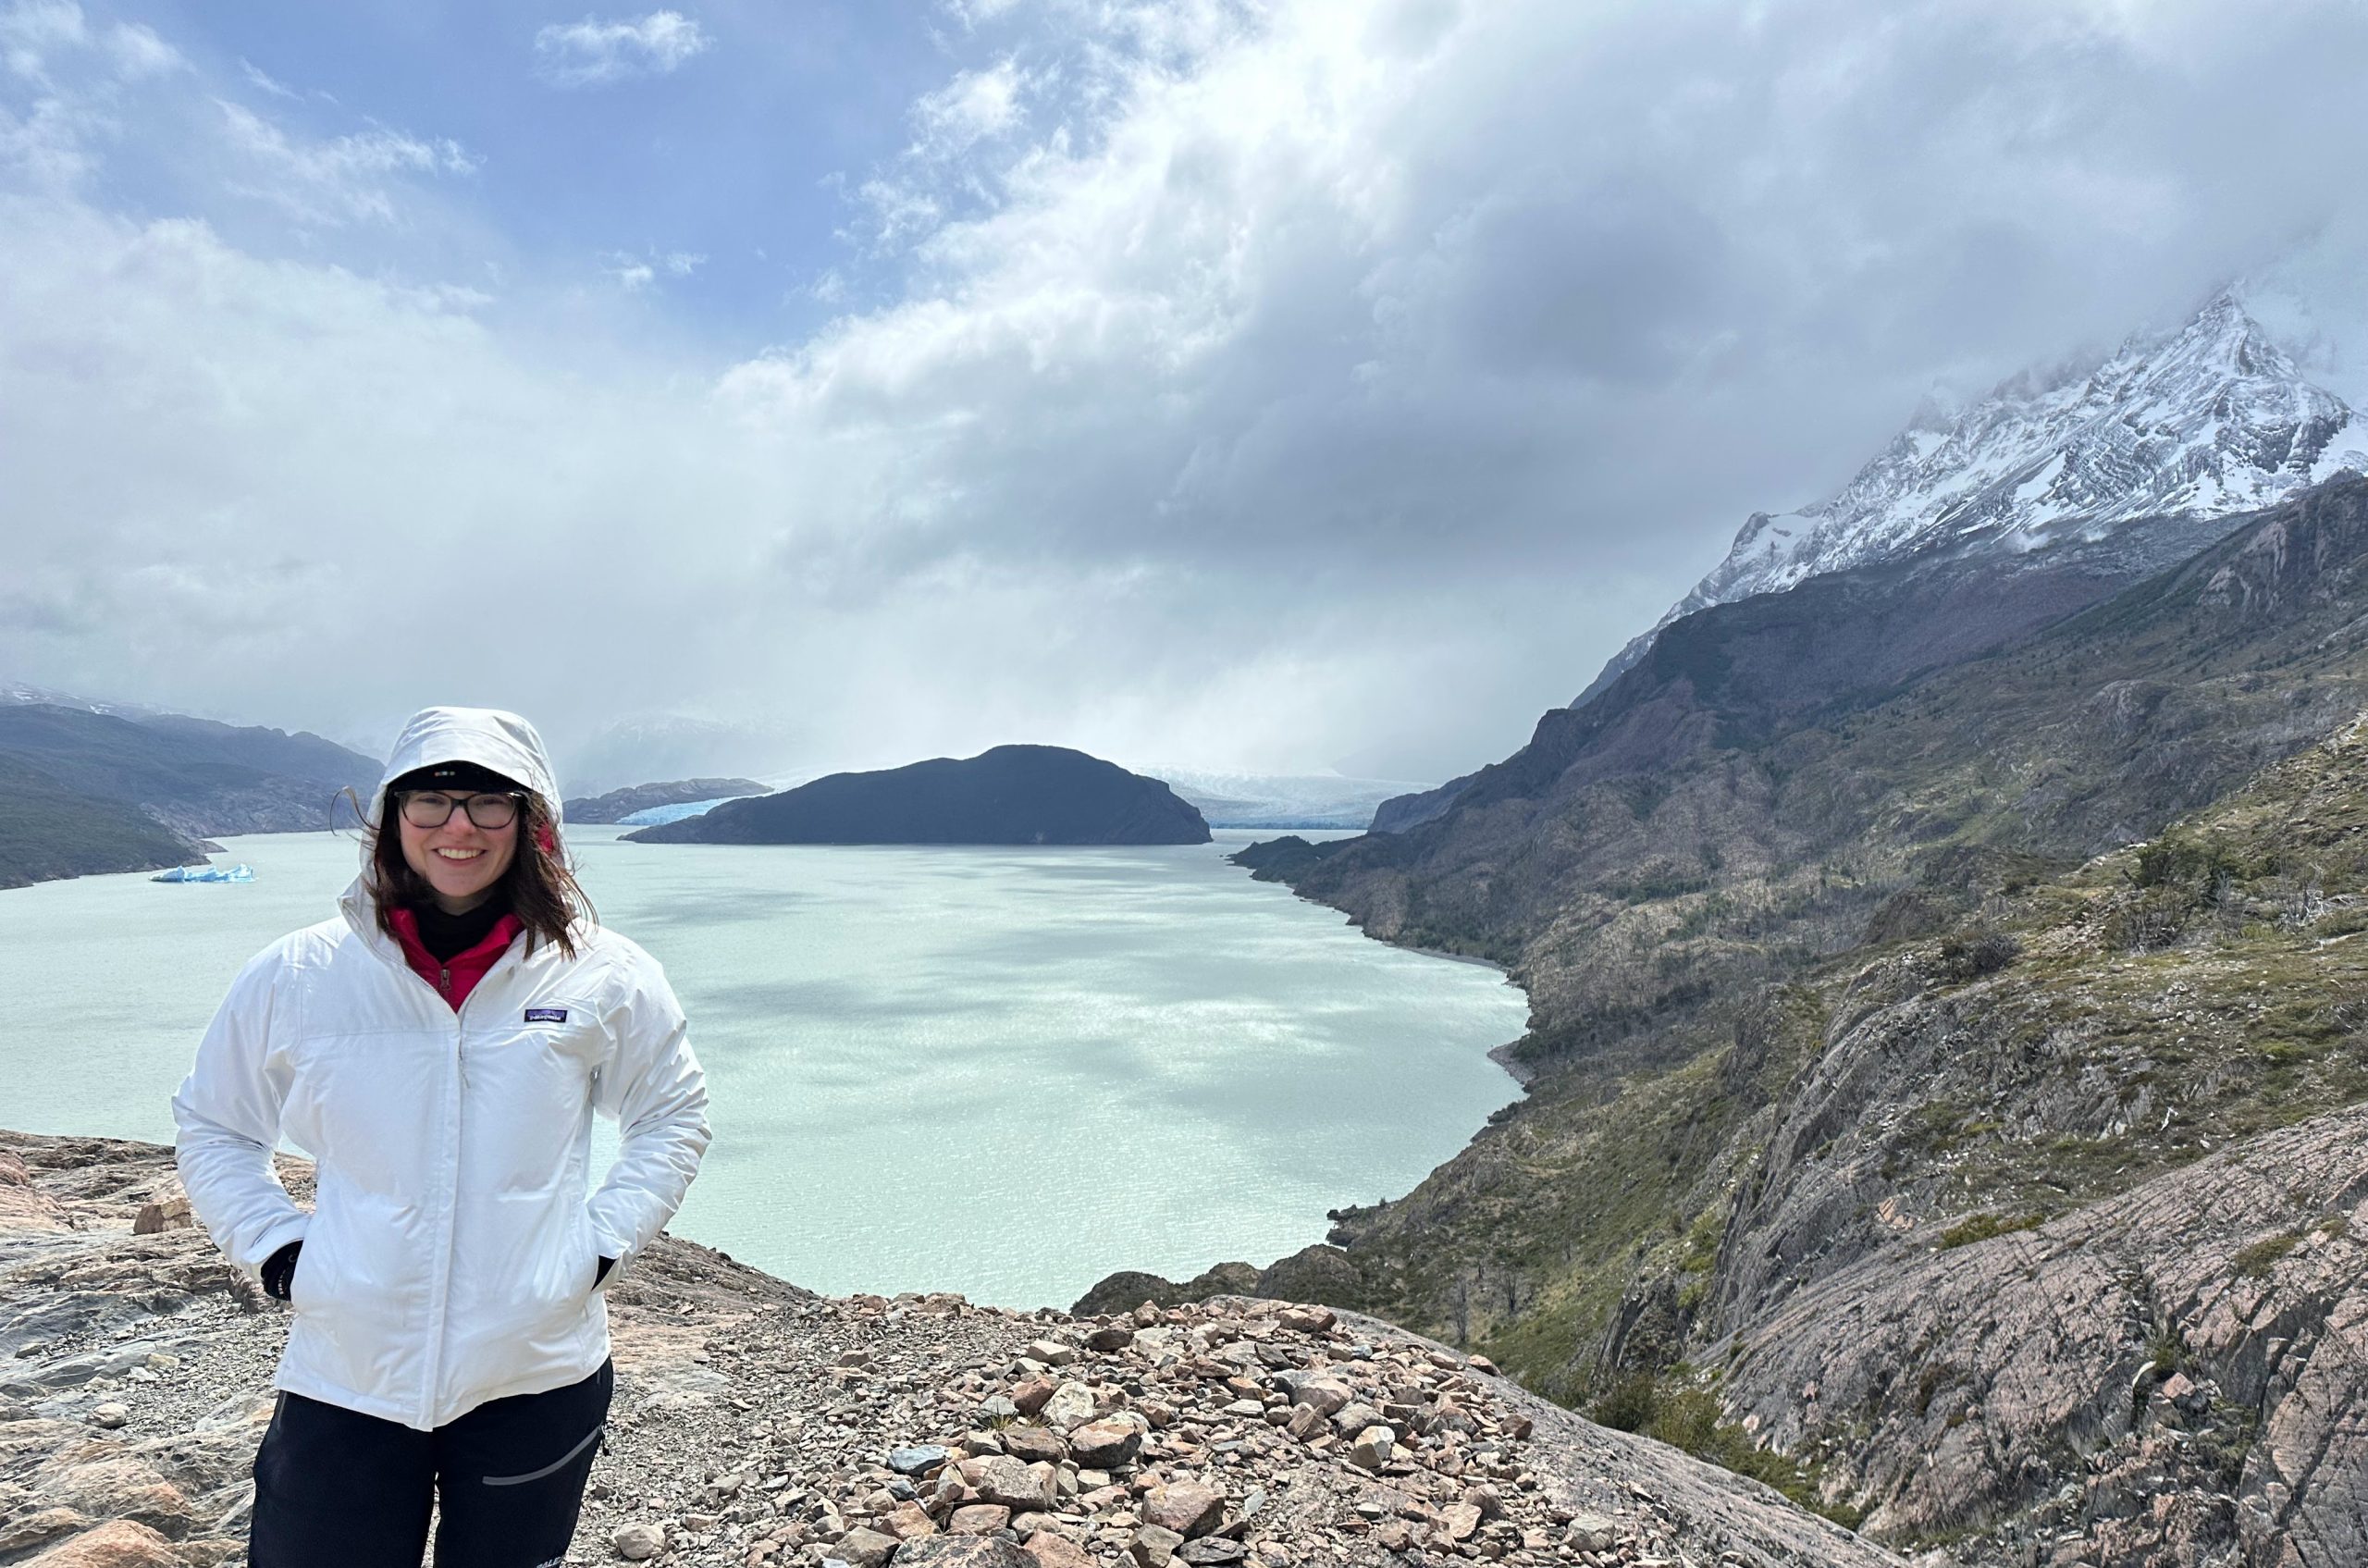
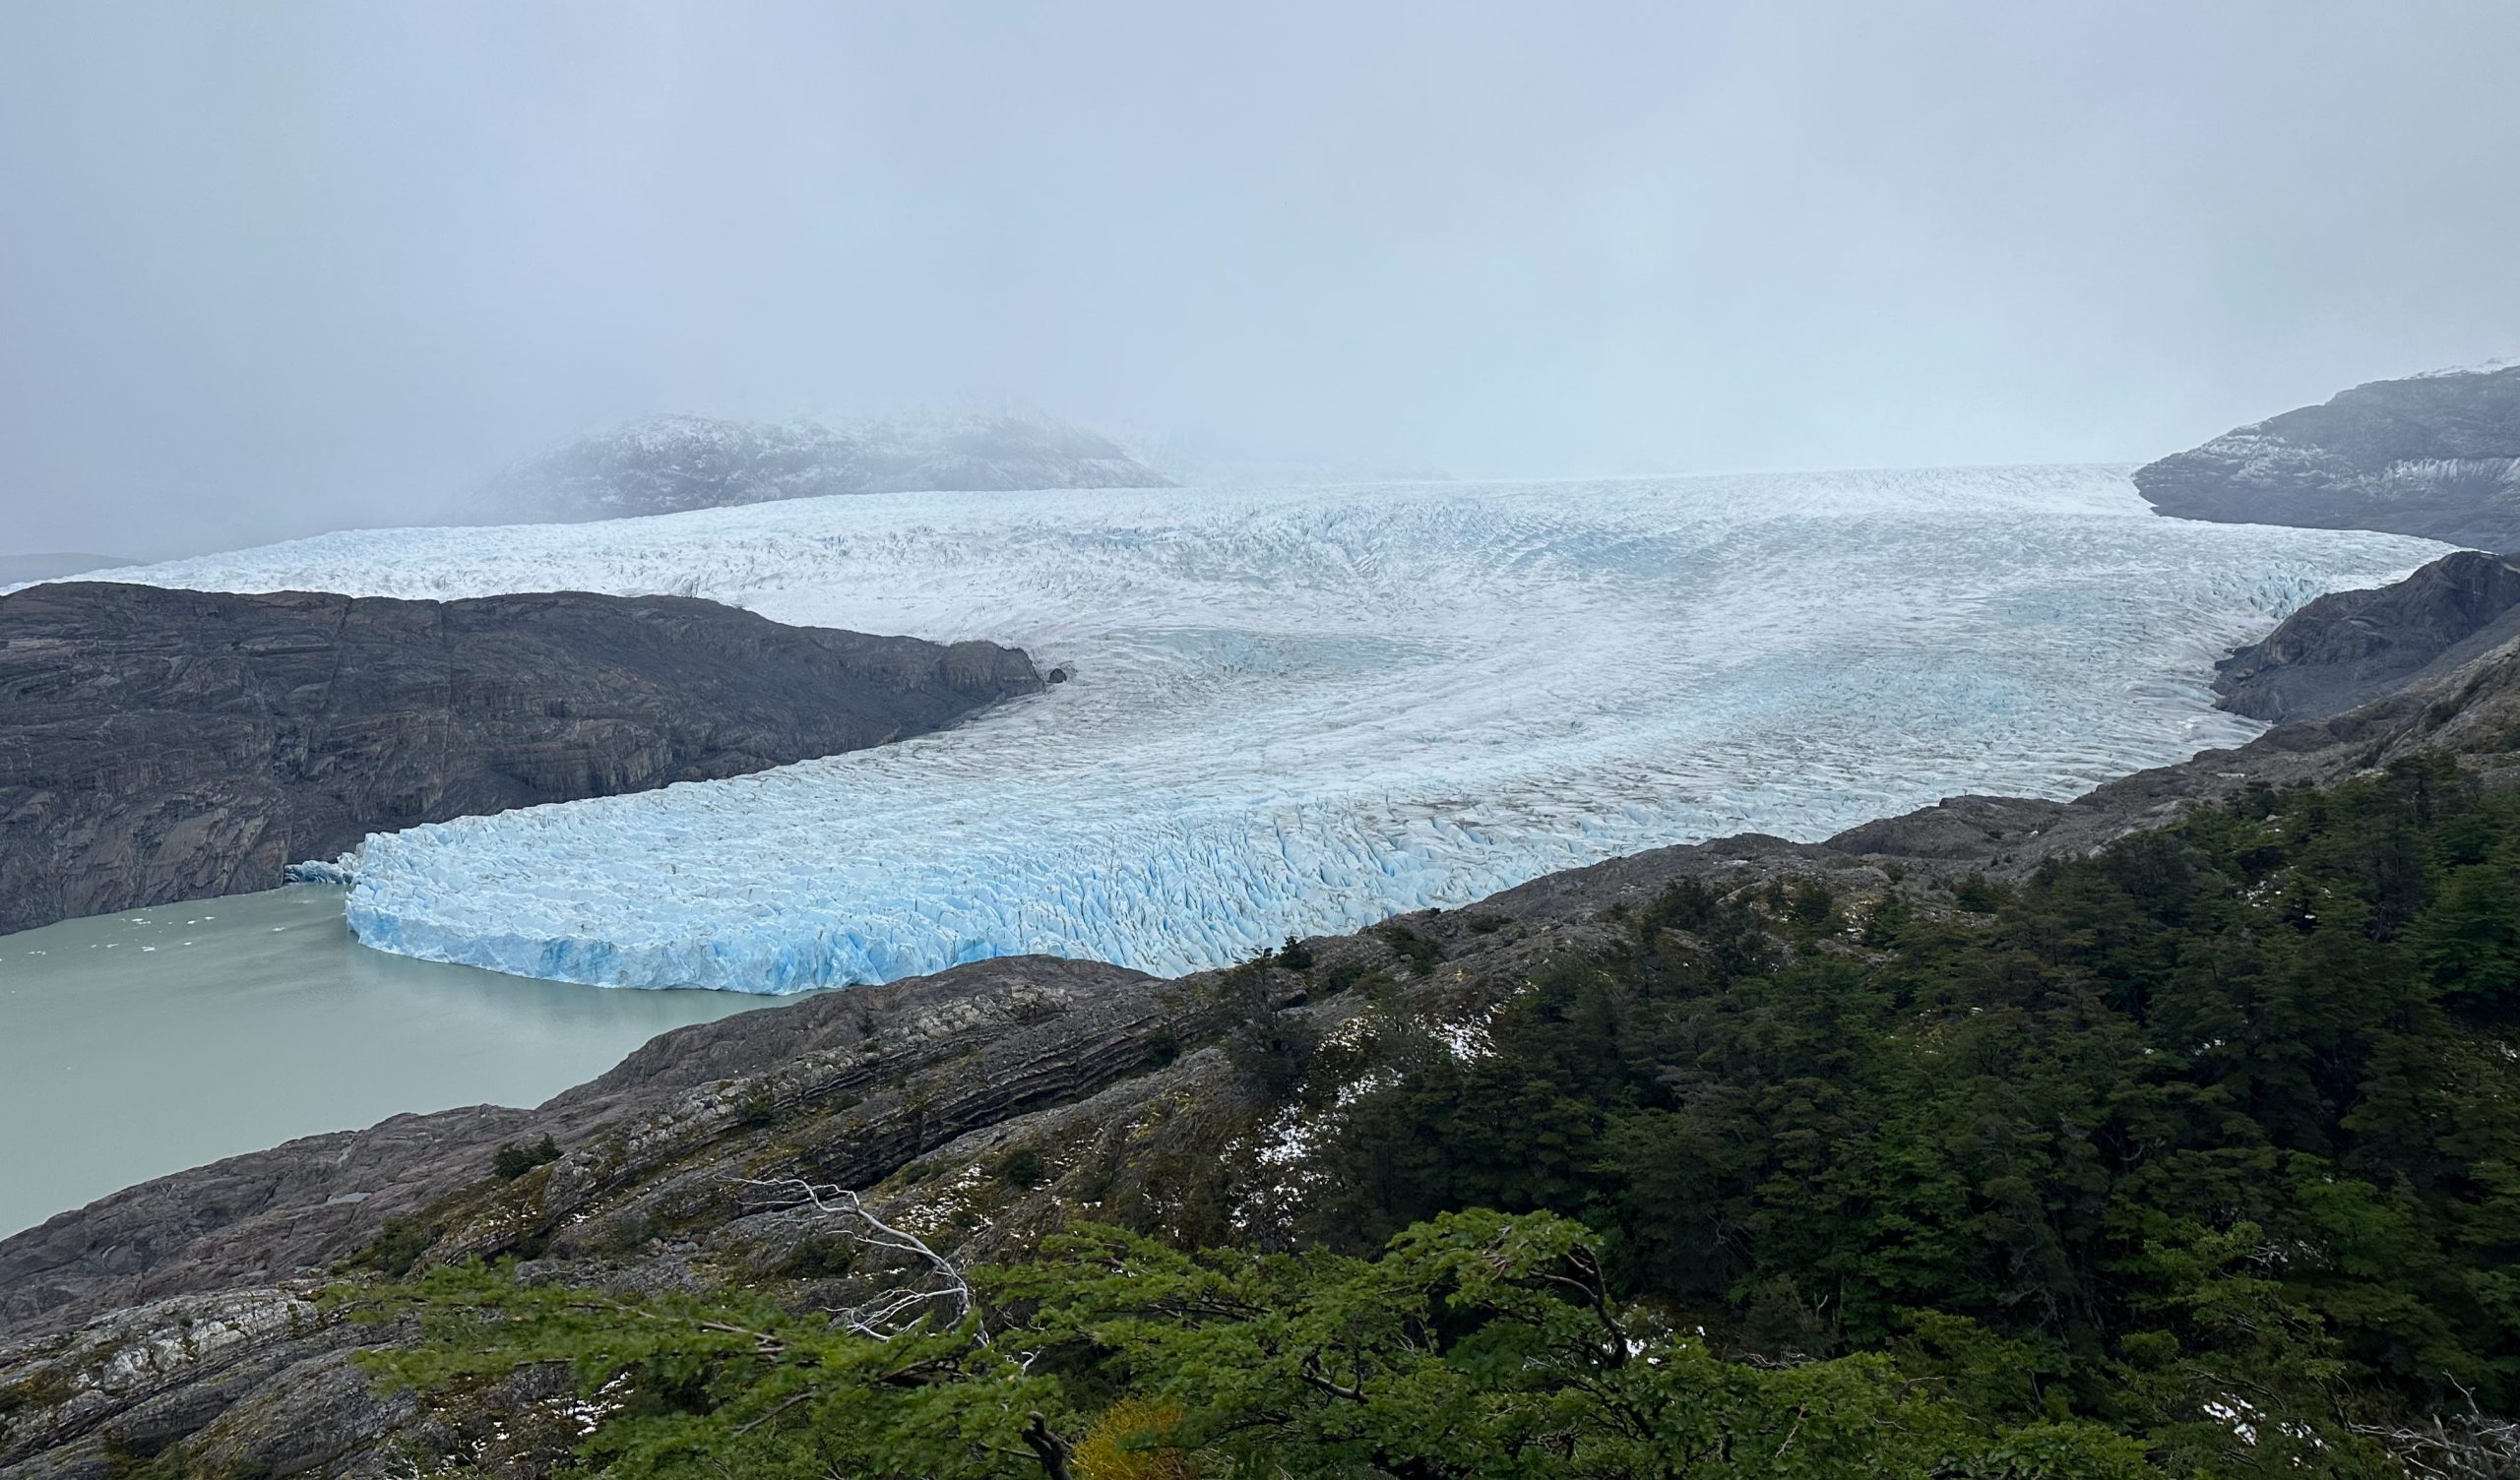
Once we got to Grey refugio, the weather miraculously started to clear up. We took a few minutes to check in, drop off our backpacks, and use the facilities, then headed back out for the short walk (15 minutes each way) to Mirador Glacier Grey. It was at this viewpoint that we realized just what kind of scenery we were in for in the coming days.
Energized after the views, we went back to Grey refugio for the night. The rooms here were small but quite nice. We had a room with two sets of bunk beds that was right across from the restroom and a roaring fireplace. There was just enough space in the room to store our luggage, and we were able to hang our wet clothes outside the room next to the fire to let them dry faster. Some downsides though: the hot water was inconsistent, and the dinner buffet wasn’t great. There was plenty of food – it was just dry and bland. In hindsight, we should have ordered a pizza at the bar instead of pre-paying for the meal plan. It looked tastier than what we had and was a fraction of the cost. Instead, the only thing we got at the bar was a bottle of wine. After dinner, we called it early and went to bed.
Day 2
We treated Day 2 as a two-parter. The morning hike (7 km) was out-and-back to a glacier viewpoint just past two hanging bridges. The afternoon hike (11 km) took us back to Paine Grande refugio for the night.
Before starting the first hike, we had our included breakfast at Grey refugio. Overall, the breakfast was much better than dinner and included plenty of food once again. Note that when checking in each night, if you purchased the meal package, you will need to select your dinner and breakfast times (given the limited seating available). The time selections are first come first serve, so try to get to the refugio early each day if you have a strong preference.
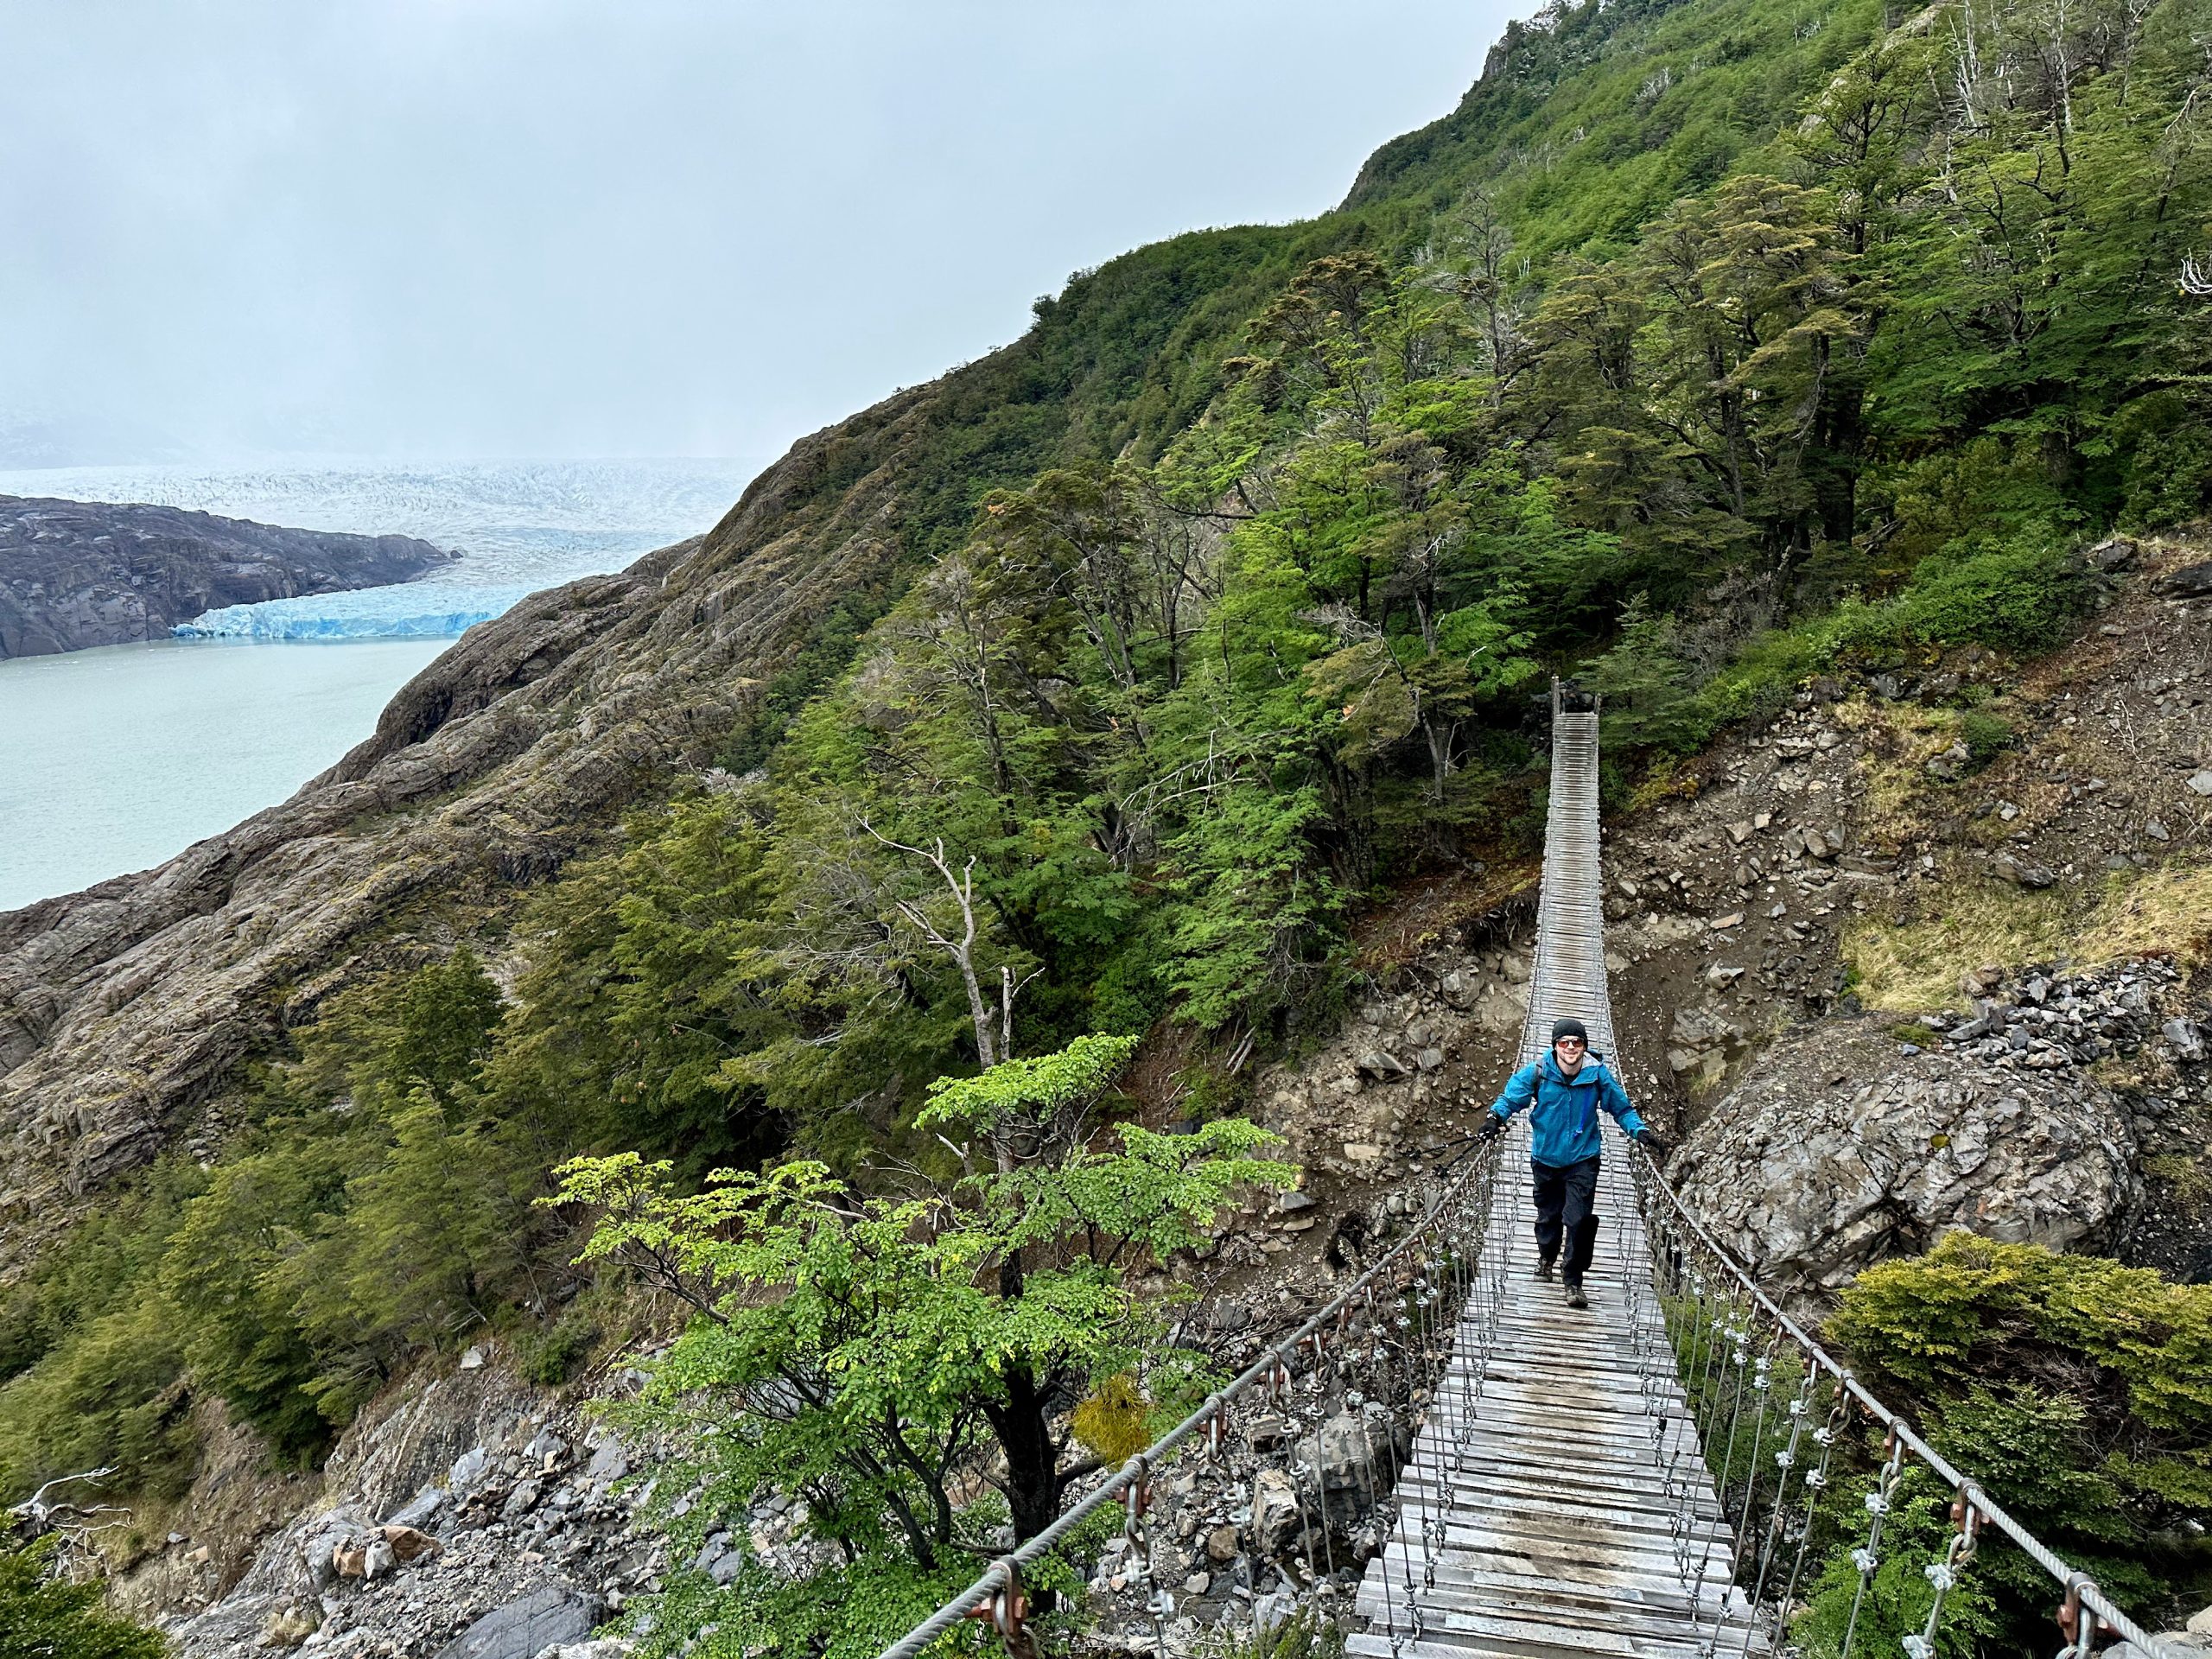
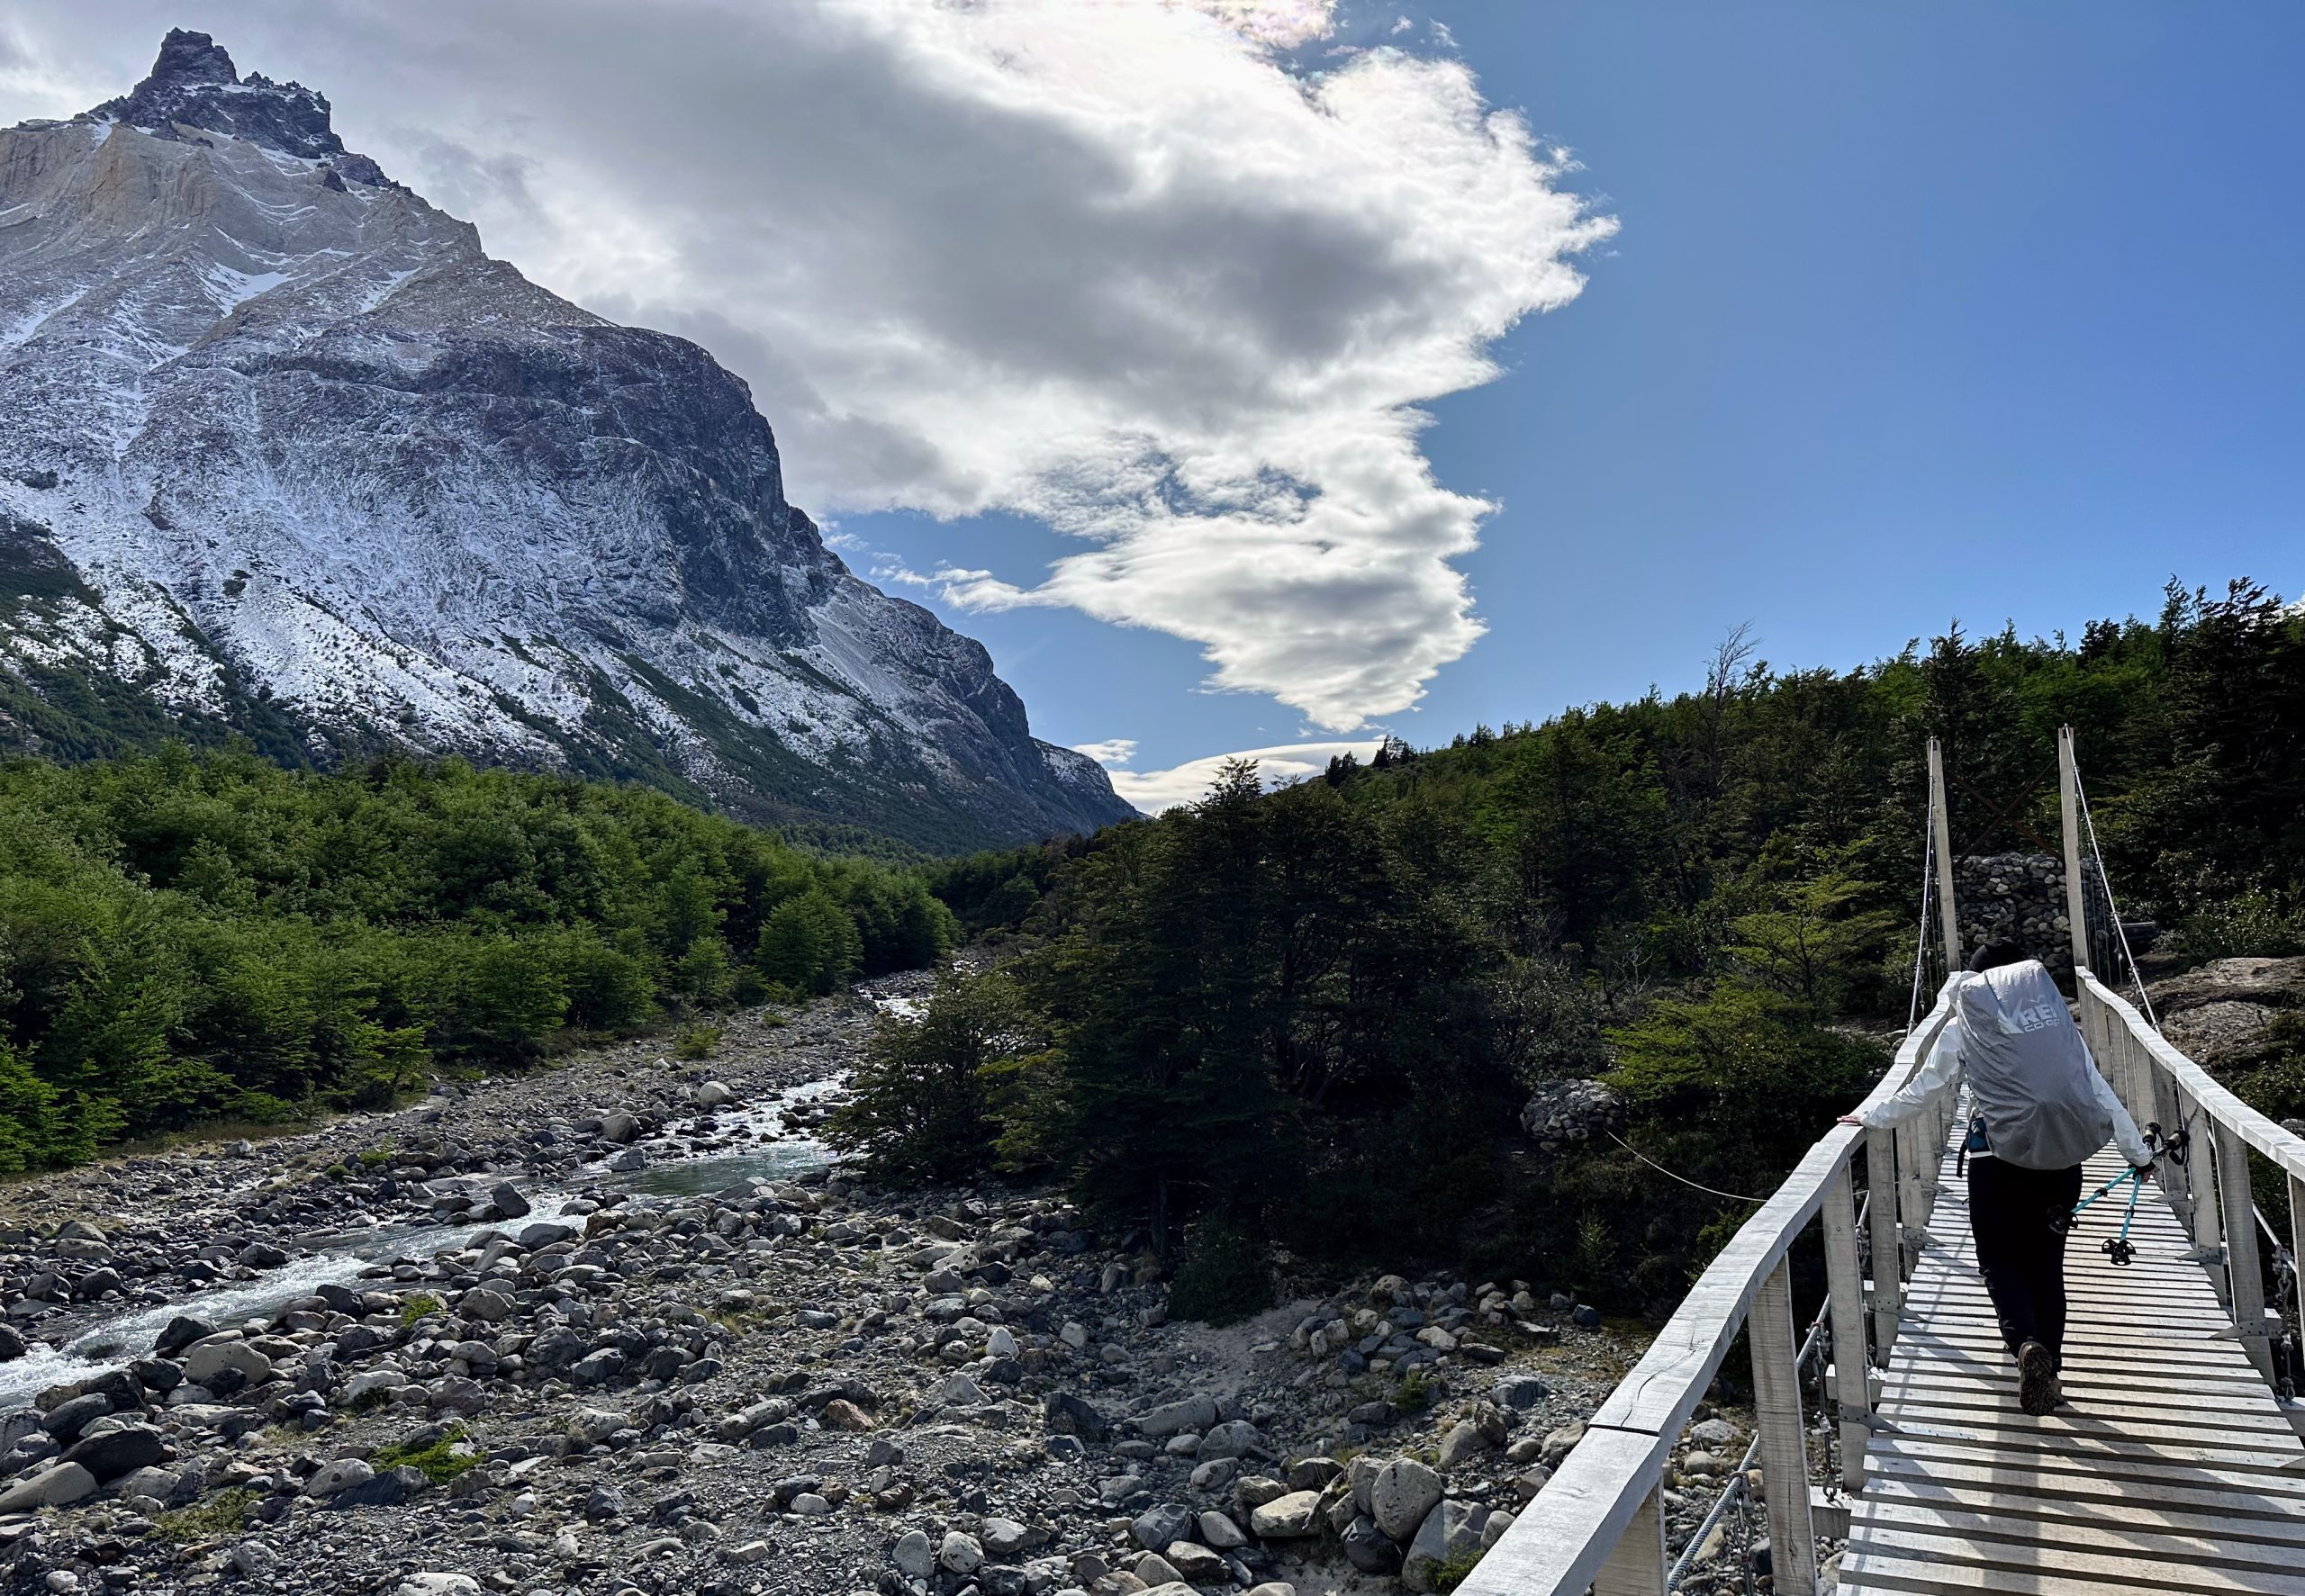
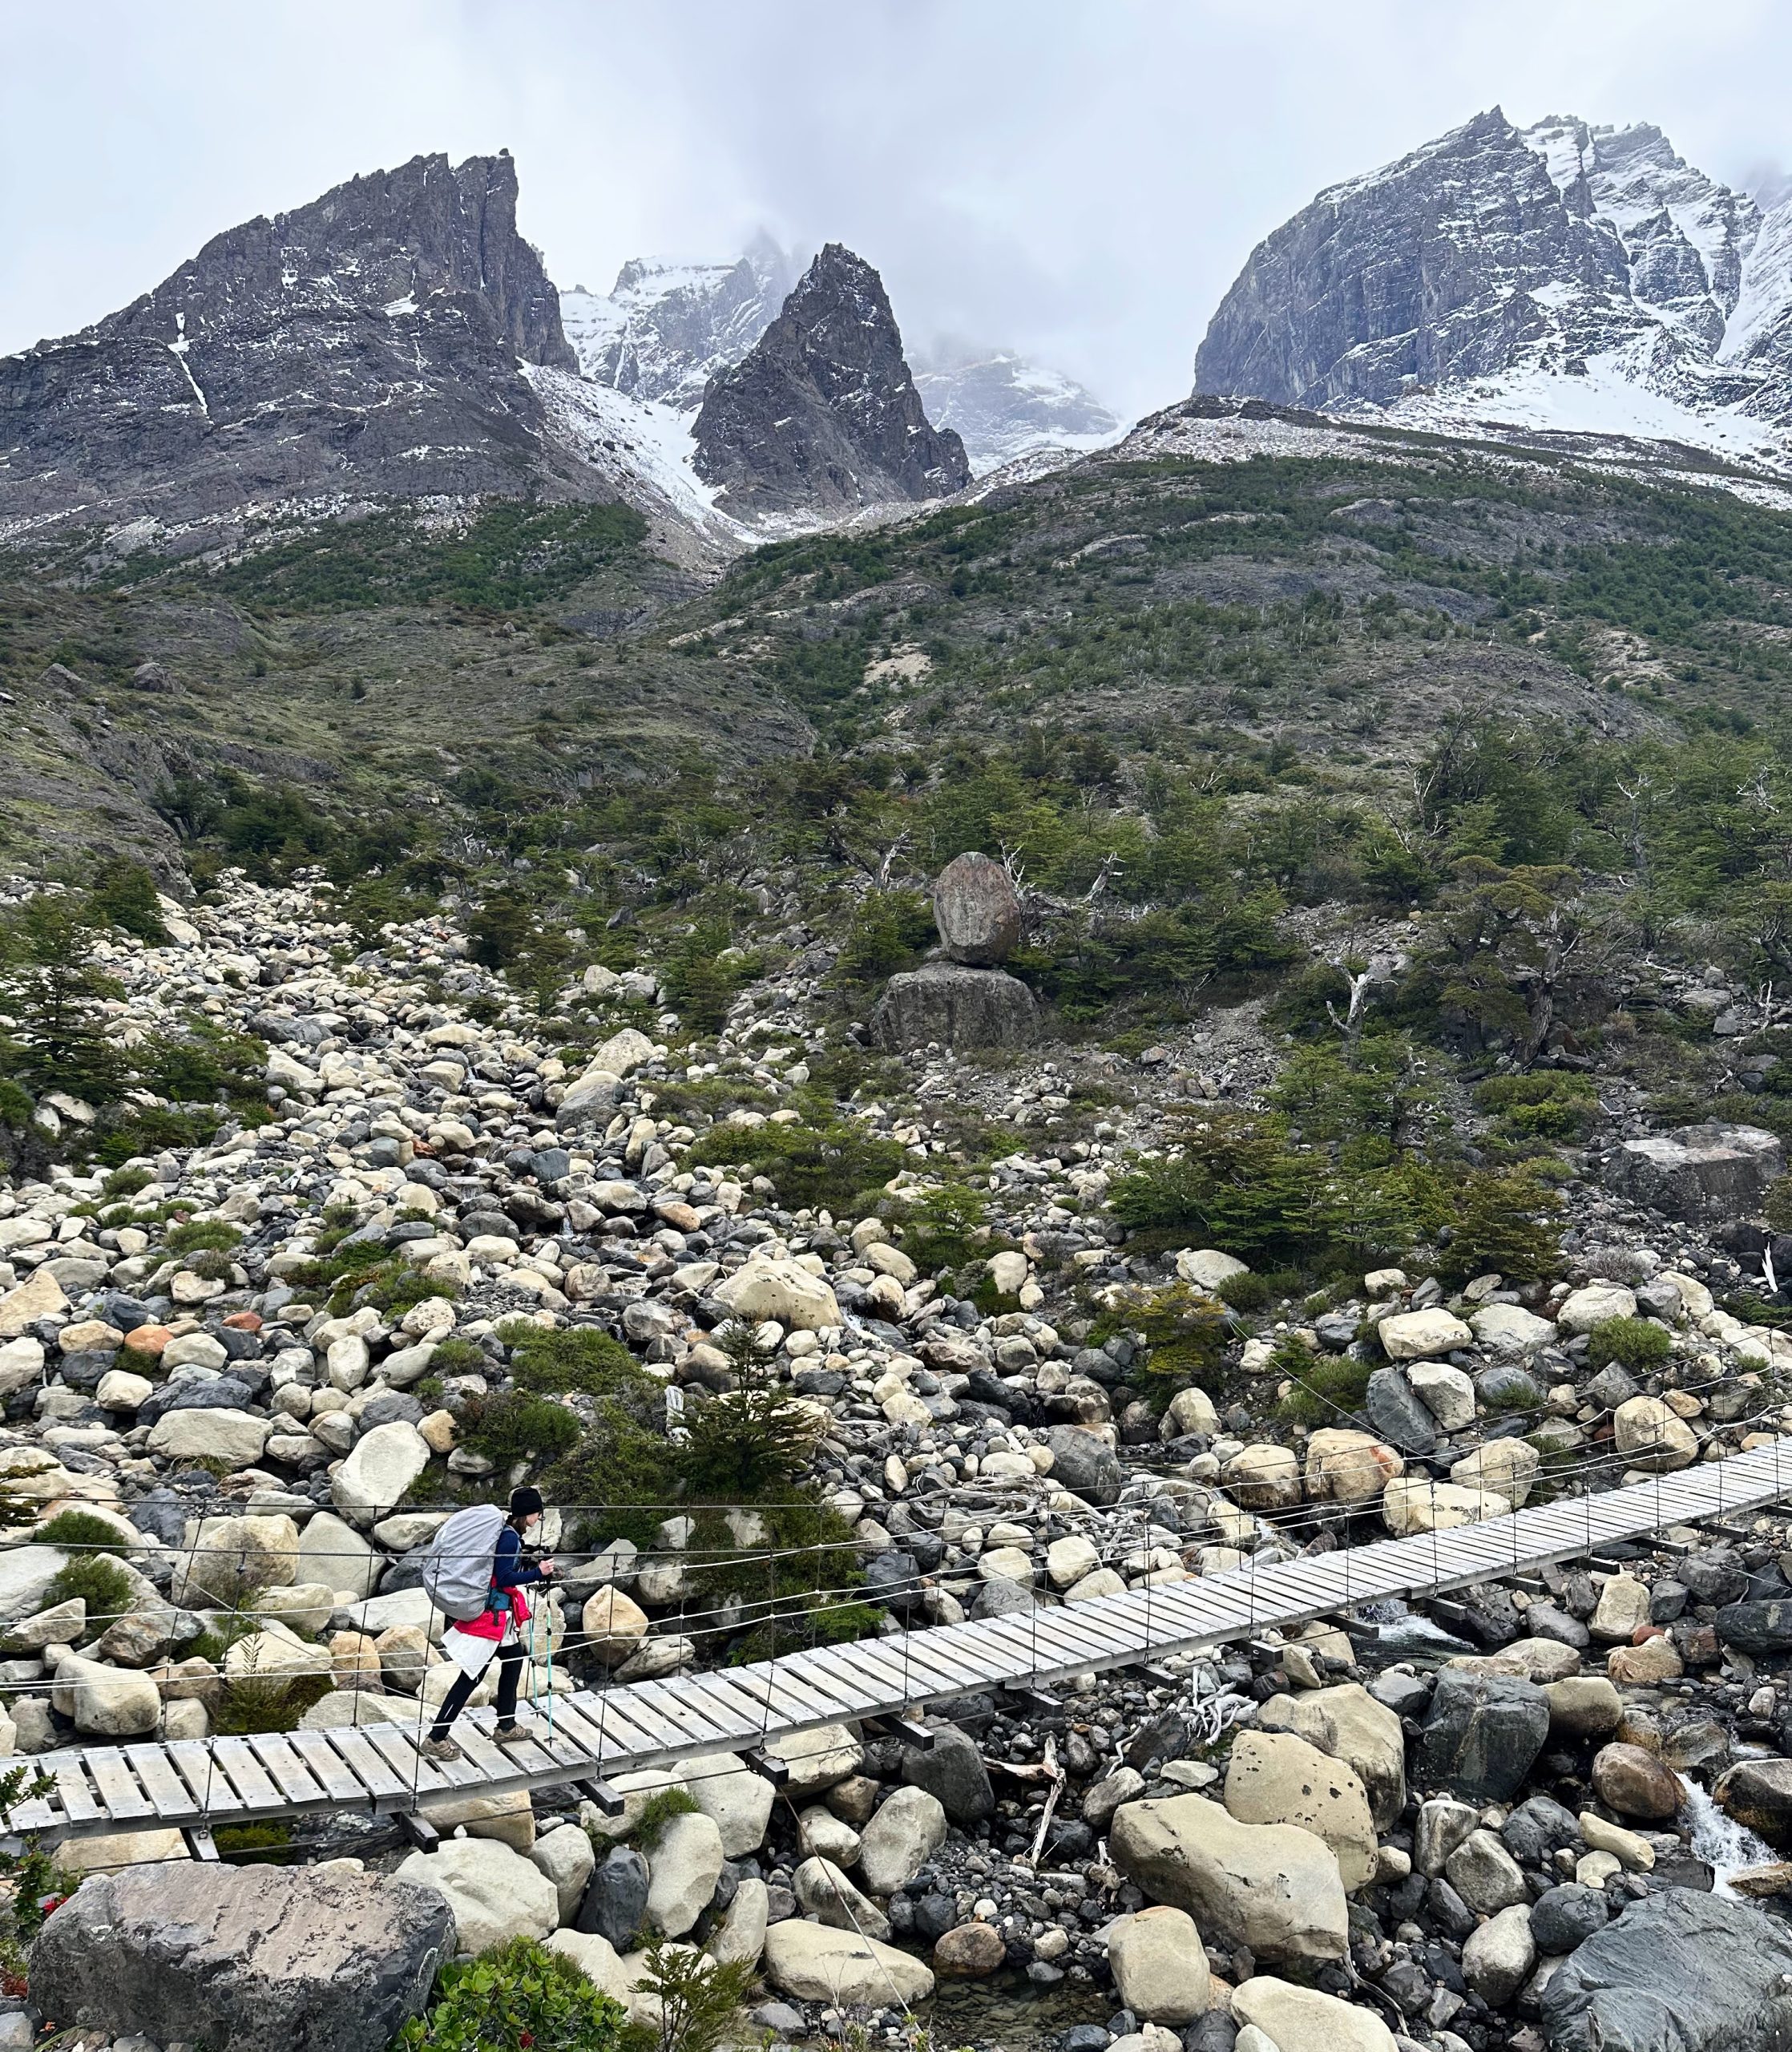
After breakfast, we set off towards the first hanging bridge. The hike there is relatively straight forward, and you get some great views along the way. Use this time to mentally prepare yourself, as the bridges are long, high, and very exposed. It’s a bit of a thrill walking across. If you do choose to admire the view or take a photo while on a bridge, do so carefully. There is no worse place to lose your footing (or drop your phone).
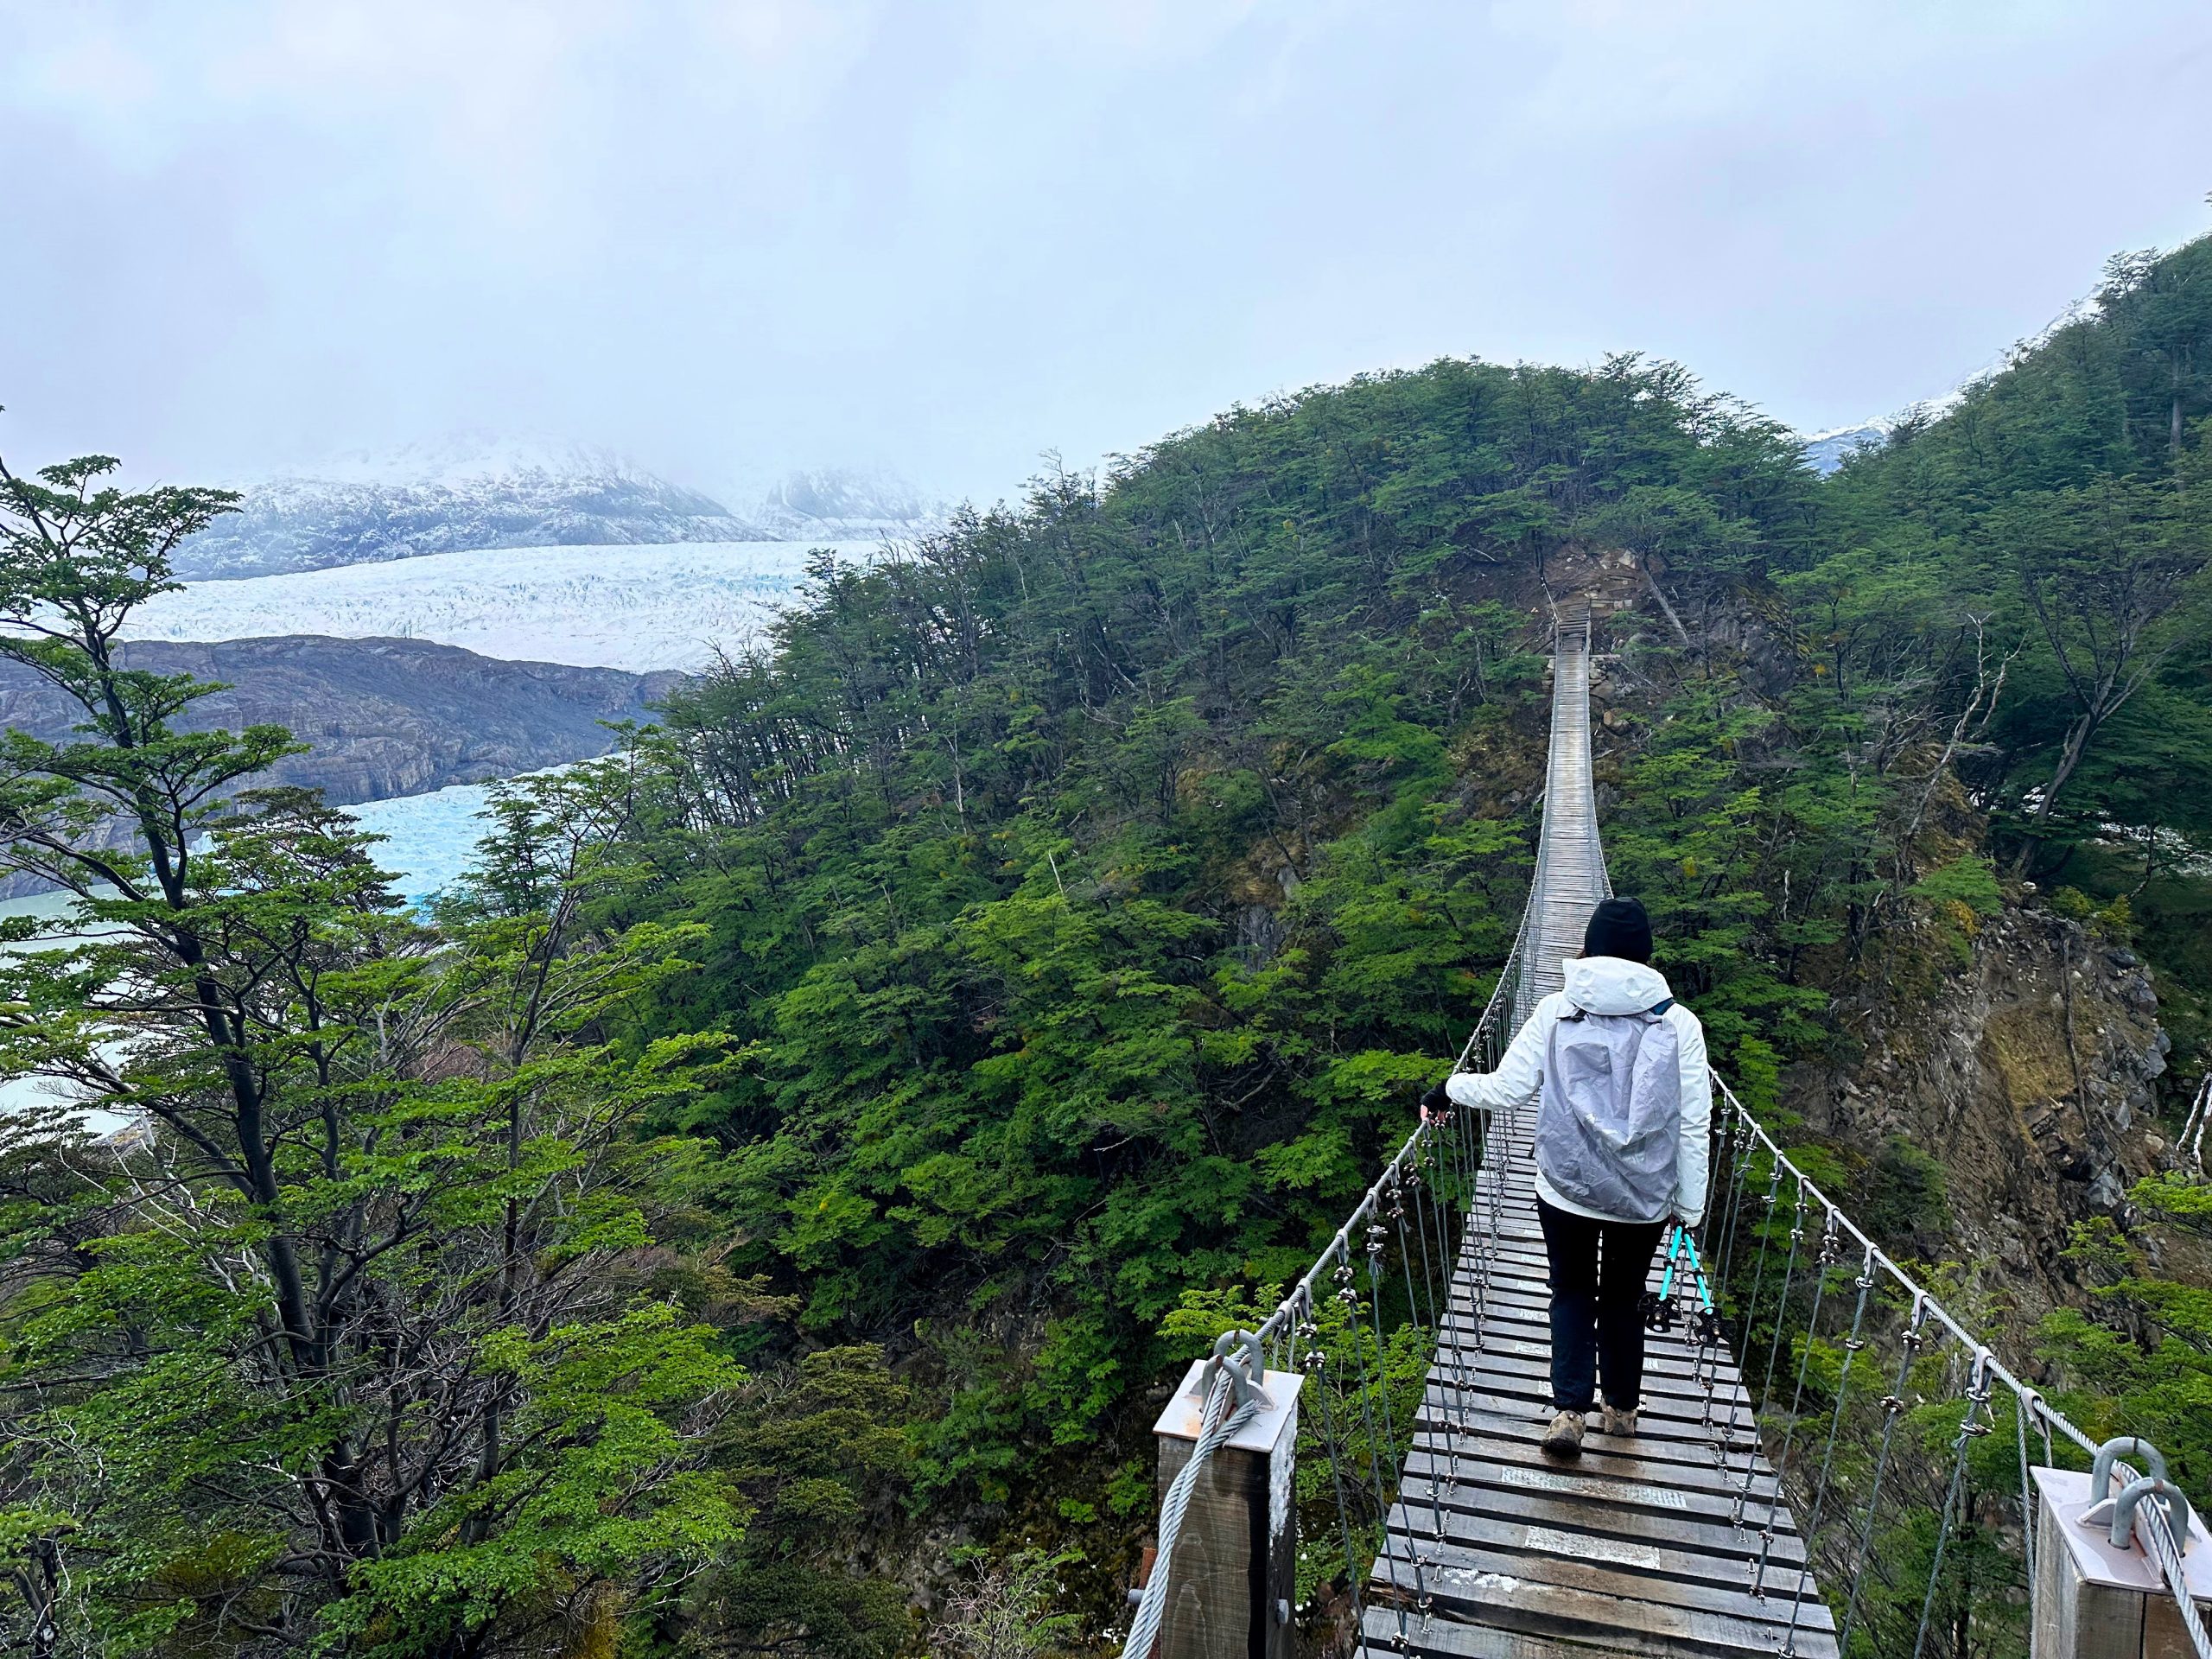
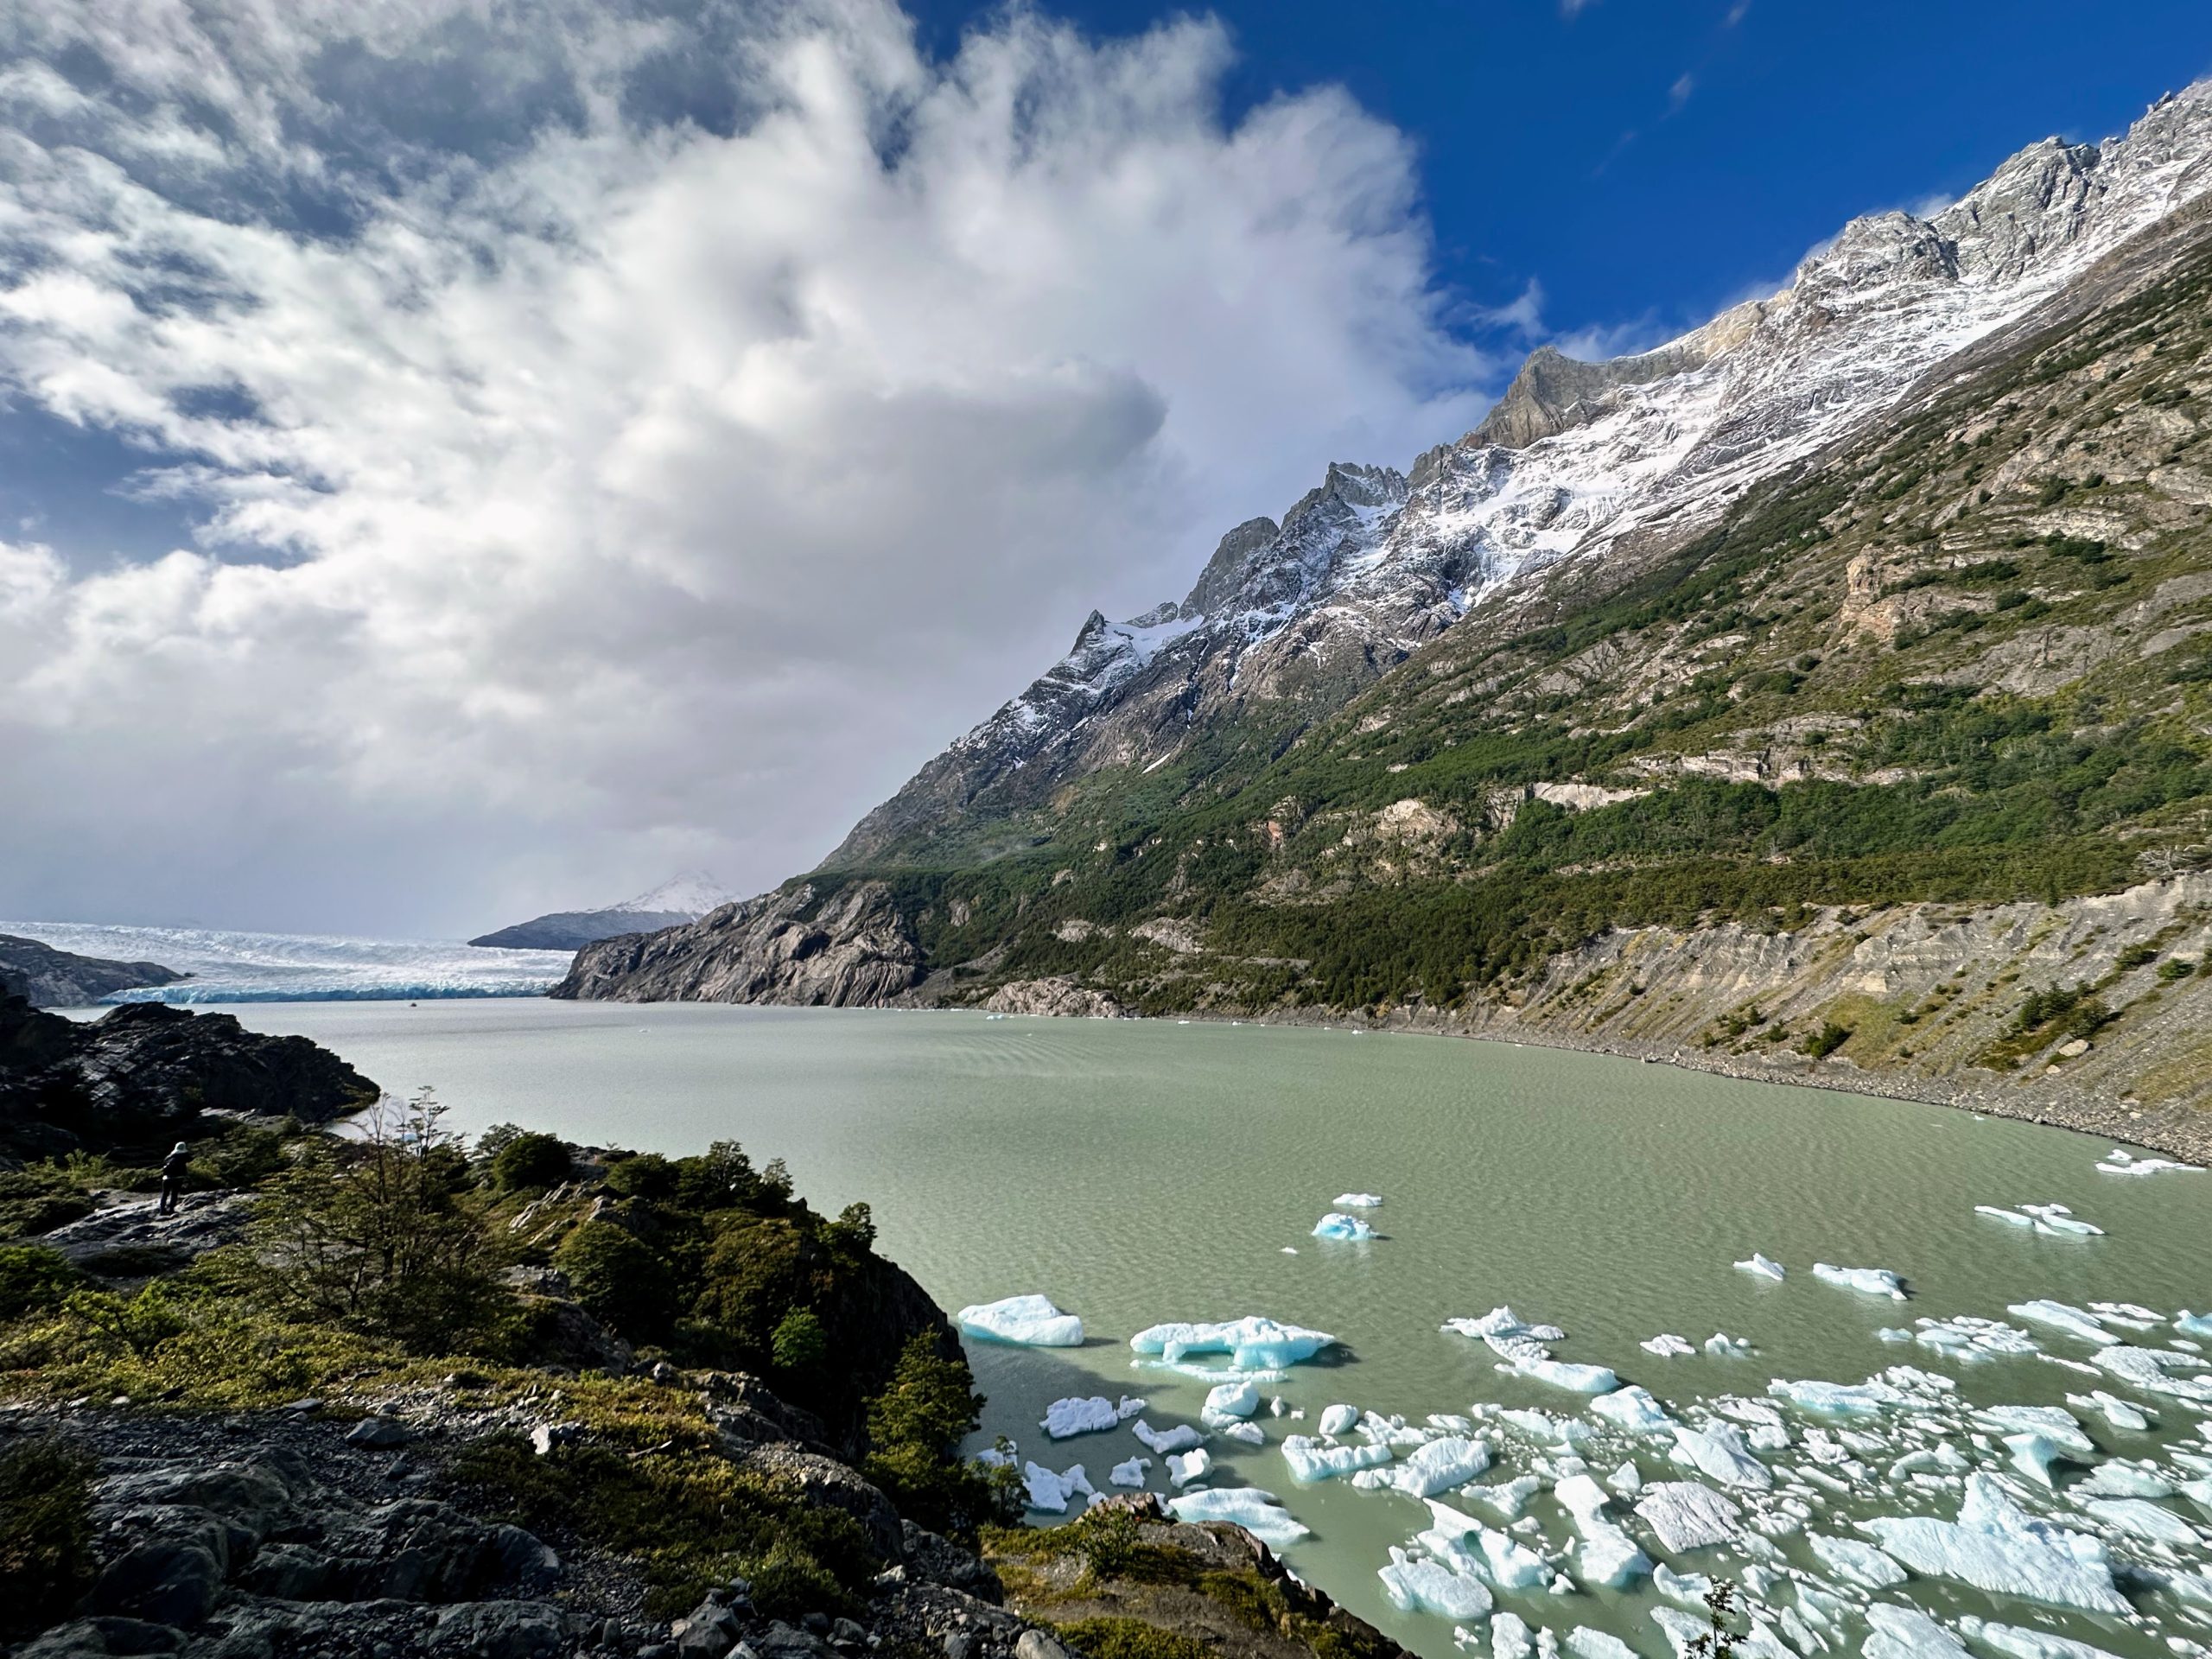
The second bridge is even longer, if you can believe it. Once you make it past, though, it is just a short uphill hike to a great view of Glacier Grey. This mirador is the end of the out-and-back portion, as anyone going further needs a permit to complete the O Trek.
Once we made it back to Grey refugio, we enjoyed our meal plan sack lunch in their dining room and picked up our backpacks (an underrated benefit of this itinerary is getting to do the morning hike without the extra weight). From there, we doubled back on the Day 1 hike and went towards Paine Grande refugio. The weather was once again brutal on this stretch, so we picked up the pace having done that trail section already.
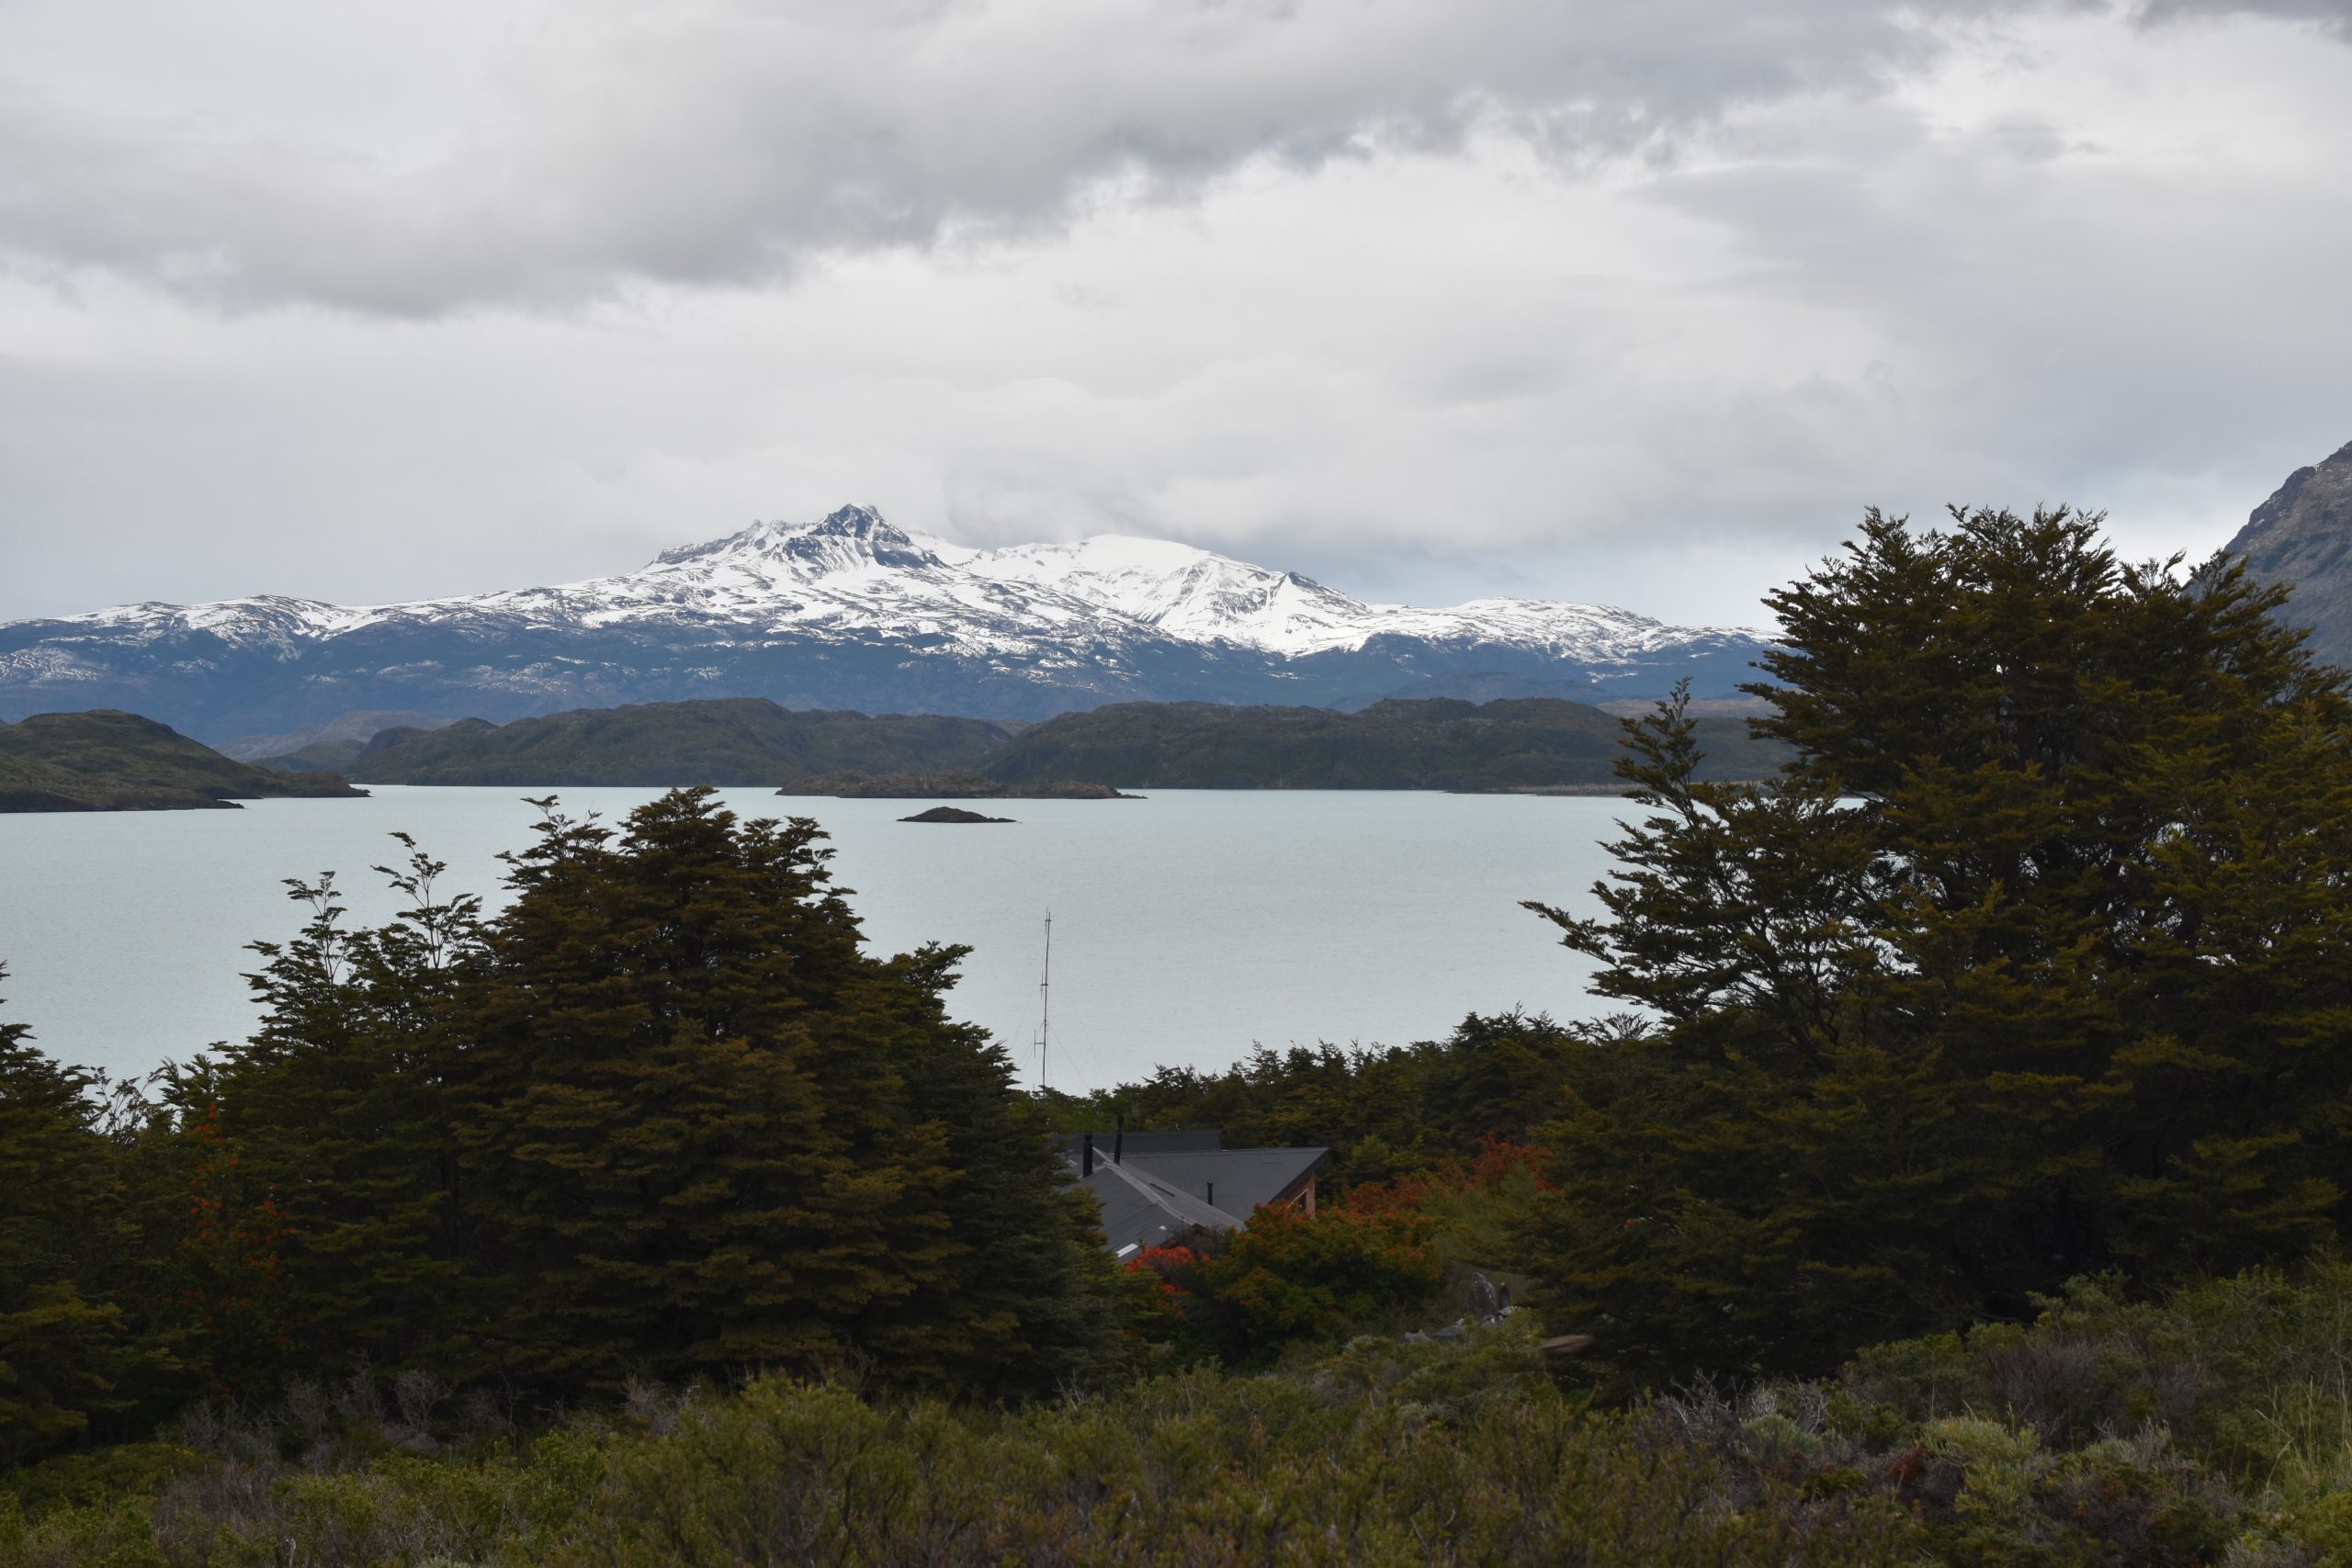
The Paine Grande refugio is massive – that doesn’t mean it’s better, though. There were pros and cons with this refugio compared to Grey. The dinner buffet here was much better, the hot water was more consistent, and there was more space in the common areas to relax and enjoy the lake view (we took advantage after dinner by paying for some wifi to check the weather forecast and plan the next day). They also had some tasty Patagonian beers available for purchase with dinner. The rooms, however, were cramped. They were barely bigger than the rooms at Grey but managed to squeeze in an extra set of bunk beds while also reducing the storage space. Our room was also as far as possible from the heat source (and the bathroom), so we had to ask for an extra blanket to stay warm. Some other couples got lucky though and had a spacious, comfortable room in a good location. Arriving on the early side seemed to be correlated with getting a better room, so plan accordingly.
One fun aspect about the W Trek is that everyone is kind of on the same independent journey at the same time. You’re bound to run into the same people at each refugio. We found everyone to be super friendly, and it was great meeting like-minded travelers from all over the world and sharing the experience together.
Day 3
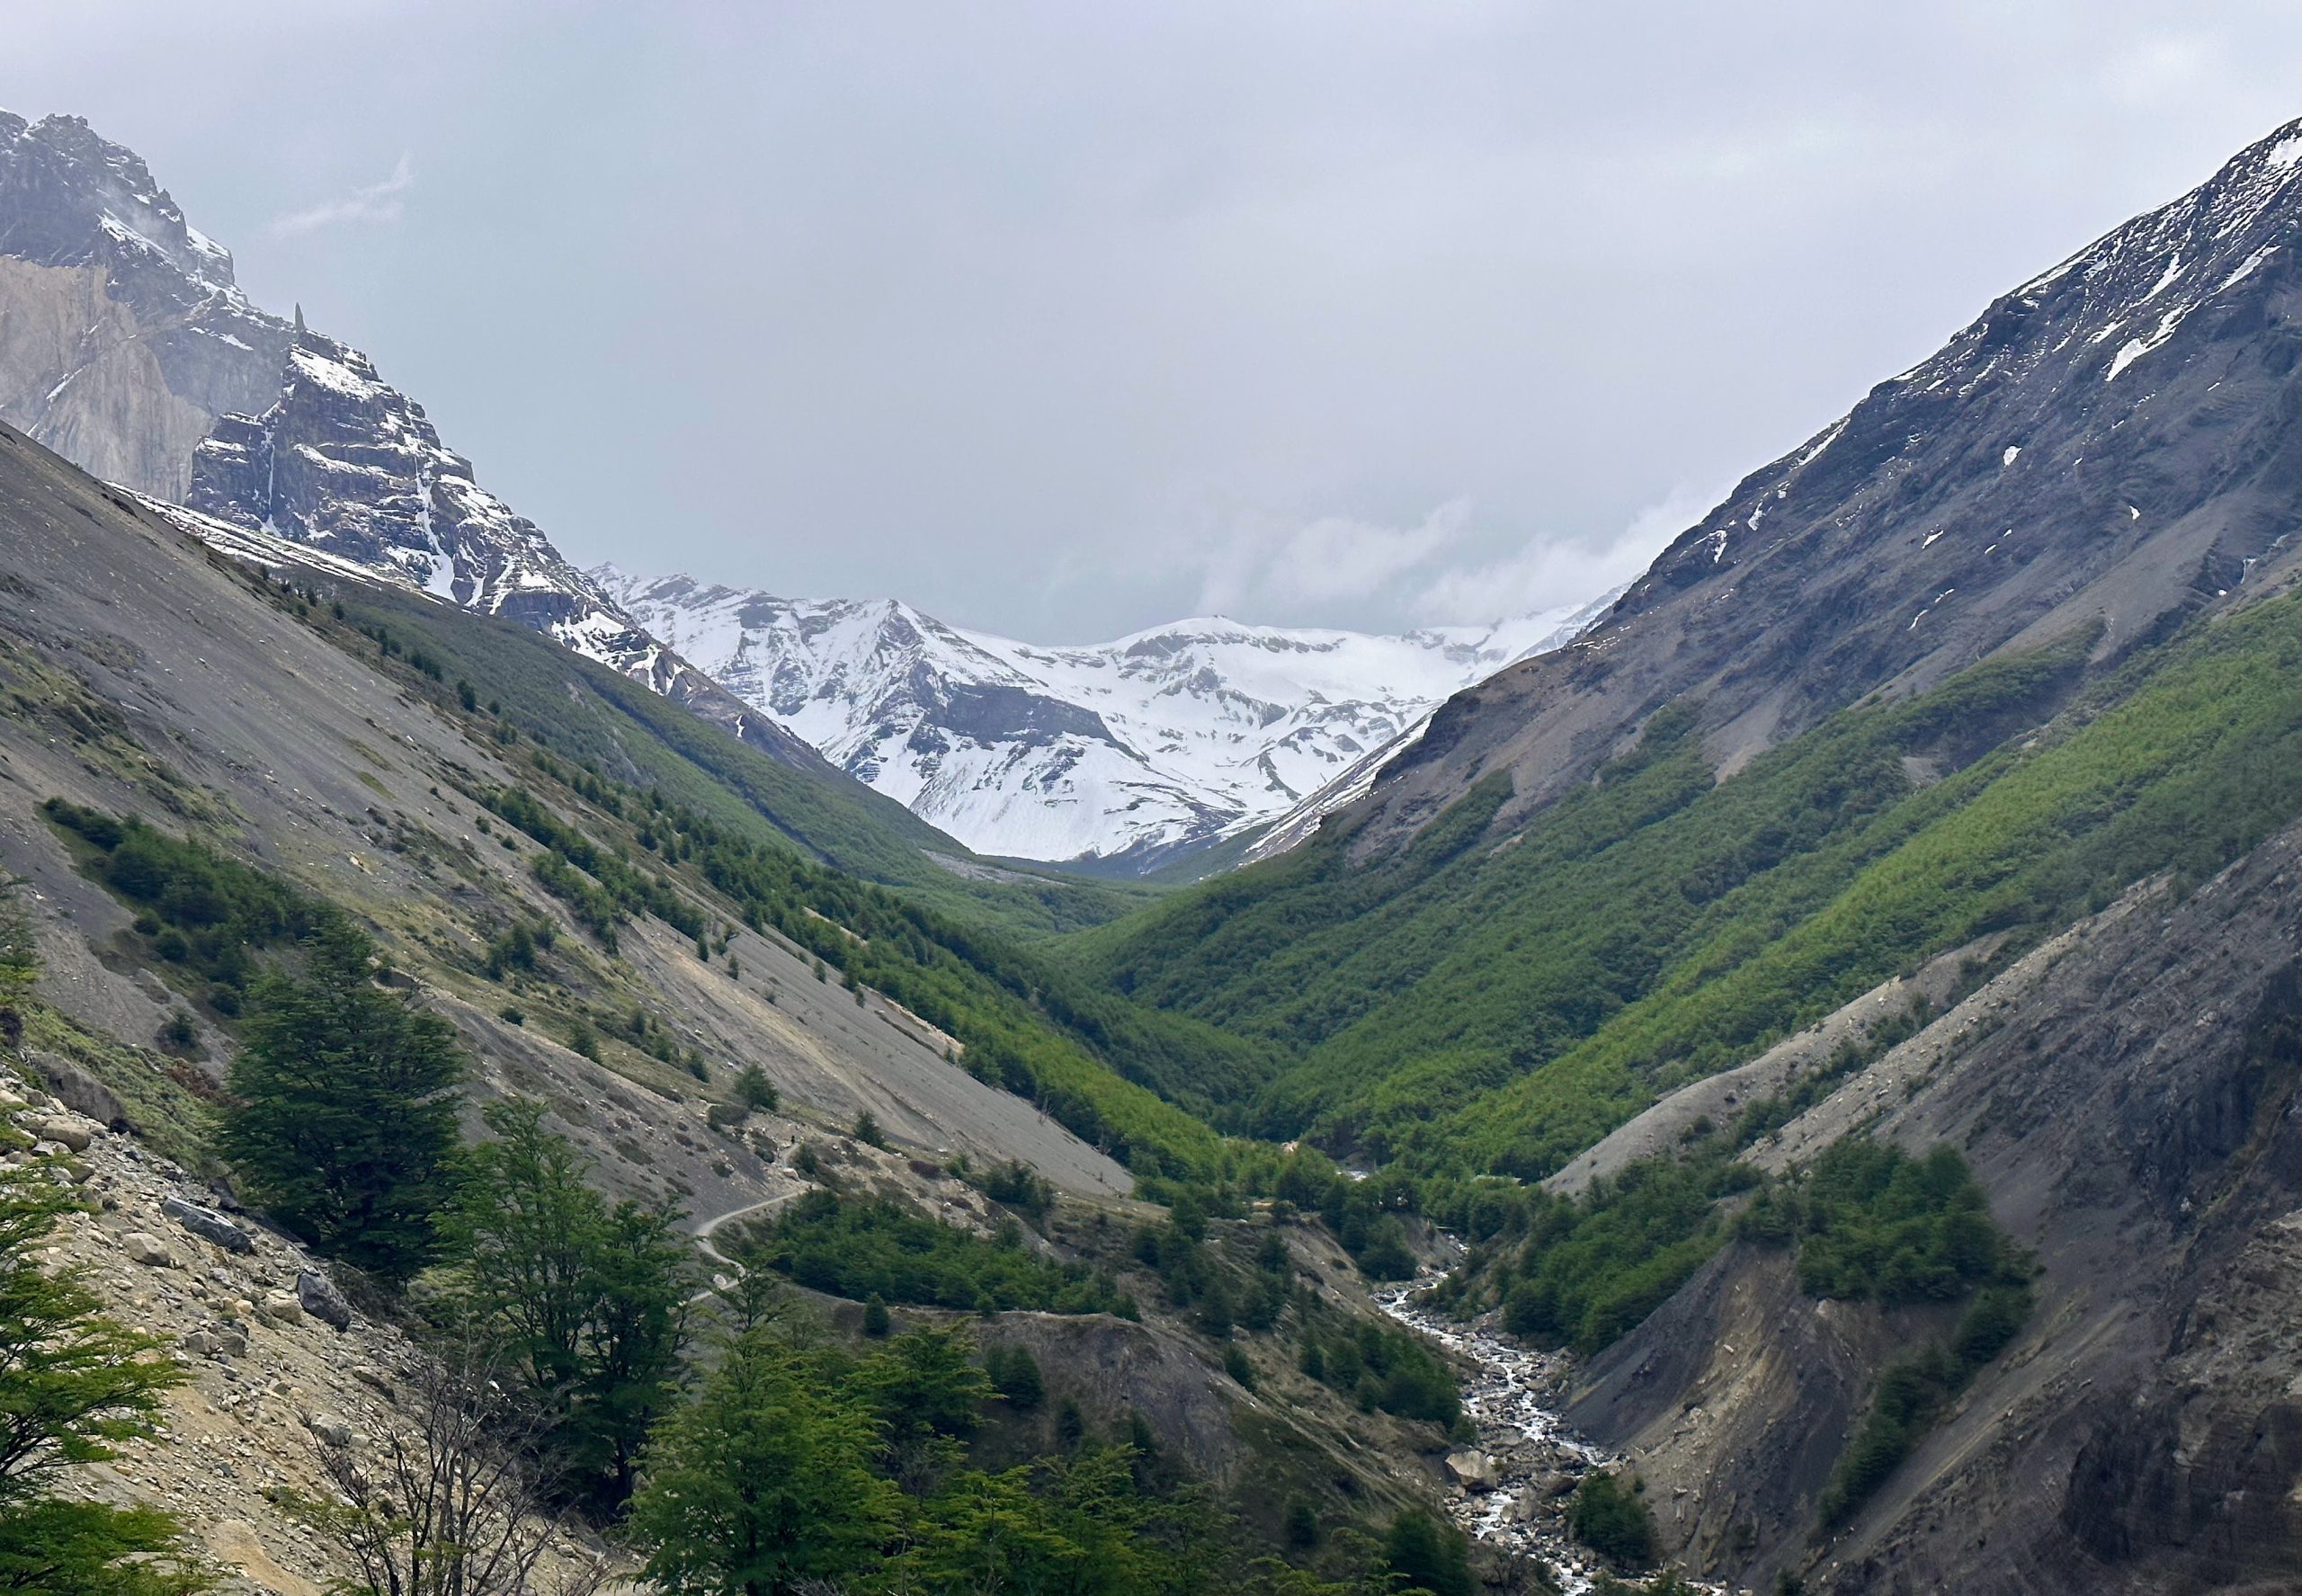
The weather cleared up! And good thing too, as Day 3 was the longest (and potentially our favorite) day. Plan to wake up early and set out right after breakfast to make sure you can fit all ~30 km in at a relaxing pace.
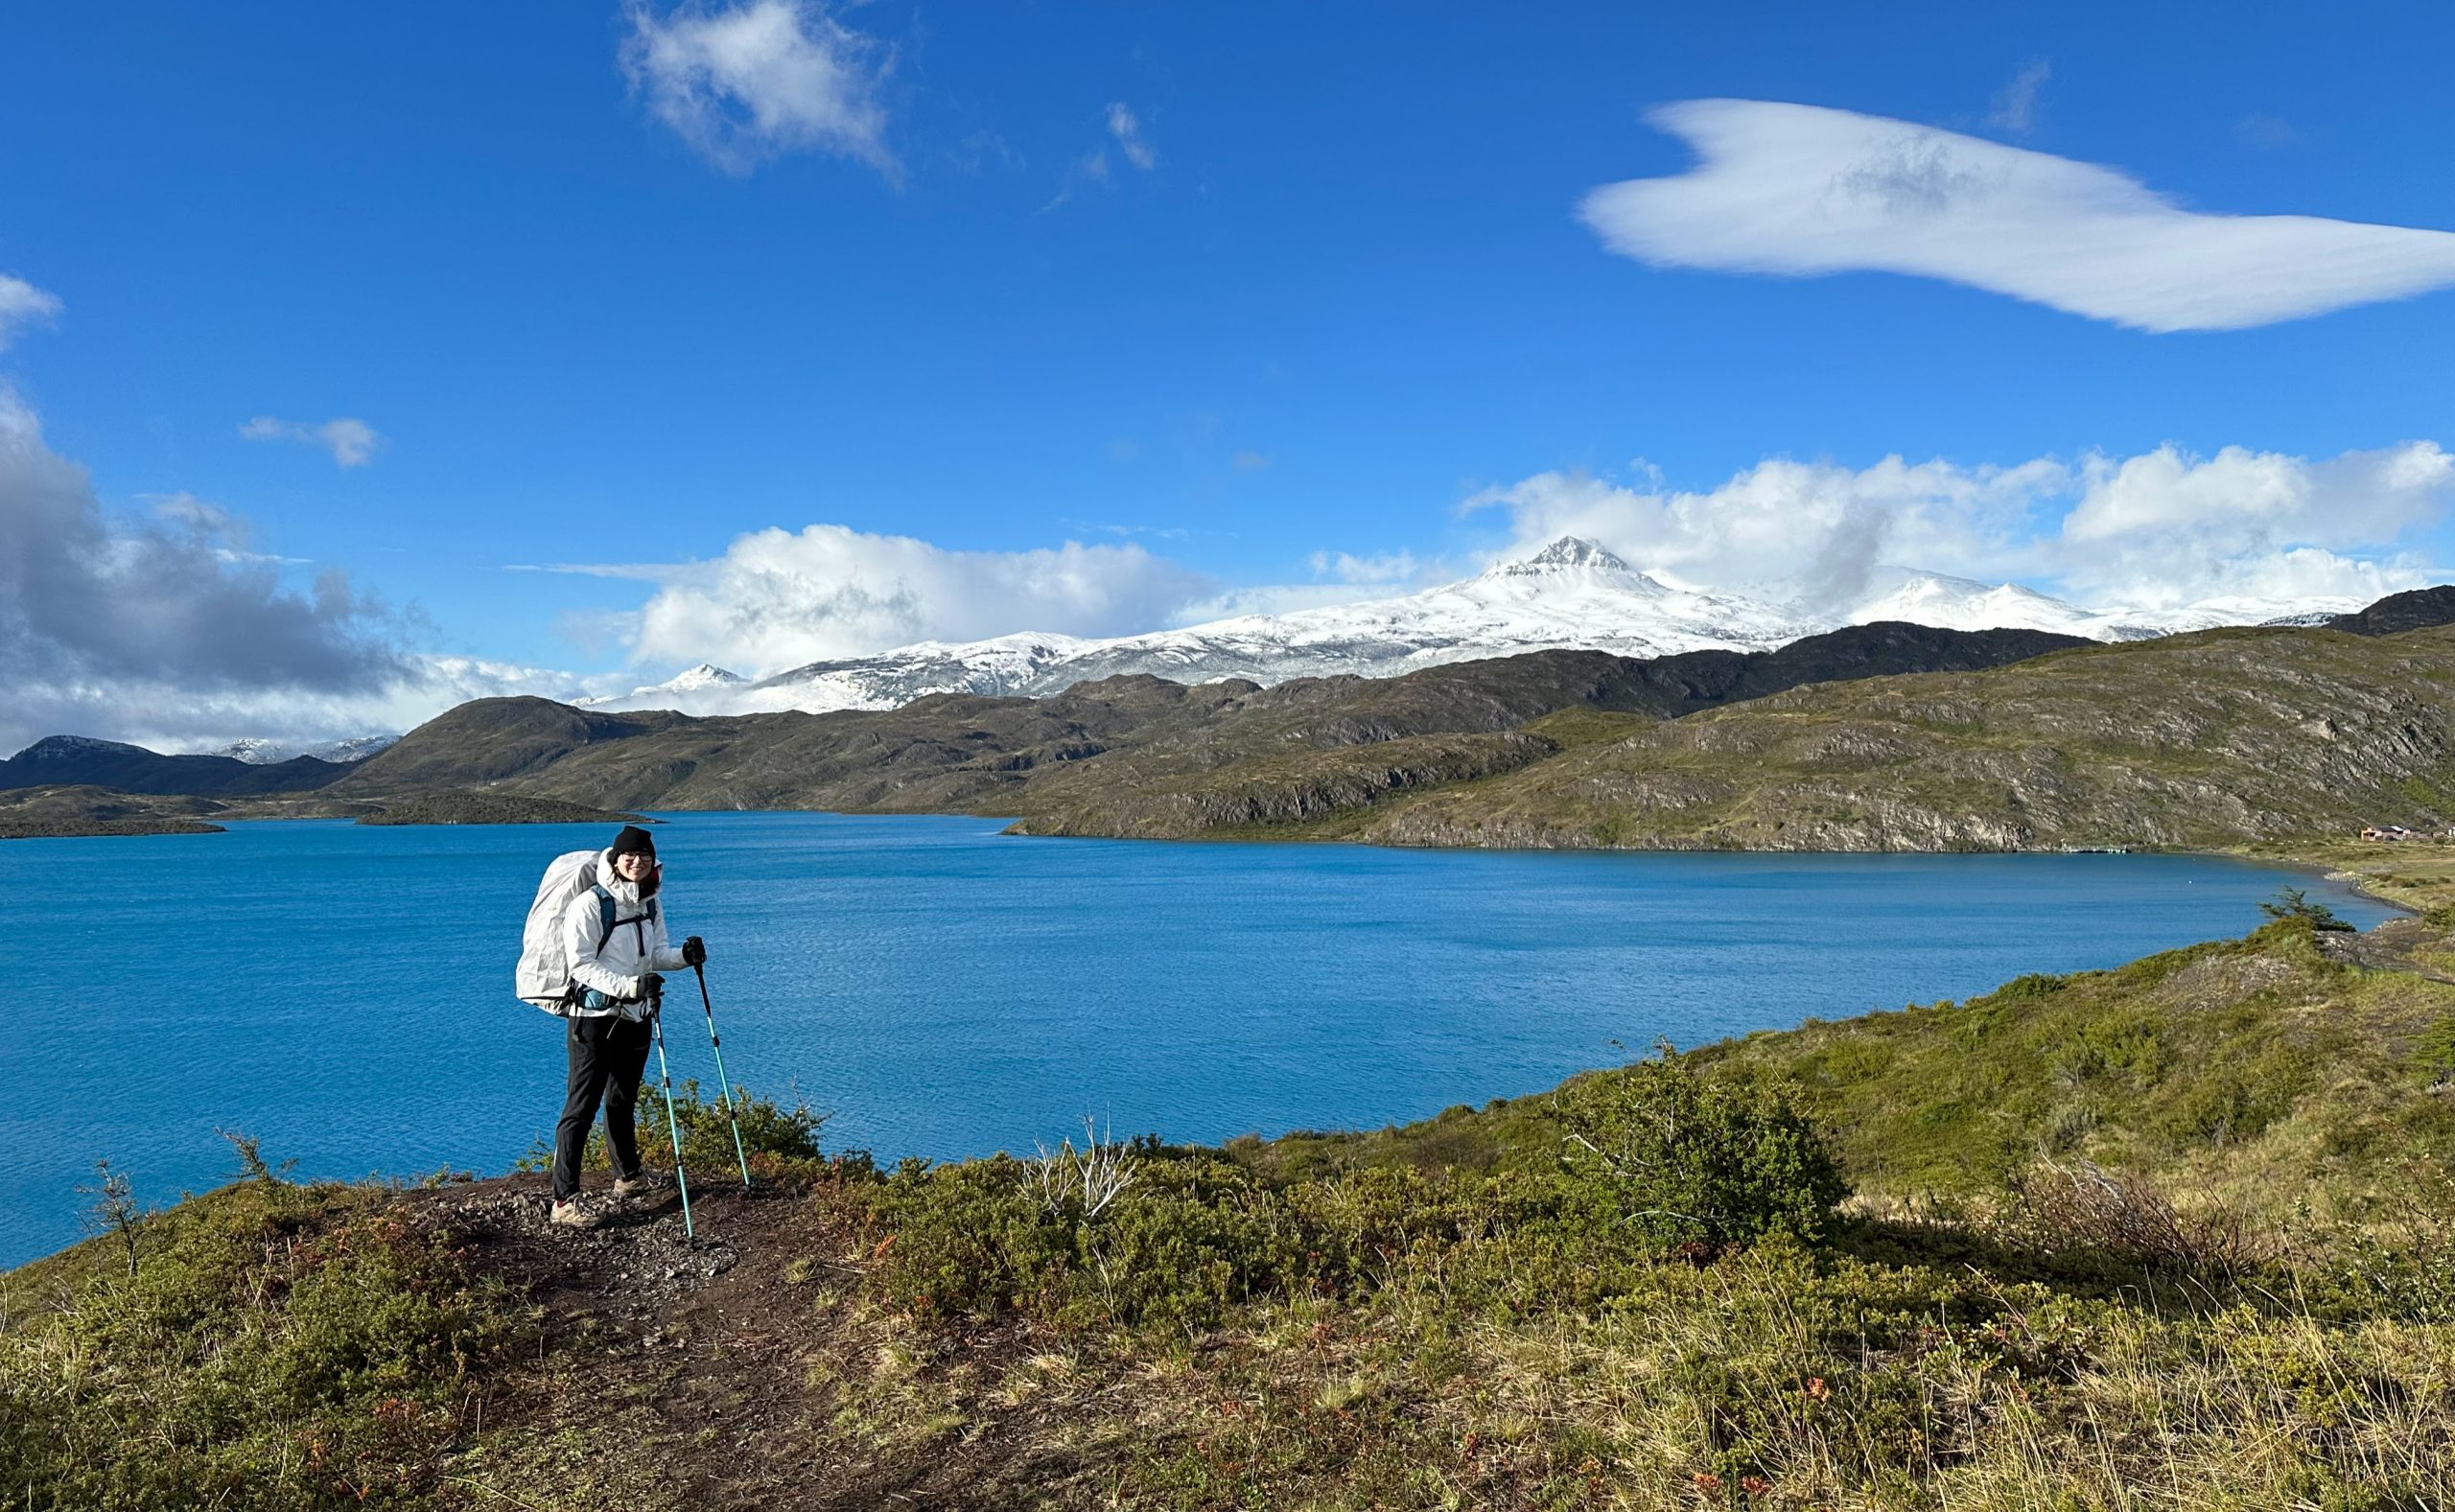
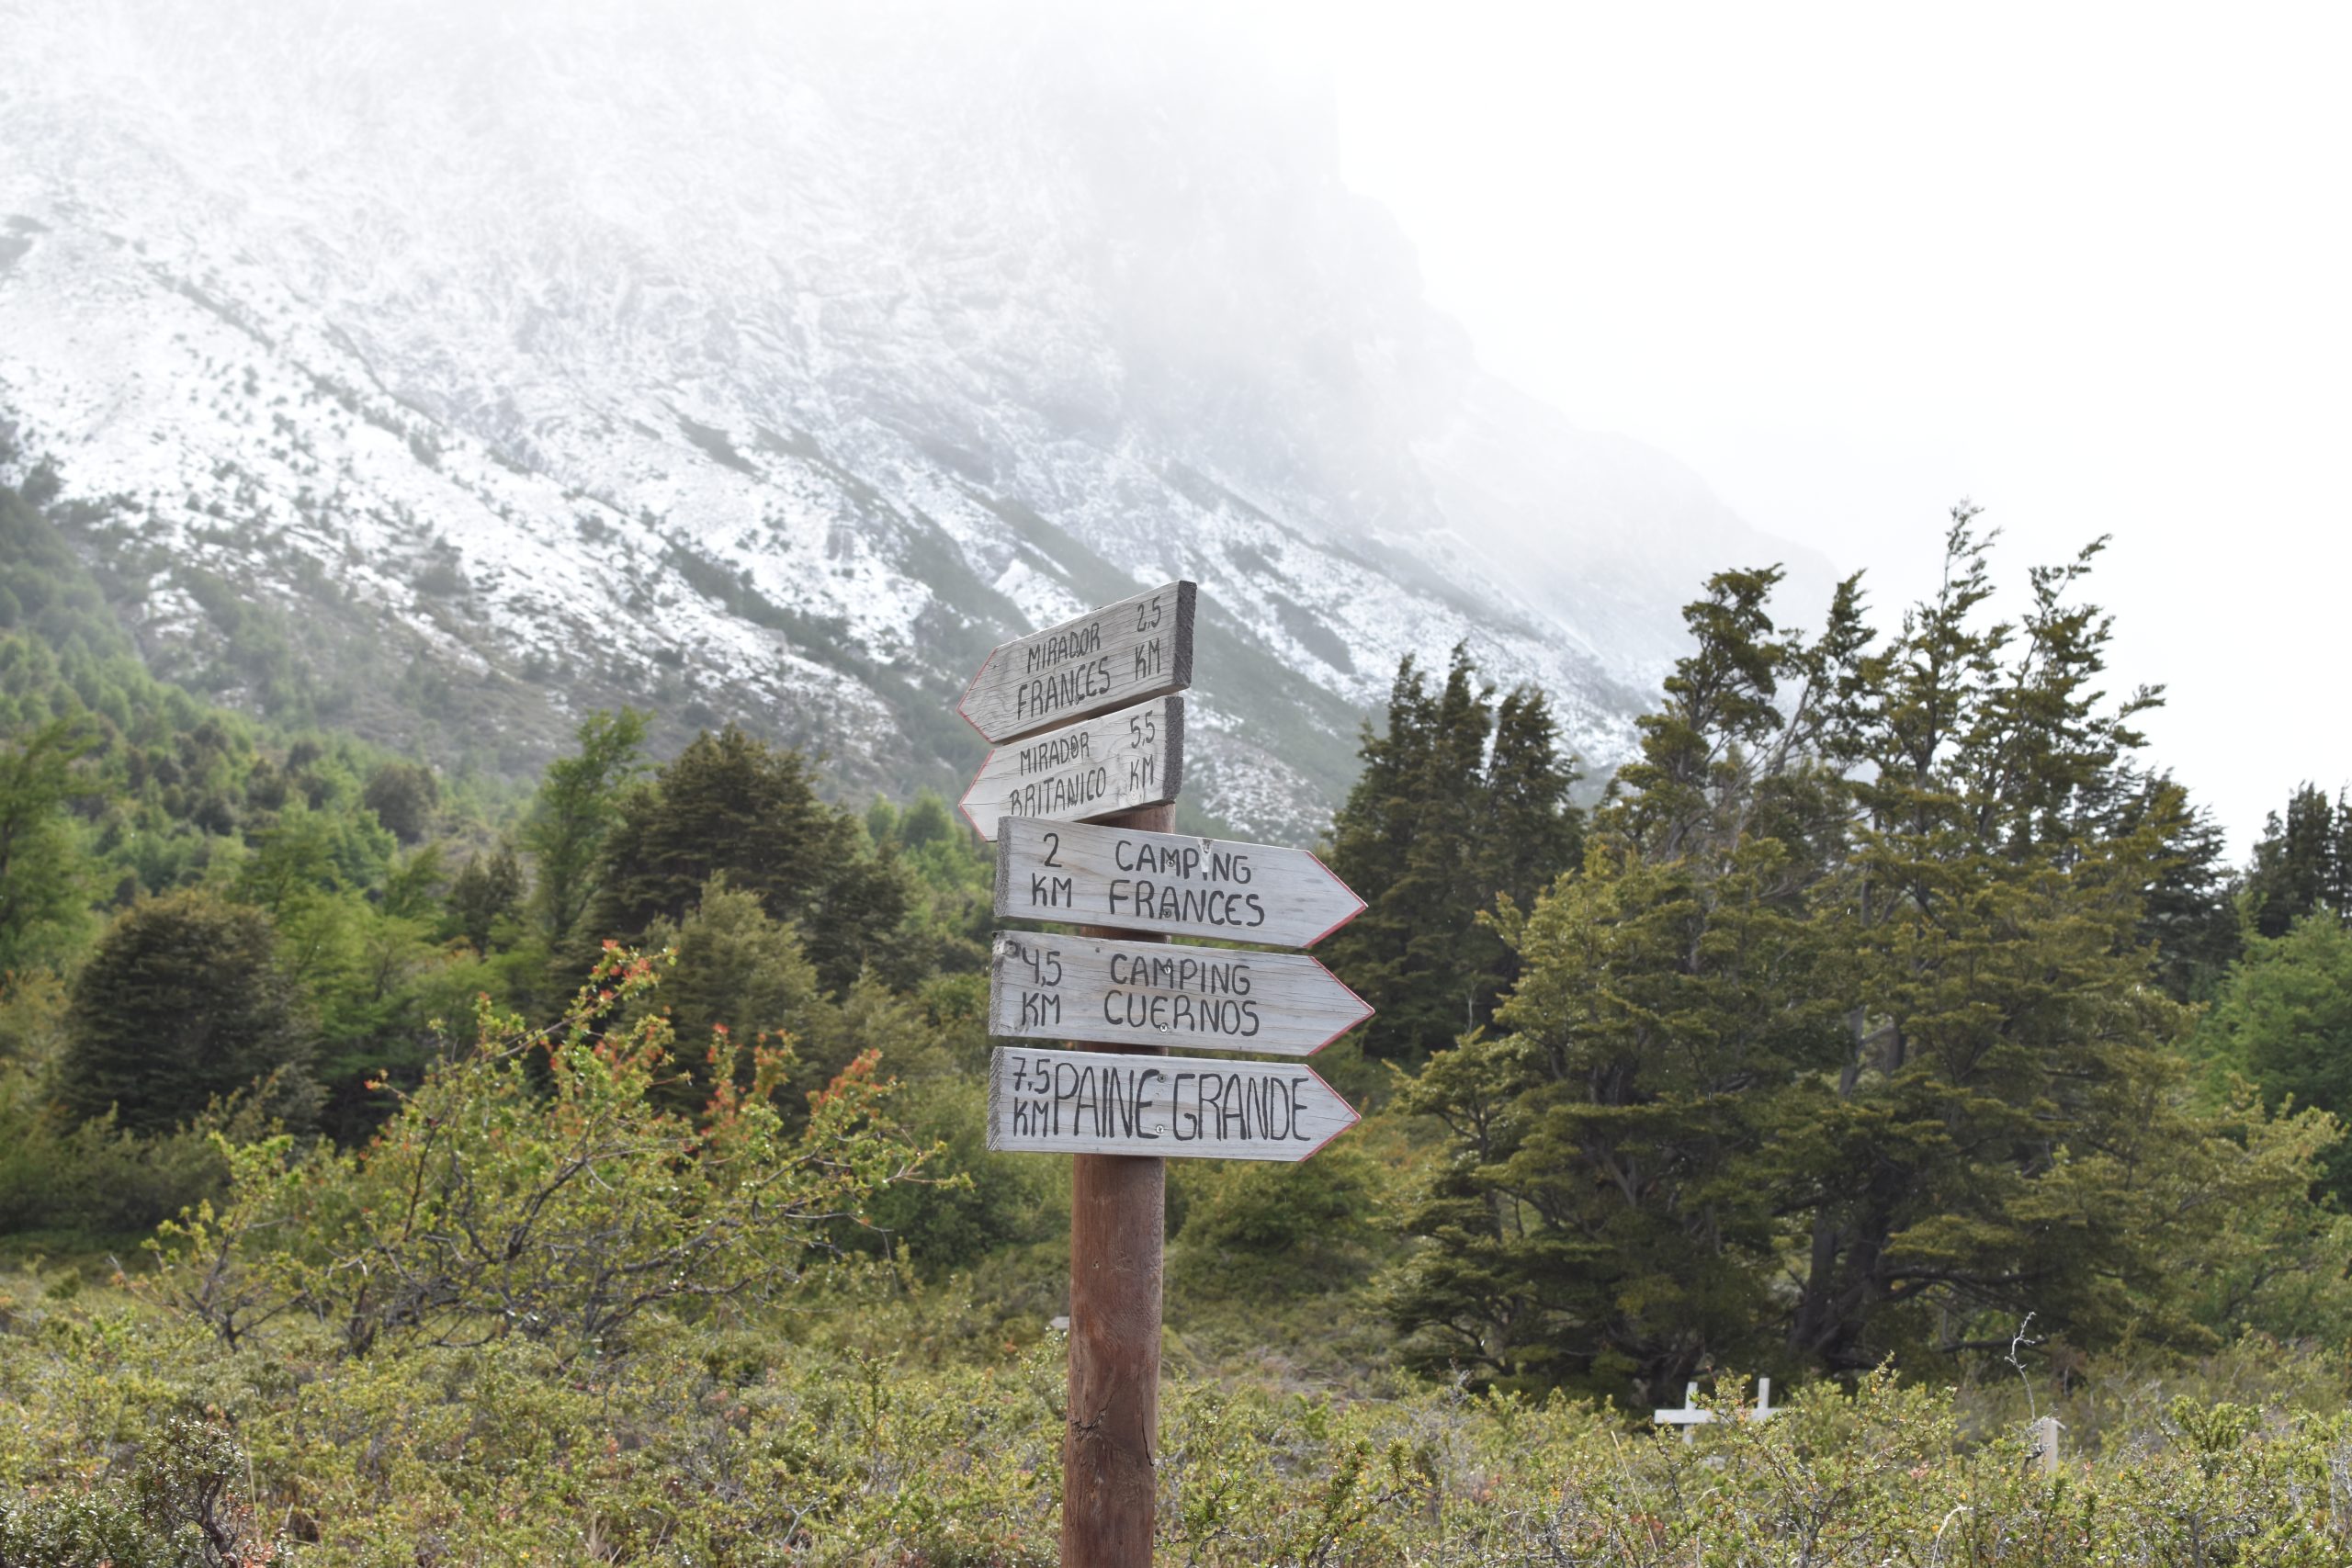
Stretch 1 was from the Paine Grande refugio to Italiano camp, which is at the base of the French Valley. This part felt more like a walk than a hike, so it was a nice warm-up to start the day – especially with the beautiful lake views as you leave Paine Grande. At Italiano, you’ll be able to drop your packs in some open storage areas and use the restroom in preparation for the climb to Britanico.
The French Valley has notoriously fickle weather. Some people say that if it looks like it will be cloudy, don’t even bother making the ascent. We aren’t those people though. The worst case scenario is choosing to skip the hike only to hear about how beautiful and clear it was at the top, and the only way to avoid that is to give the hike a go. We are very glad we made that decision.
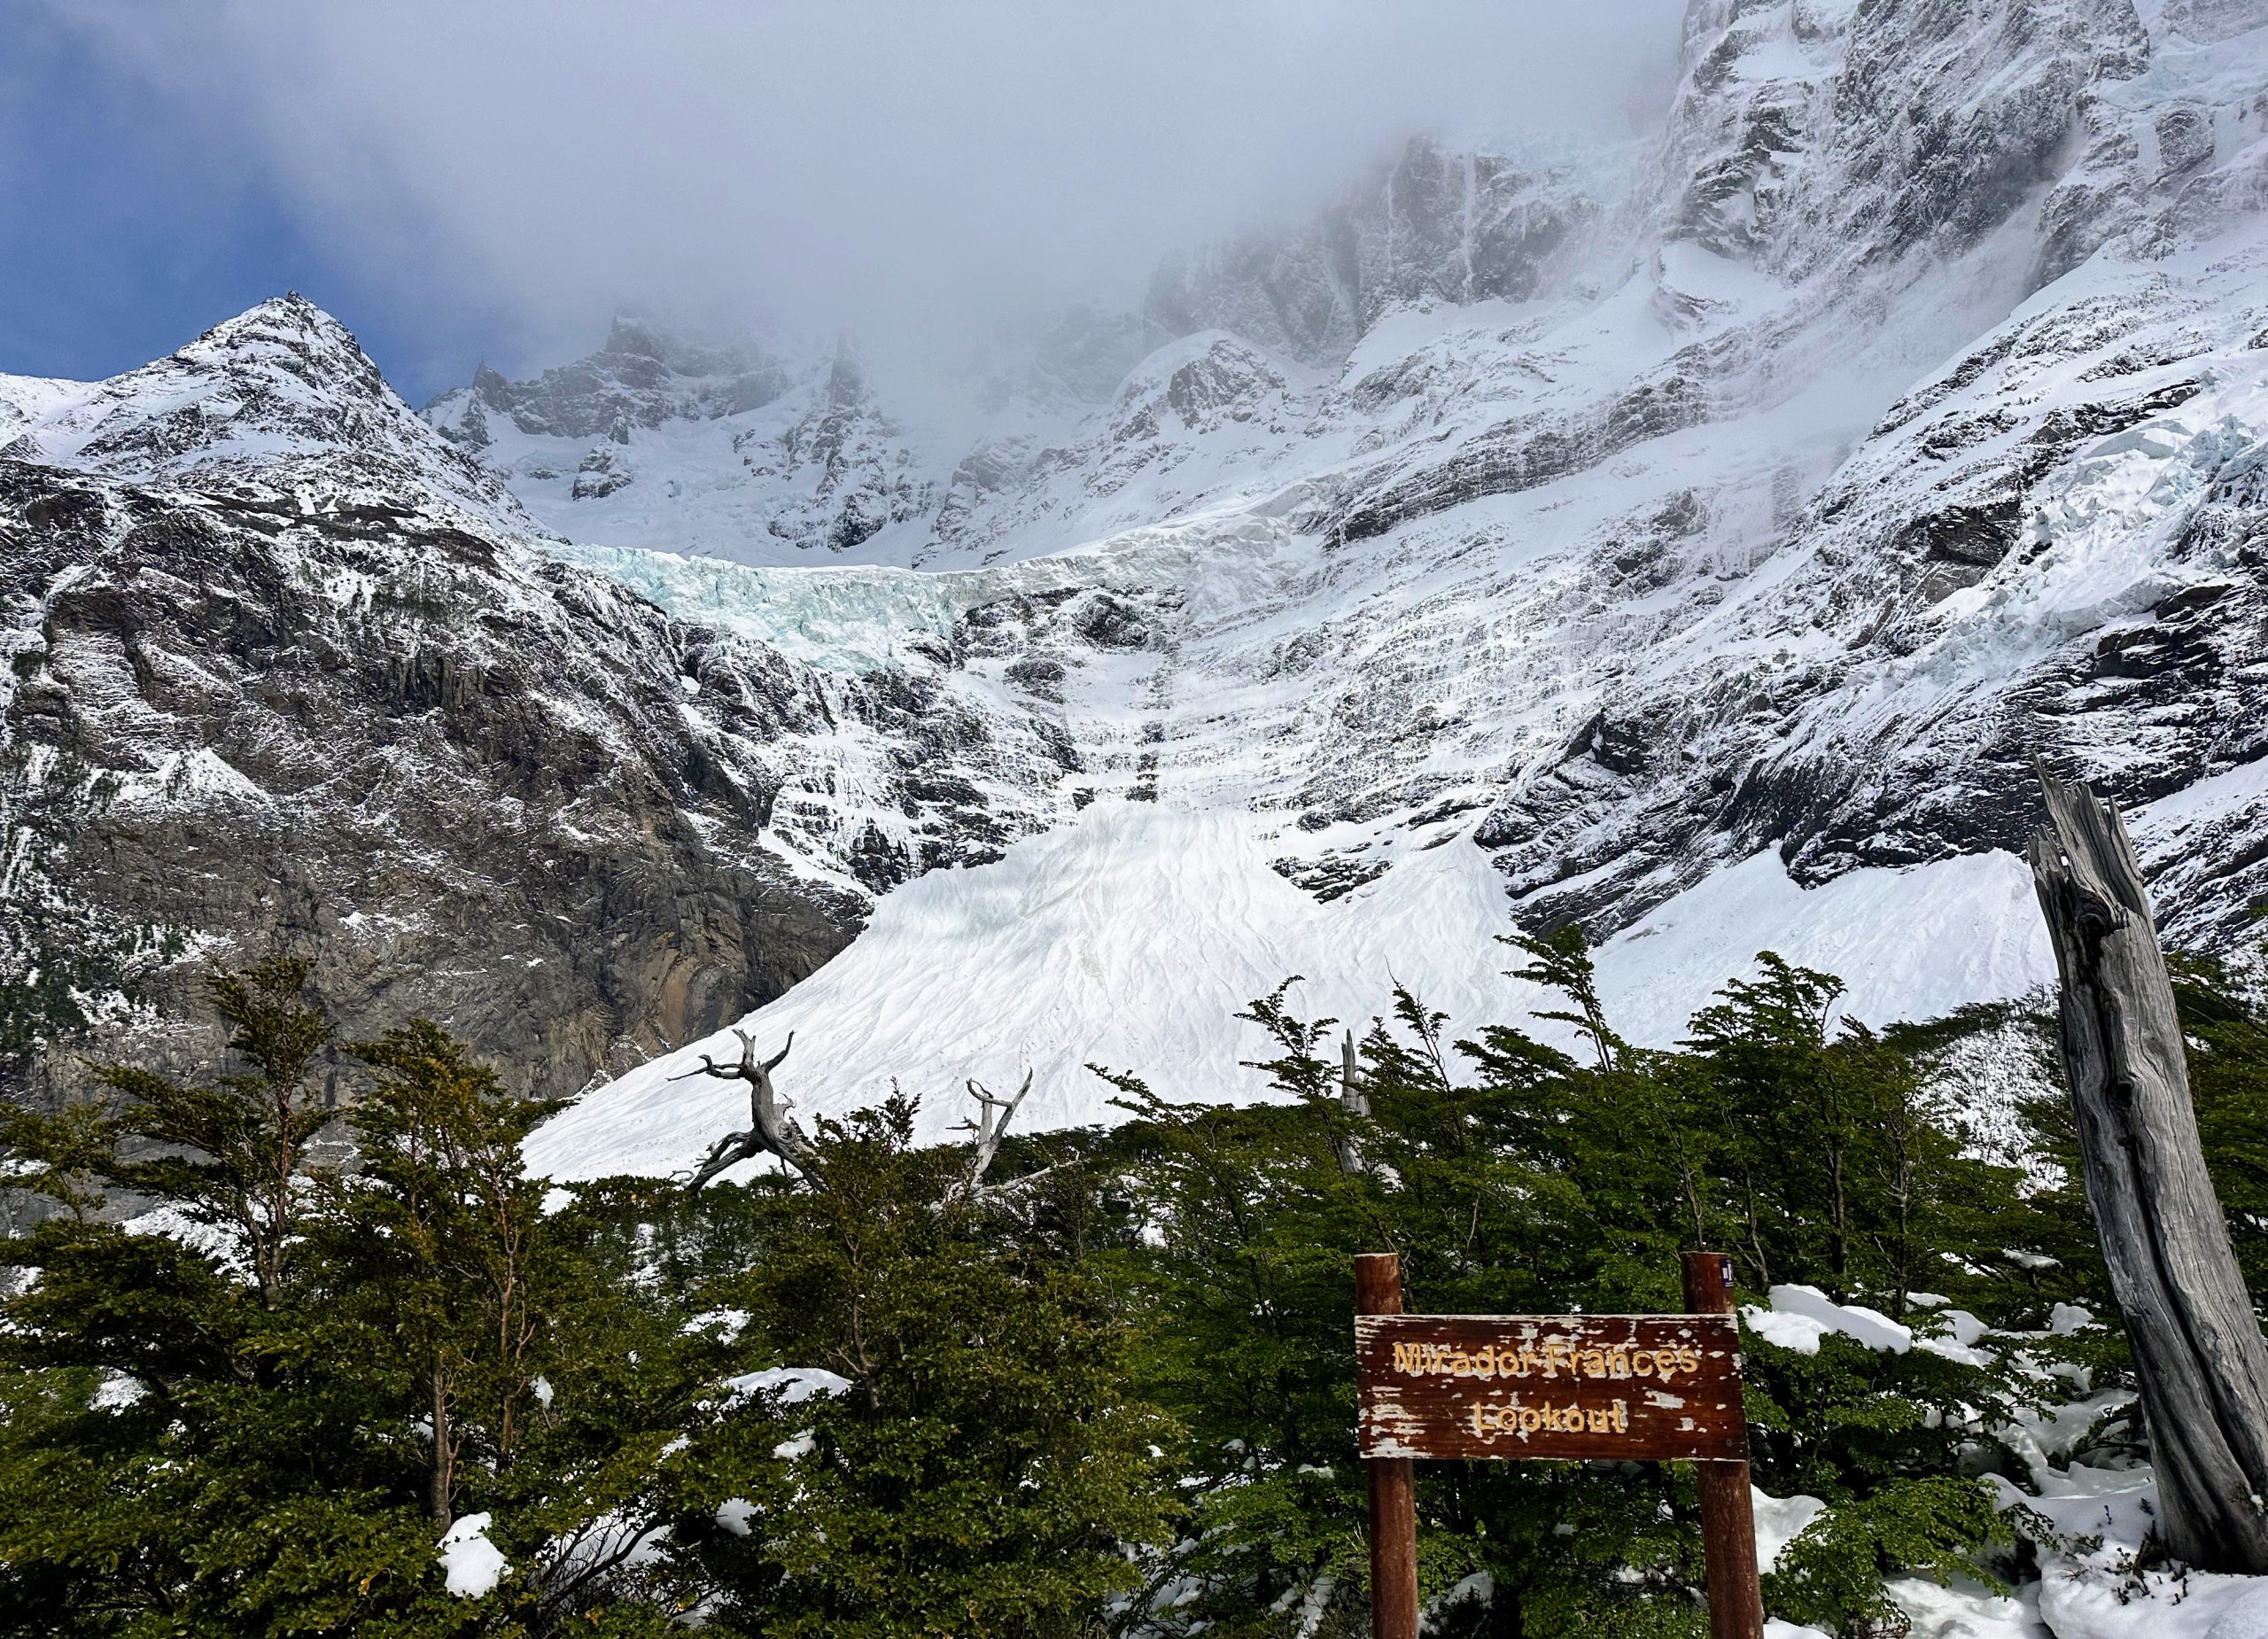
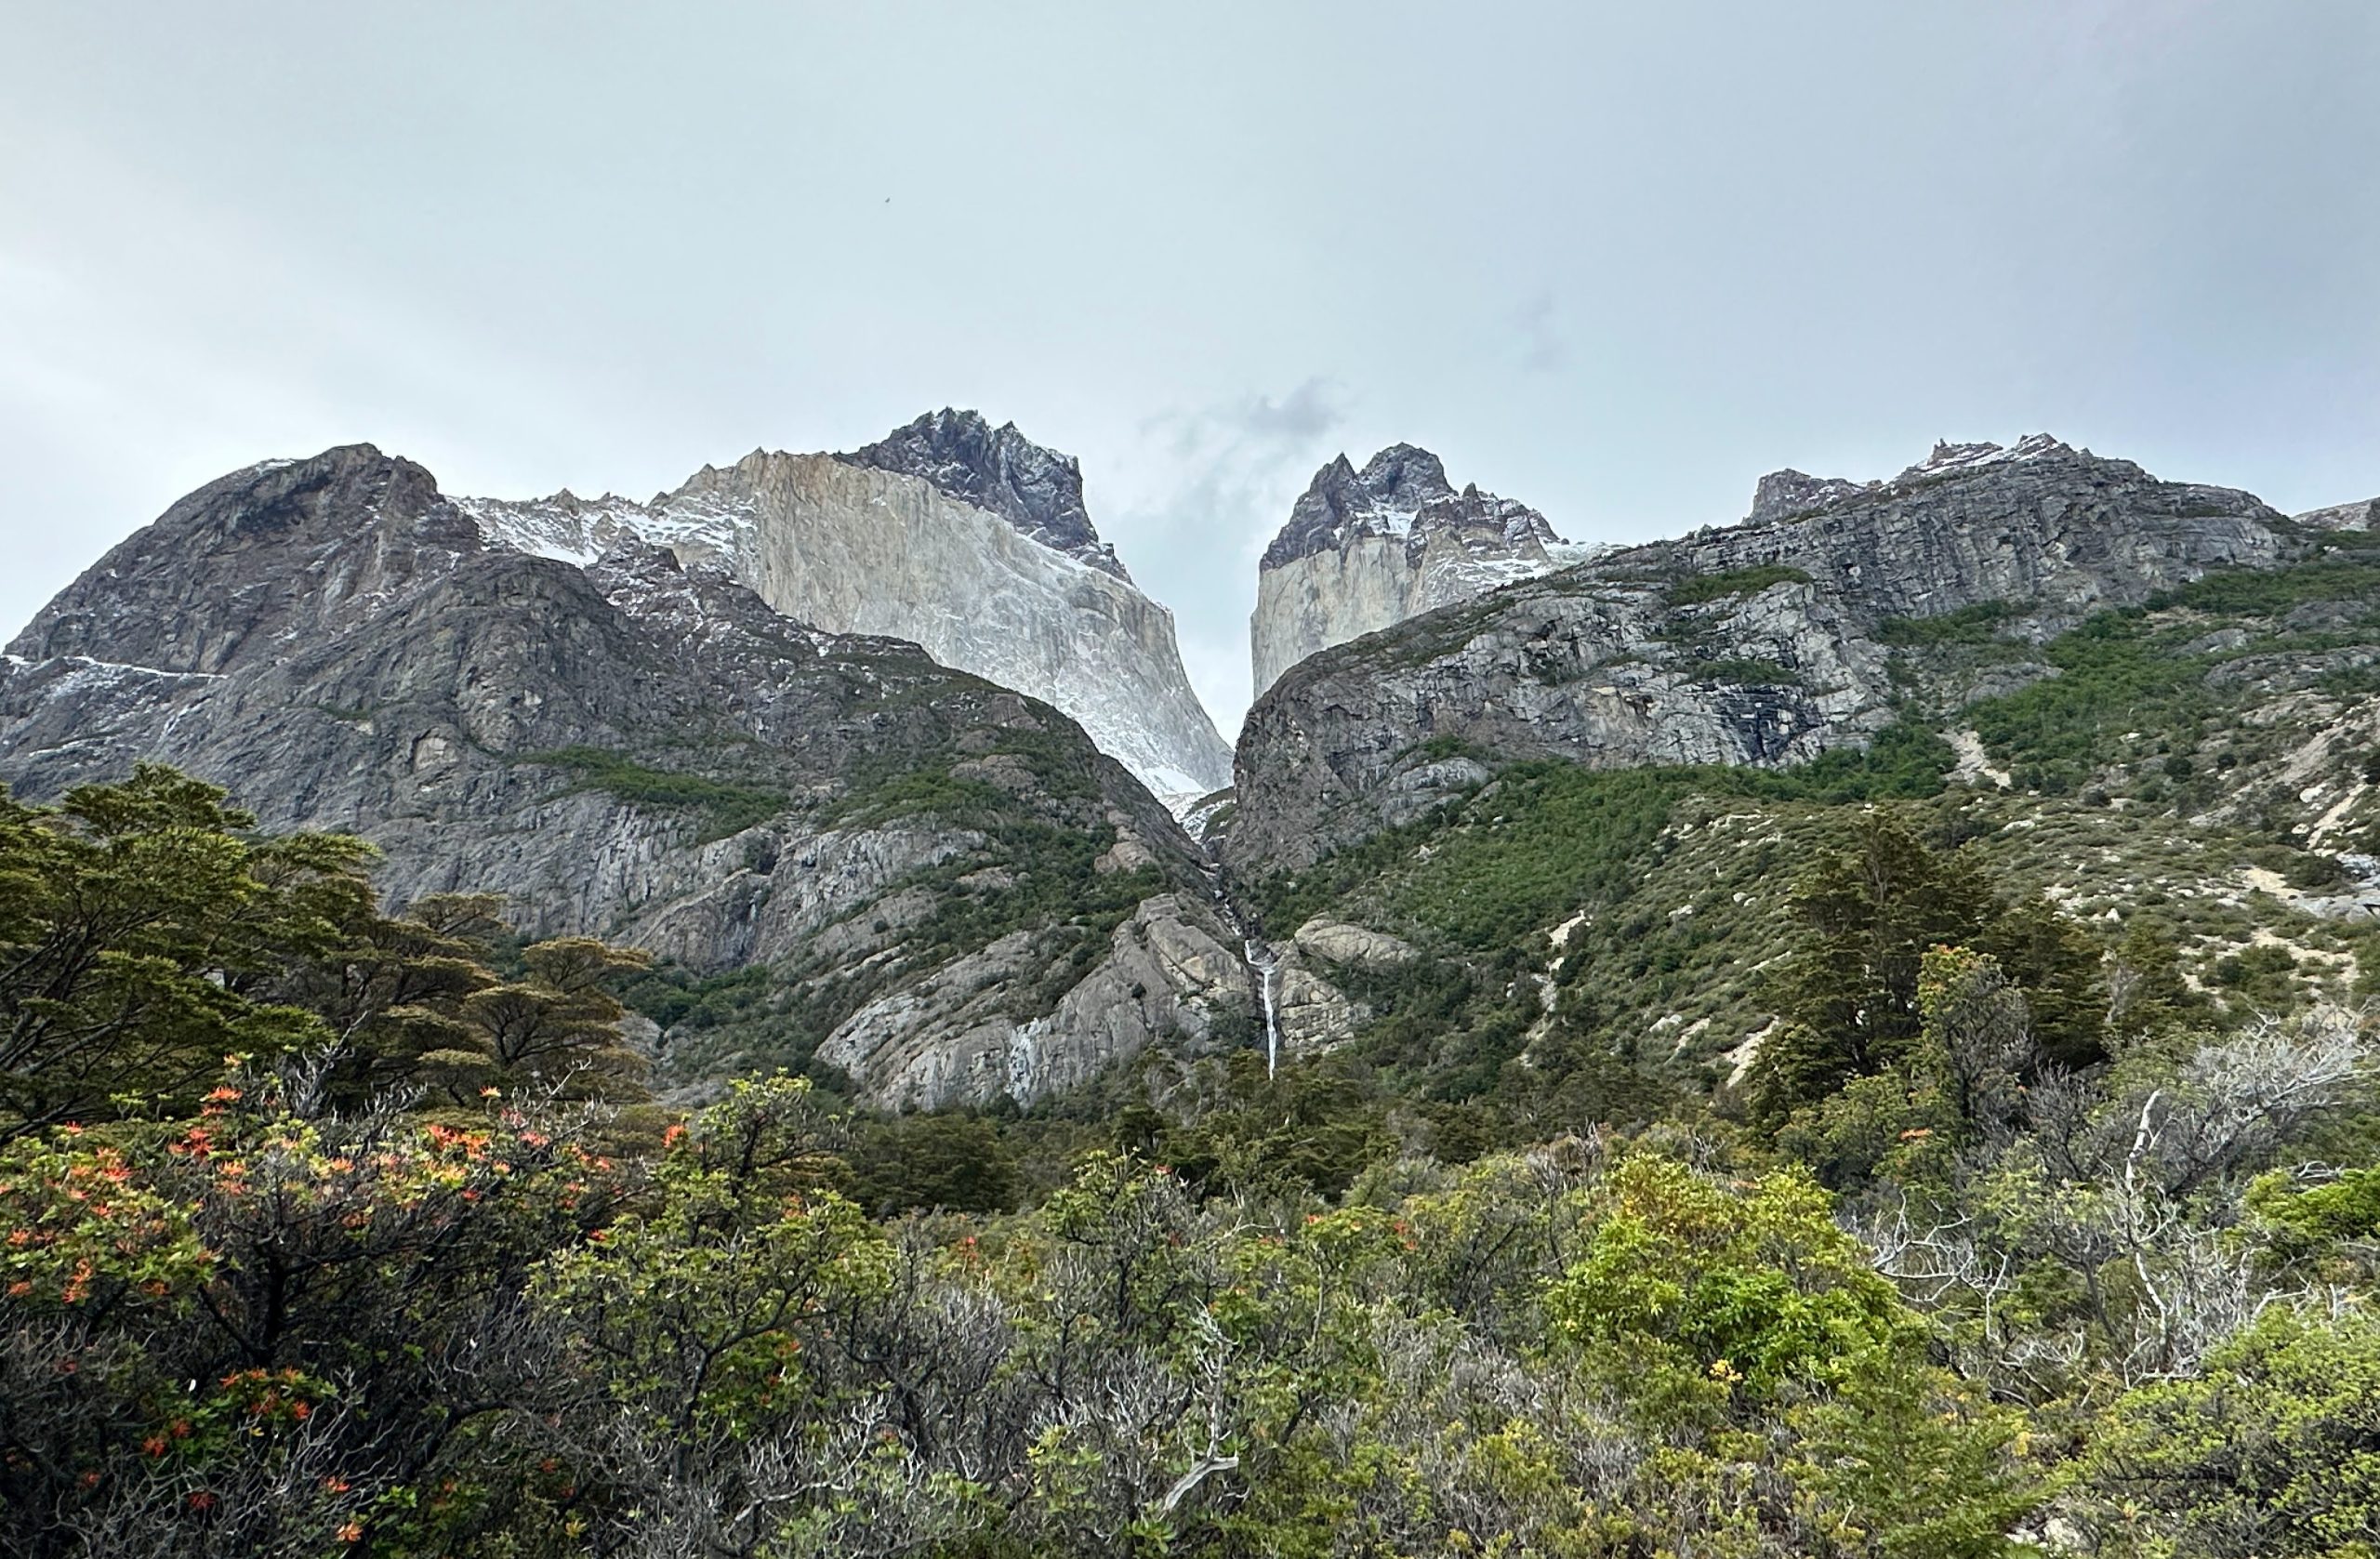
The first part of the ascent took us to French Glacier, which was entirely different from Grey but equally impressive. Rather than rising out of the water, the French Glacier was a frozen cascade coming down the mountain. It was a really striking view, and there were plenty of spots along the trail to stop and admire. Once we got to the official Mirador del Frances, we decided to take a break and enjoy our packed lunch. Here we also had the benefit of eavesdropping on an English-speaking tour guide to get a sense of the trail beyond that point.
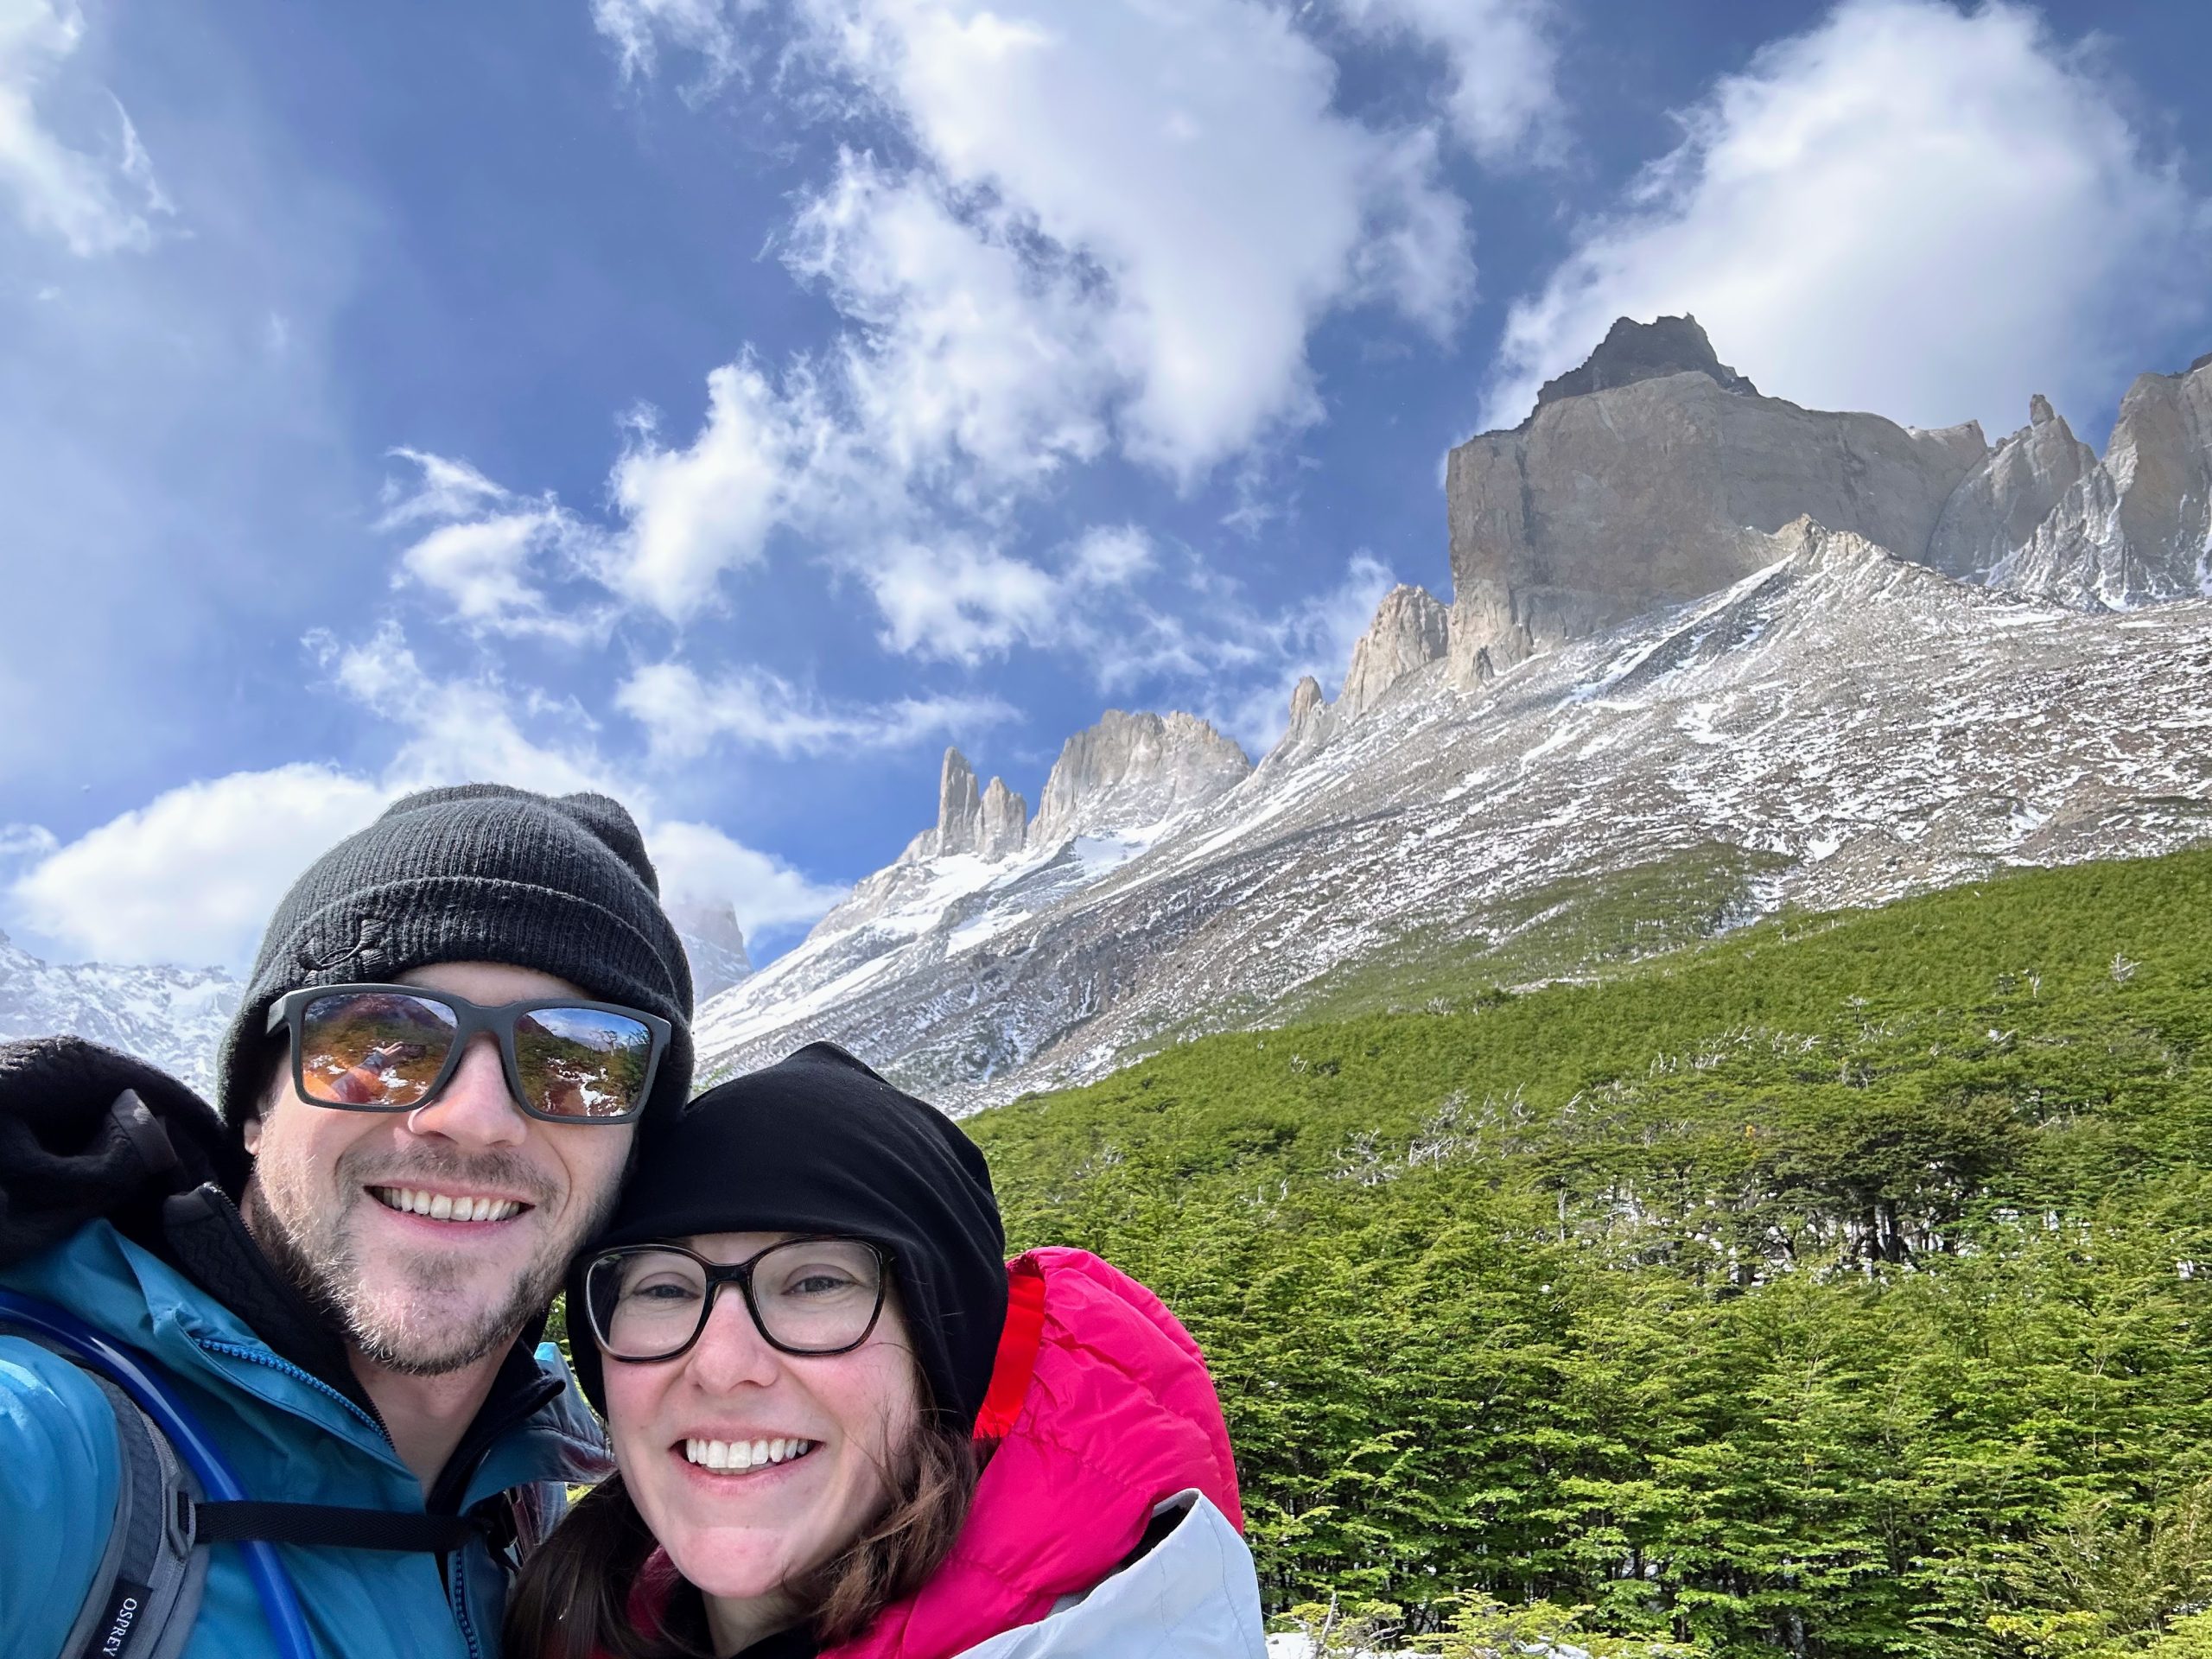
The path was definitely icy / snowy after the mirador, but the view at Britanico was worth it. After our lunch break, the trail started to get steeper, eventually leading to a clearing in which we were surrounded by mountains in a truly panoramic view. From there, the trail got even steeper. By the last stretch, we were on our hands to give us additional support (and to stop us from slipping). Finally, the terrain leveled out, and we had made it to the top.

There were a few large rocks that were perfect for taking a seat, relaxing, and enjoying the panoramic views. At first the cloud cover made it difficult to see all parts of the mountain range, but luckily the weather in the French Valley changes every 5-10 minutes. After a brief wait, we got the views we had come for, and they didn’t disappoint.
Heading back down from Britanico, we did more of a crawl than a hike. With how slippery the trail was, it felt safer to sit and scooch. Luckily, that stretch only lasted 10 minutes, and from there we were able to be on two feet again.
The rest of the way down to Italiano had its icy spots but was fine overall. We were pretty exhausted by the time we picked up our backpacks from the storage area, but we weren’t done yet. The stretch from Italiano to Los Cuernos refugio (our stop for the night) is about 5 km.
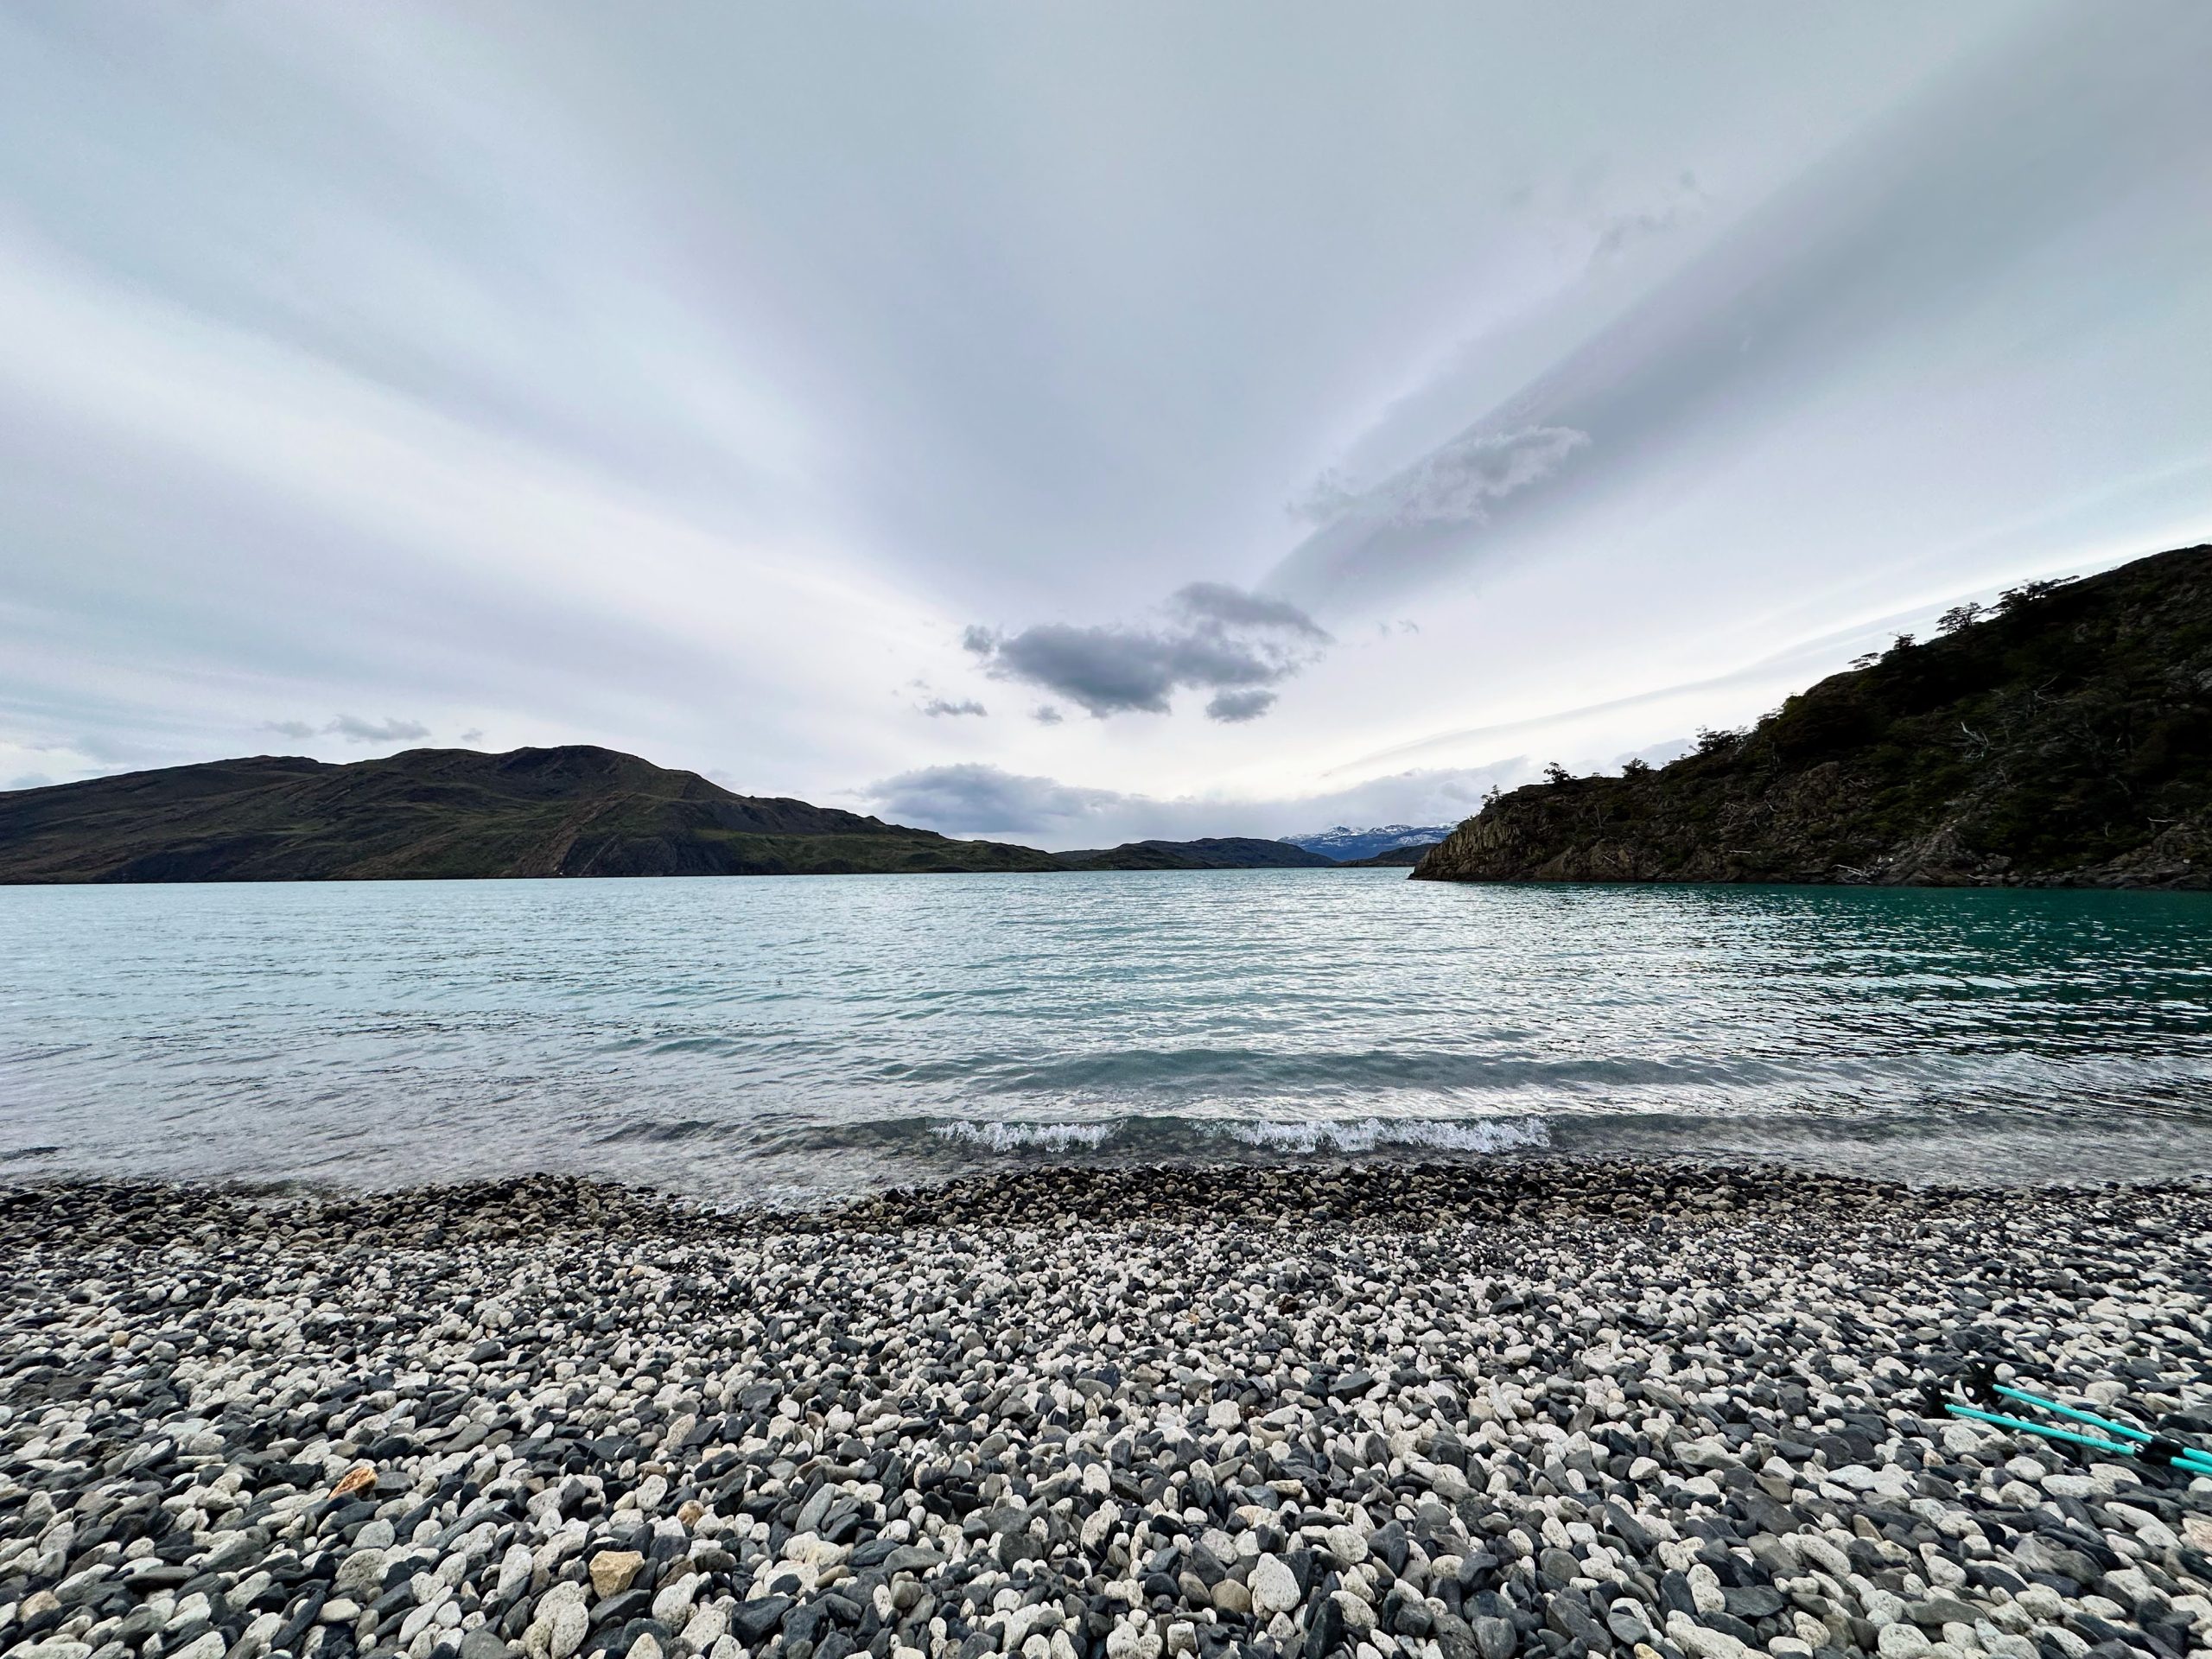
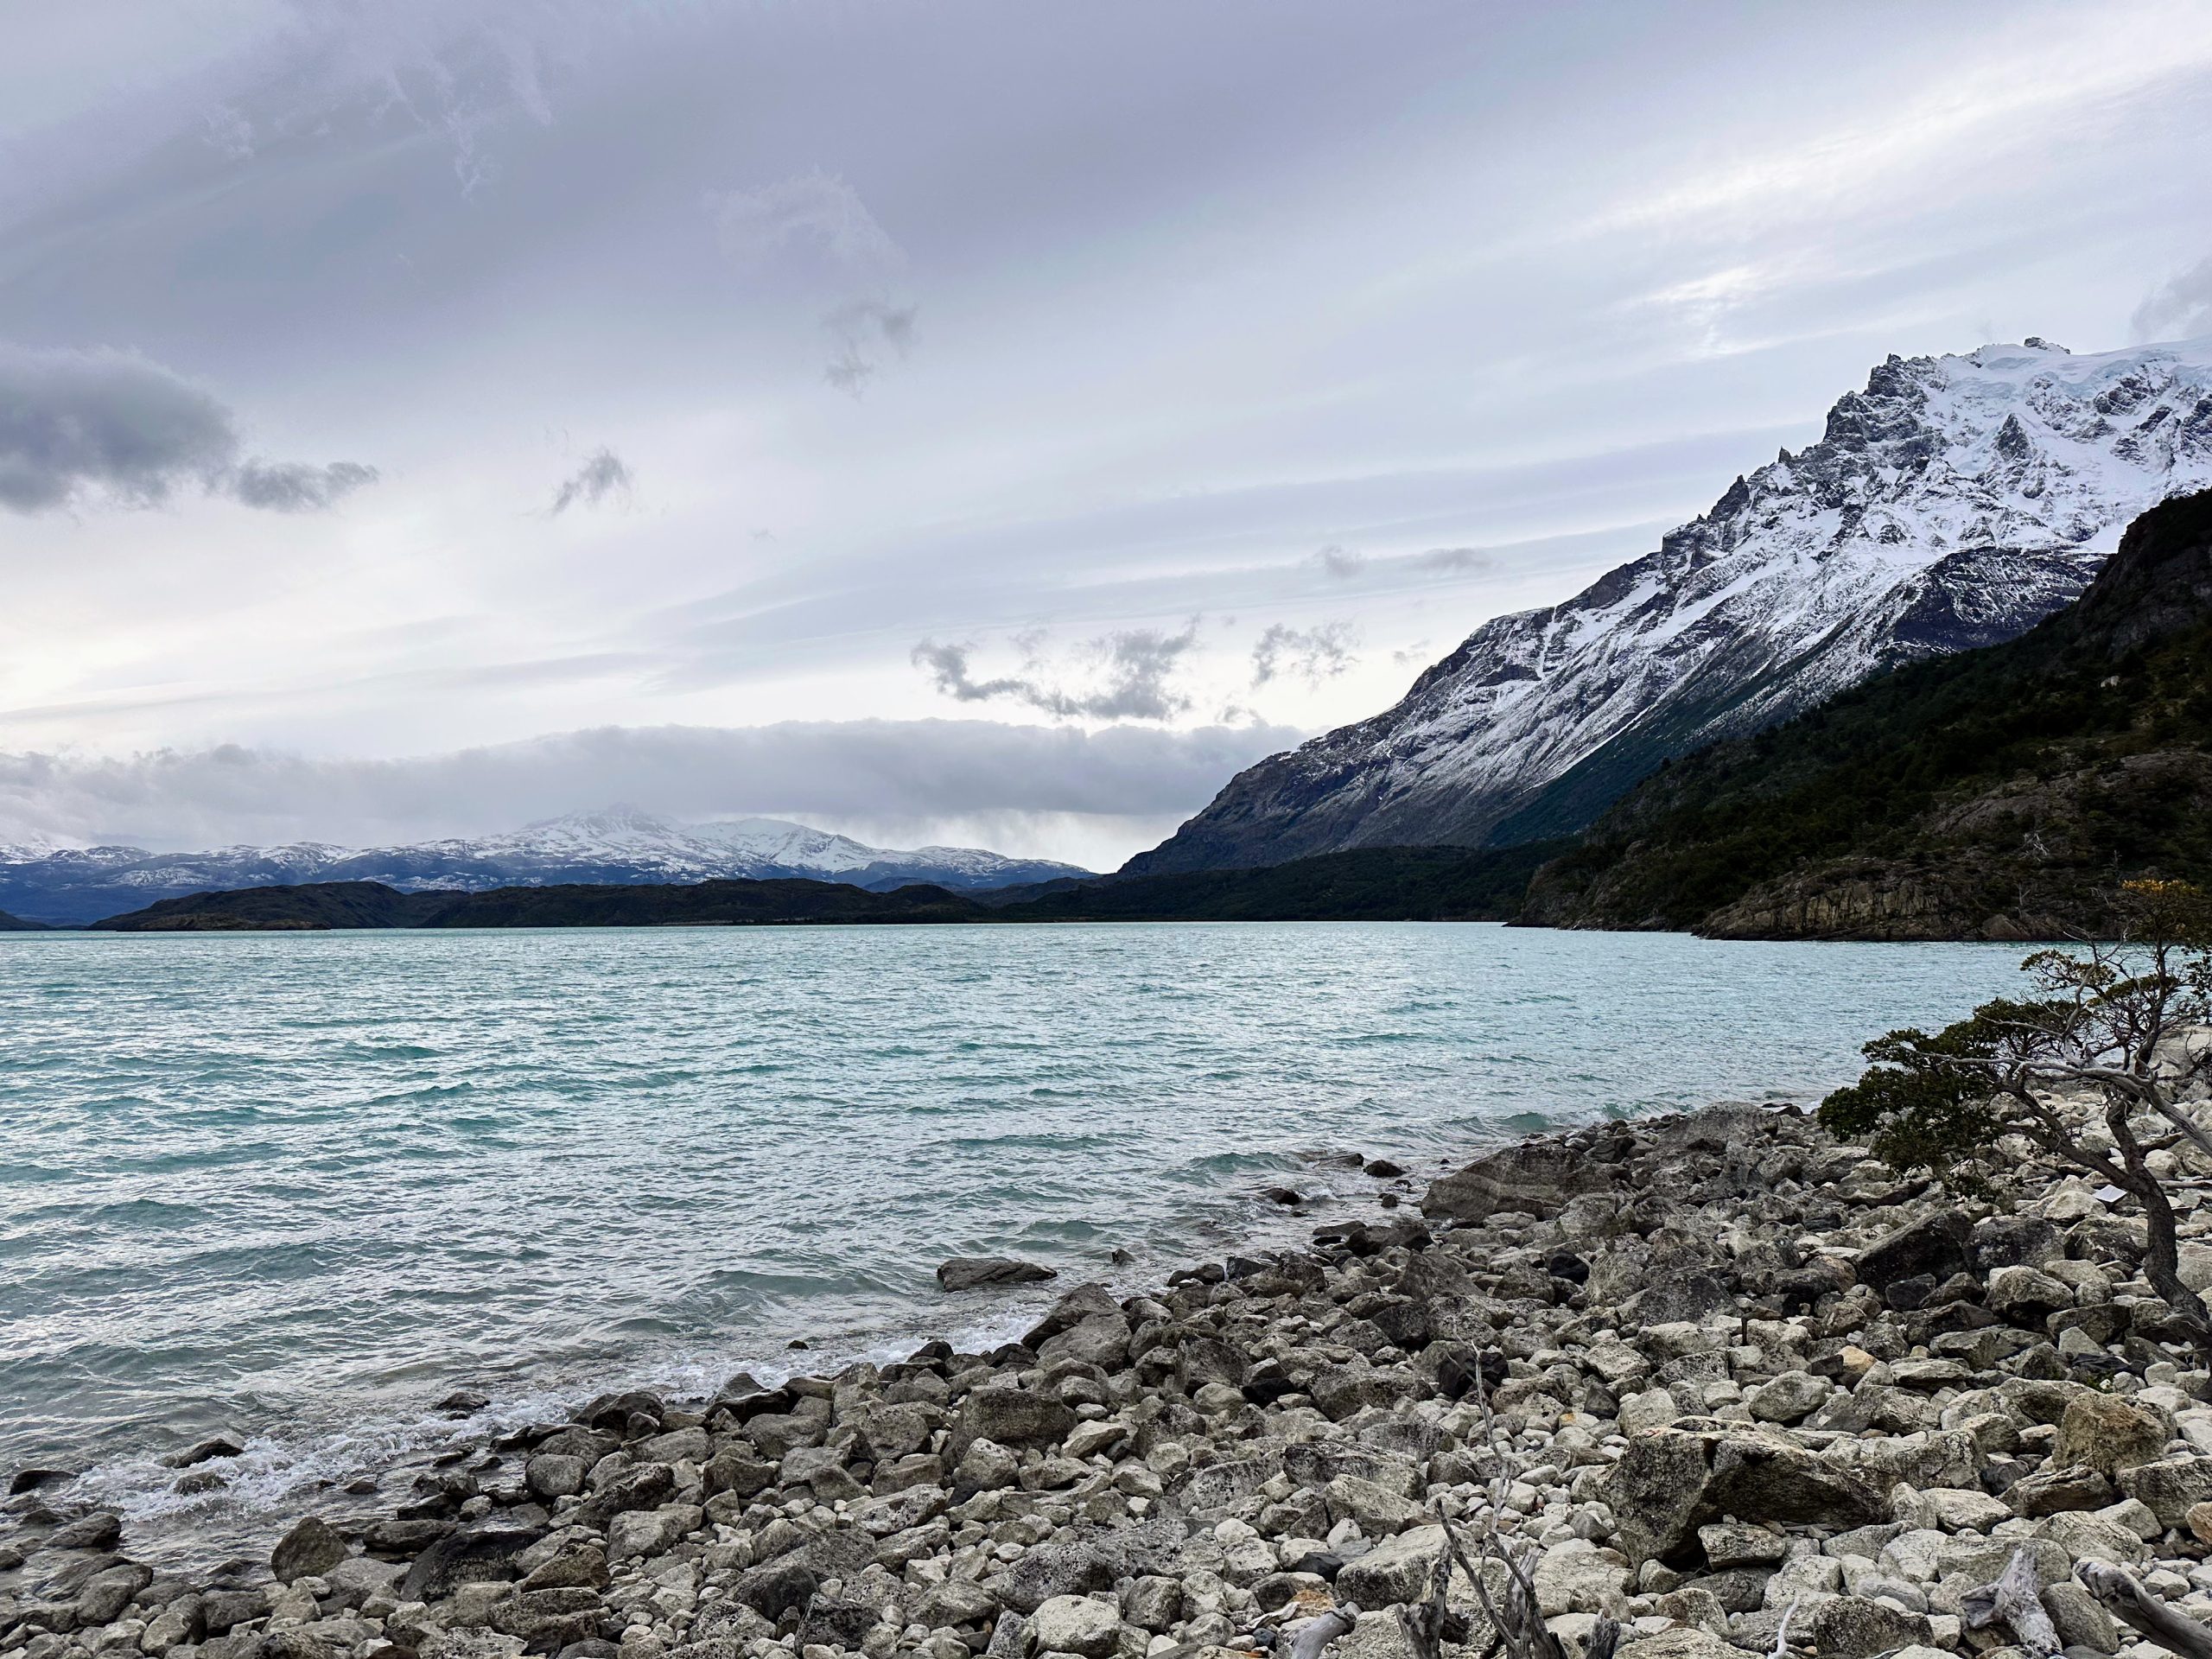
Luckily, this last part of the day’s trail was not too steep, and it turned out to be really beautiful. We actually had to walk along a pebble beach for part of it. The crystal clear water was freezing (as you might expect), but that didn’t stop another traveler from stripping down and running into the lake while we sat on the beach and shook our heads.
Finally, we made it to our refugio around 7:00 PM. To give ourselves a bit of a reward at this point in the trail, we had booked a private cabin rather than a shared room or campsite. It’s hard to imagine a more picturesque setting for a cabin, and it was really nice having that extra space and privacy. That said, it was way more expensive, and we still had to walk outside to a shared bathroom with no hot water. It was easy to warm back up with the wood-burning fireplace in our cabin, but don’t expect the typical amenities that would come with a room of that price tag.
The dinner at Cuernos was a pretty tasty spaghetti dish with a side salad. It wasn’t as filling as the dinners from Grey or Paine Grande, though, so we supplemented with some cookies we purchased before the trip. Then, it was off to bed for another early night. It just felt so good to be off our feet after the long day.
Day 4
Thankfully, after the ~30 km of Day 3, we had a (relatively) shorter 15 km hike on Day 4.
Breakfast this morning was different than at the other refugios, but it was still great and plenty filling. Rather than the buffet we came to expect, it was more of a sit-down breakfast with various plates brought to the table. Luckily, there was still hot chocolate and coffee available to keep us warm and ready for the day.
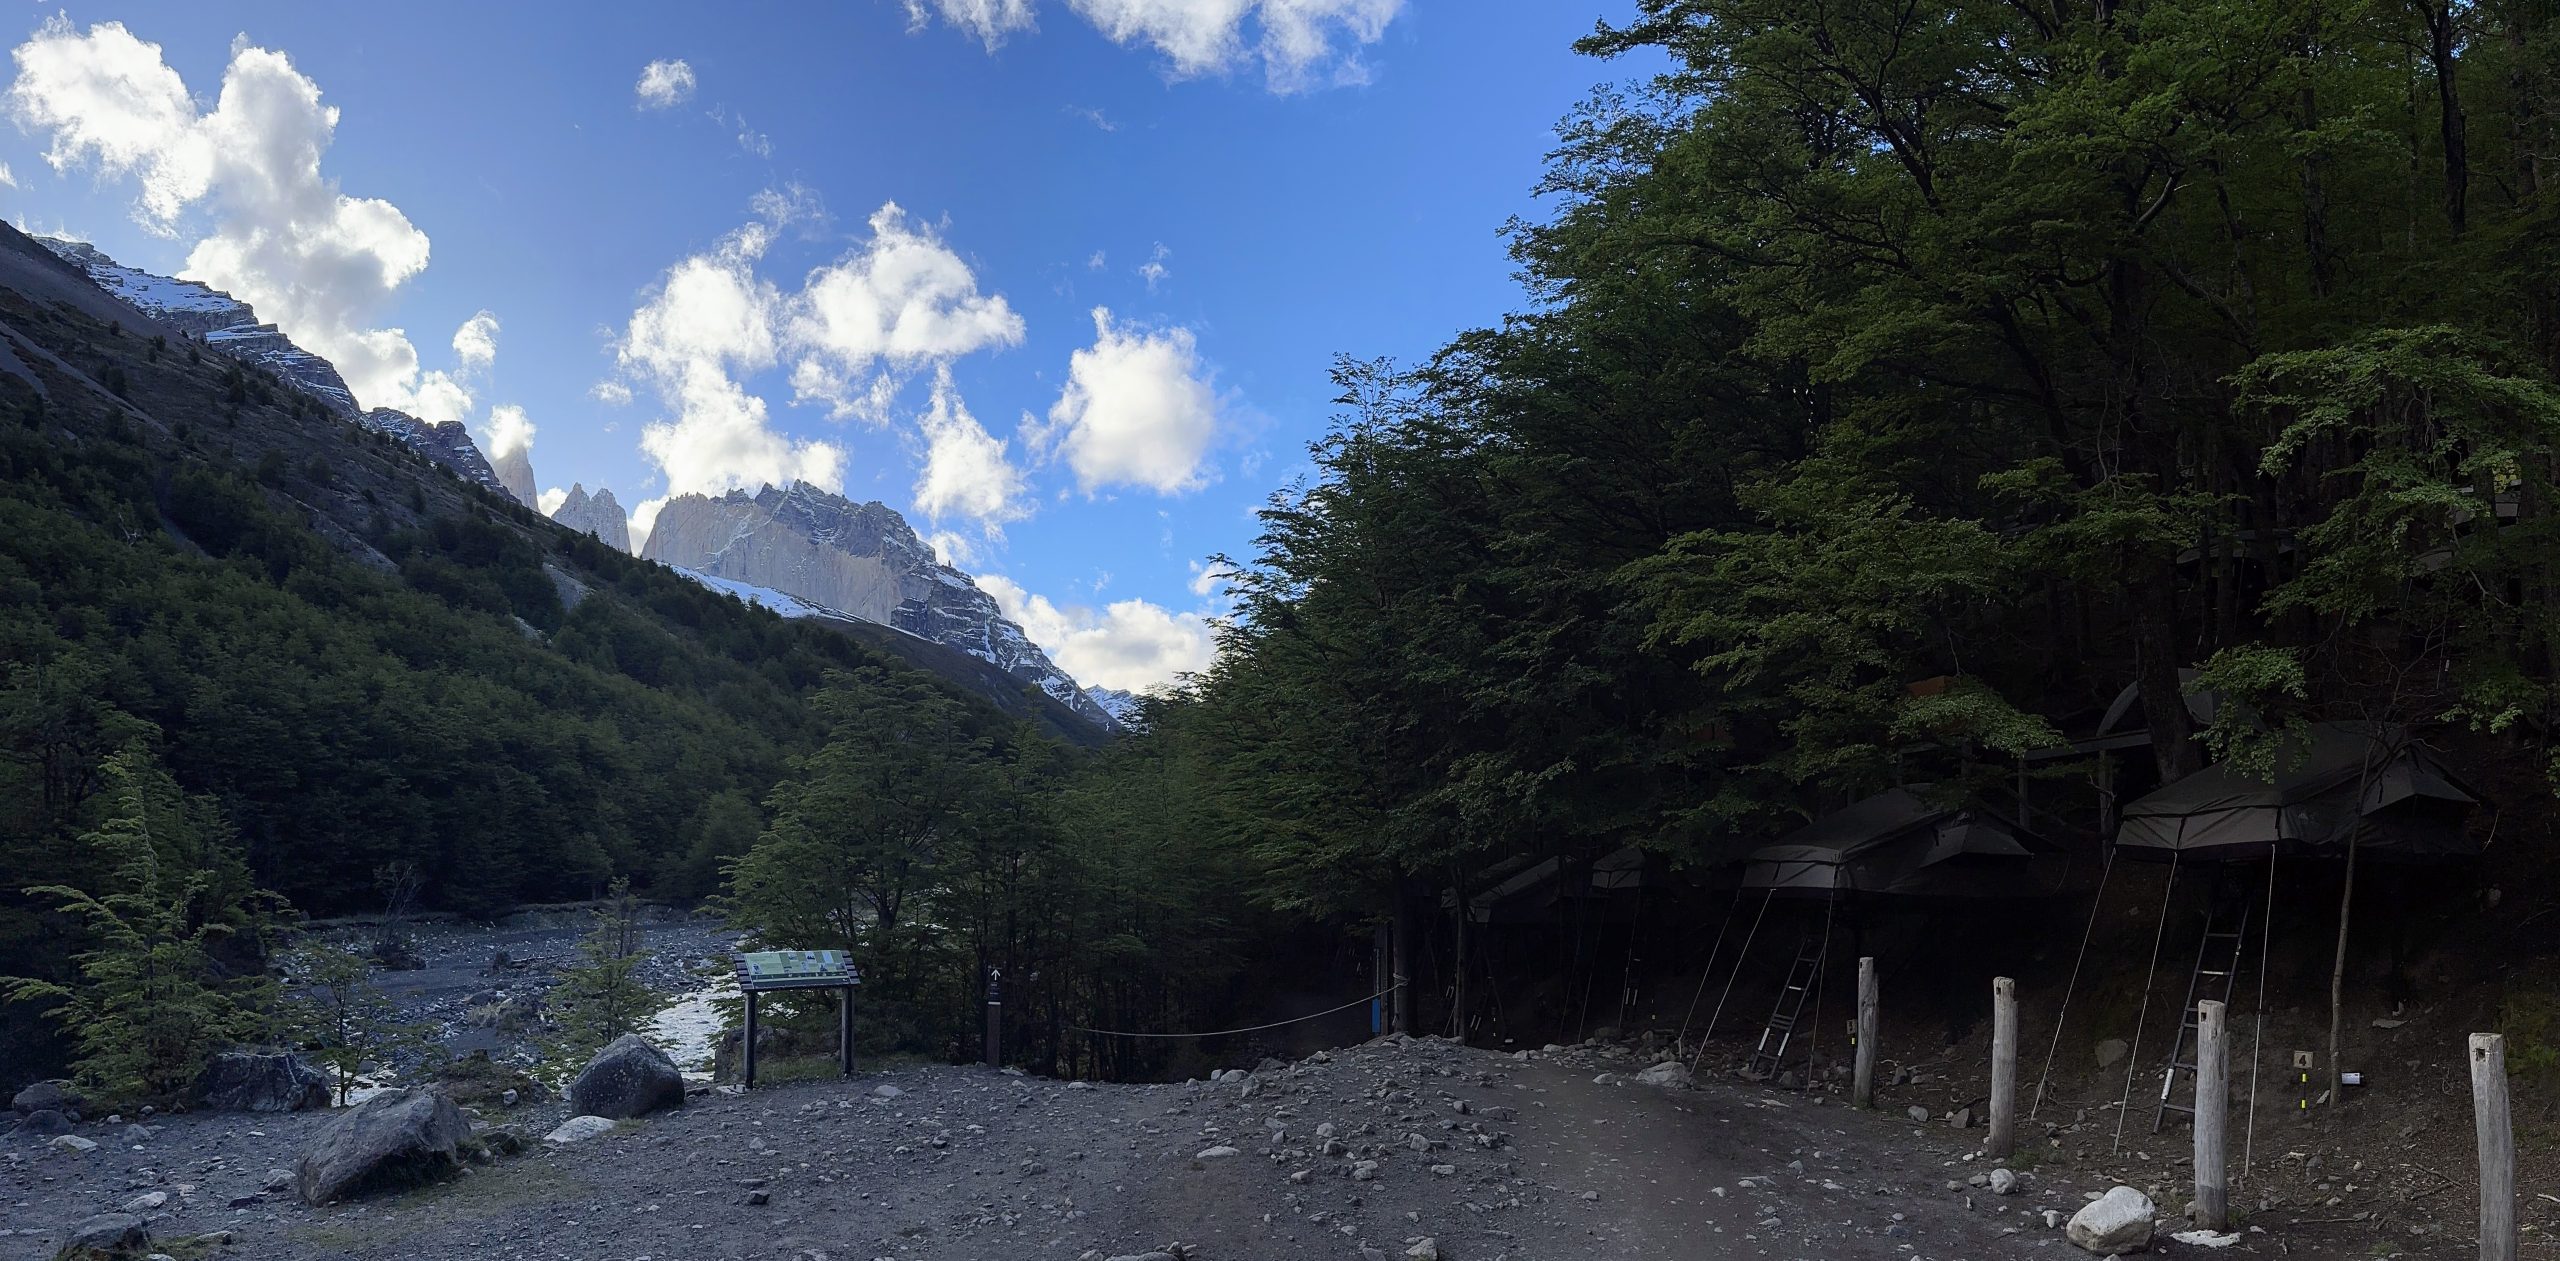
There are two paths to get from Los Cuernos to Chileno (our home for the night). The standard path along the W Trek goes towards the Las Torres hotel before turning left and hiking up to Chileno. The shorter path – which we decided to take – cuts across the W shape to take a more diagonal route directly to Chileno. While this decision saved us some time, it was an admittedly muddy path that was less maintained and required some trial and error to traverse. At one point we had to play The Floor is Lava with a flooded portion of the trail to avoid shin-deep water.
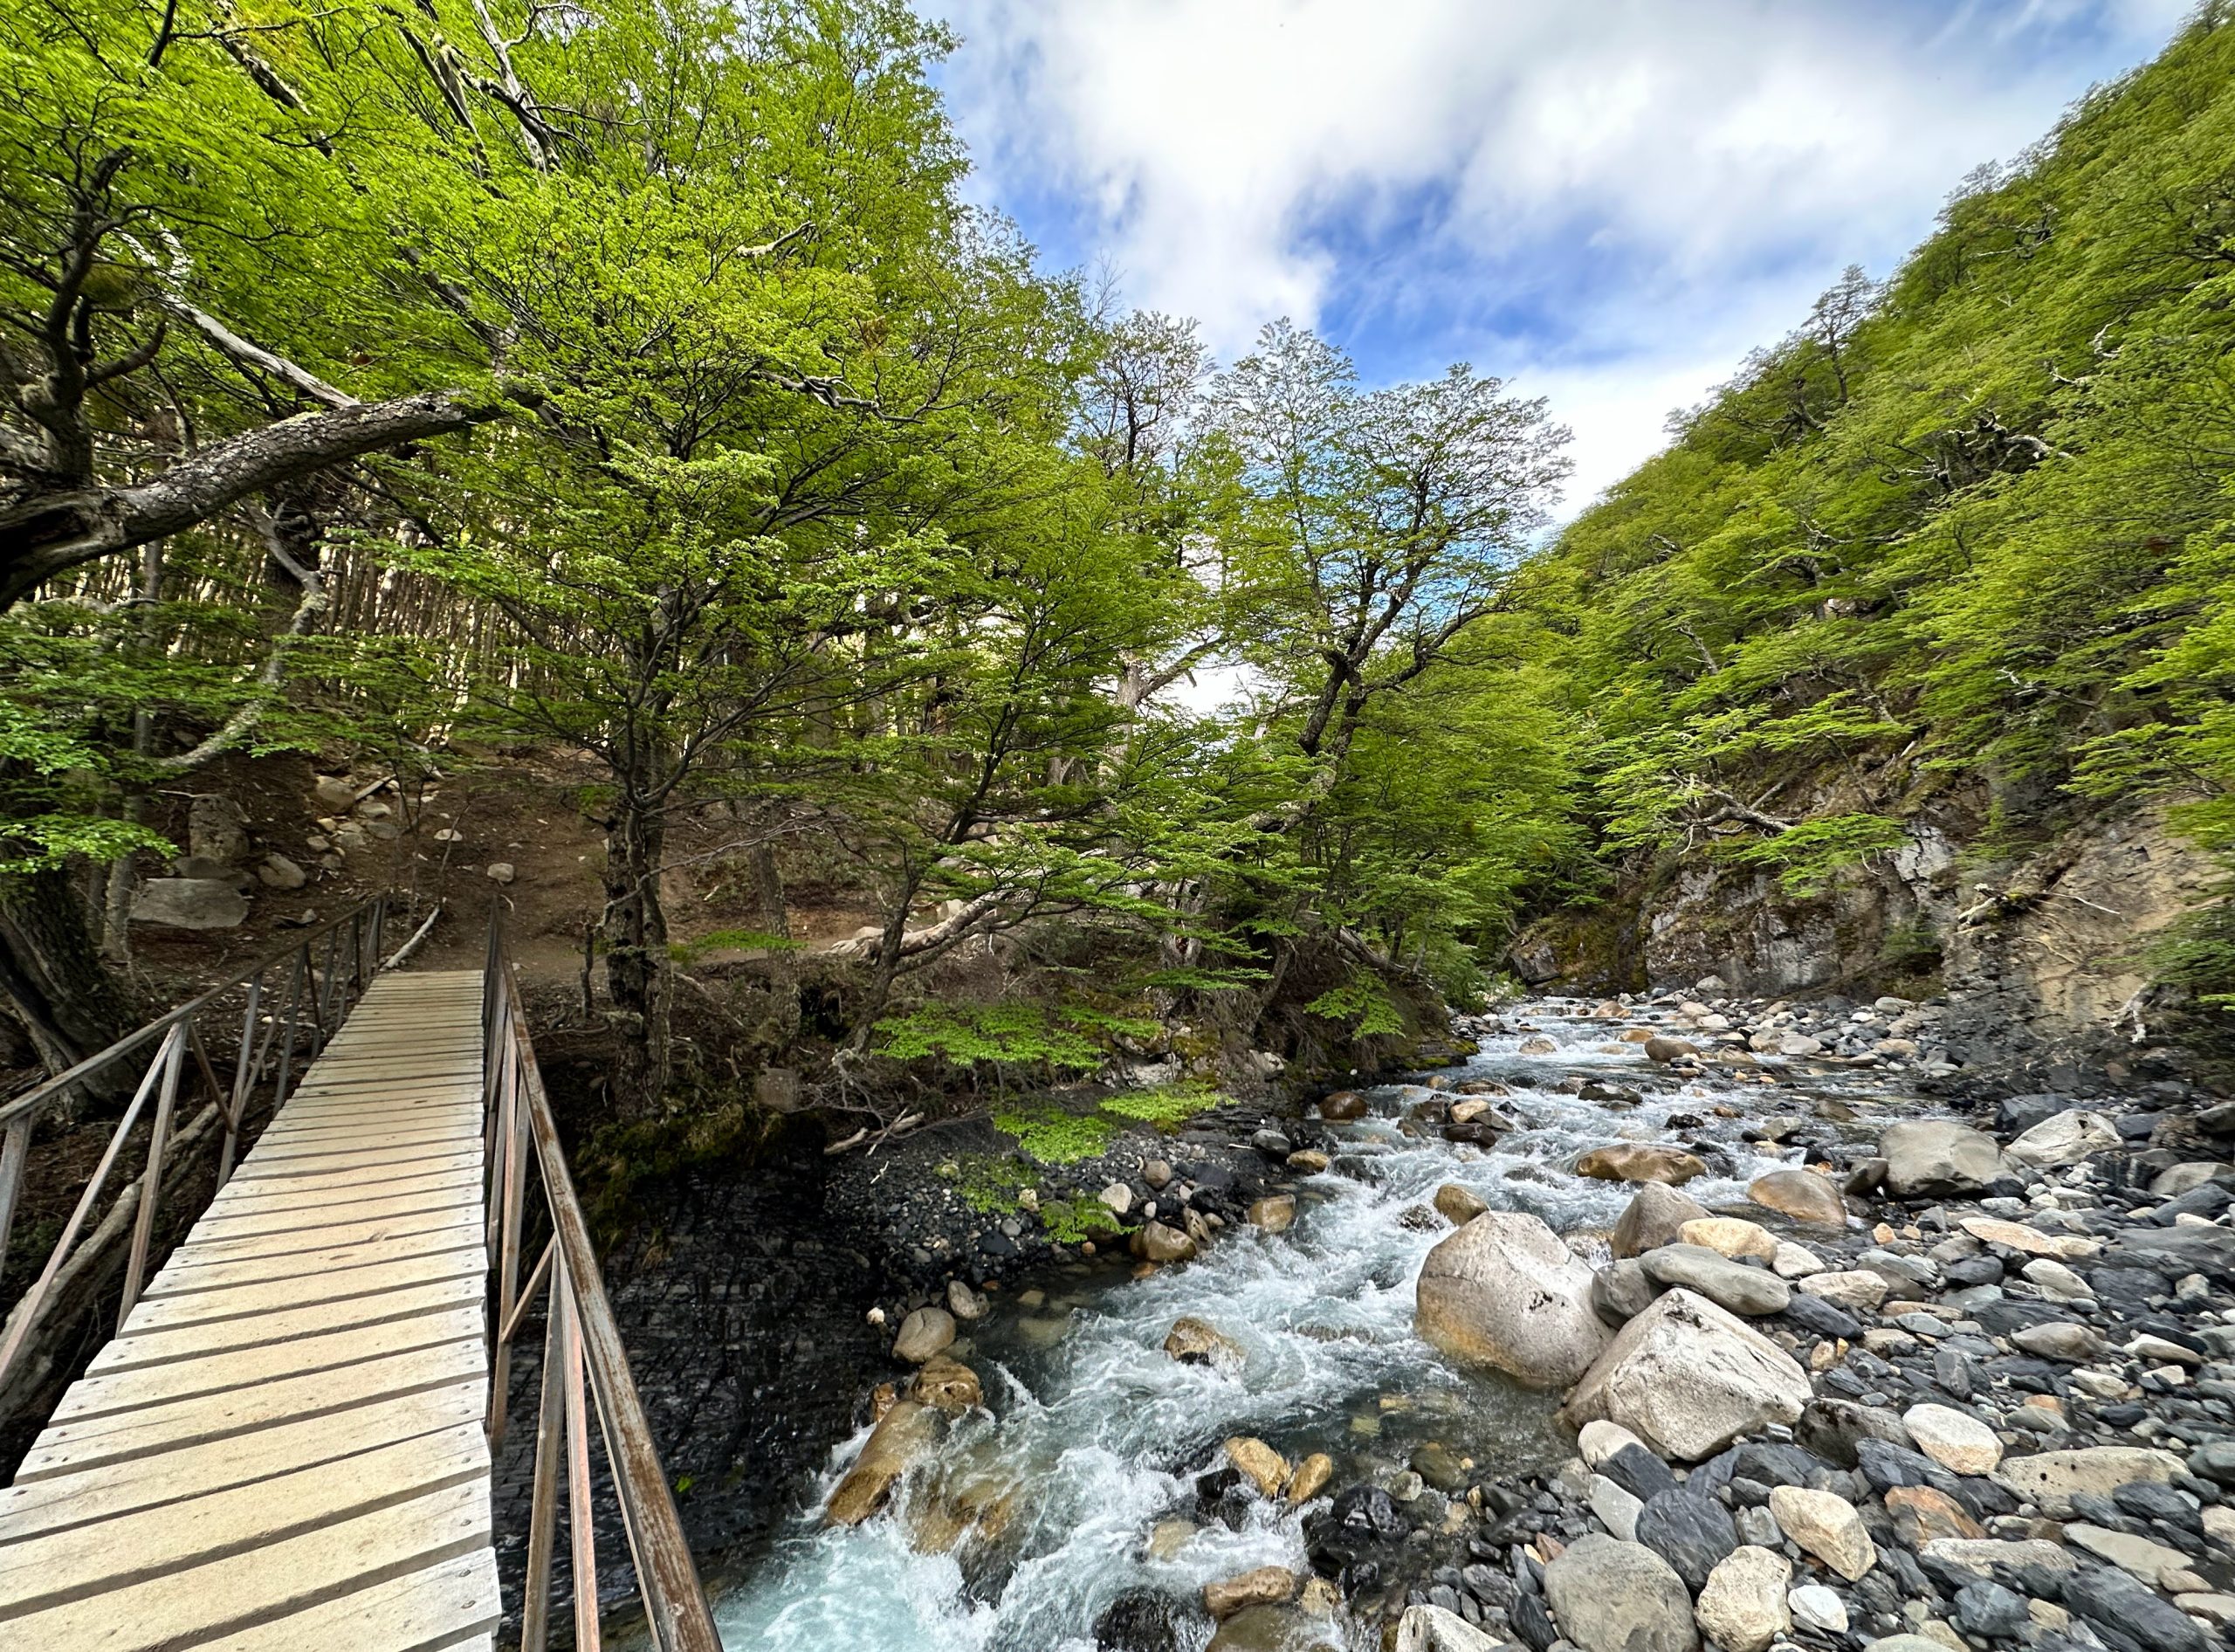
All of Torres del Paine National Park is beautiful, but there was less to see on Day 4. We found a nice spot with a lake view to stop for our sack lunch, but generally speaking the most scenic part was the final stretch to Chileno. This portion of the trail hugs the mountain side and takes you through a gorge all the way to the refugio.
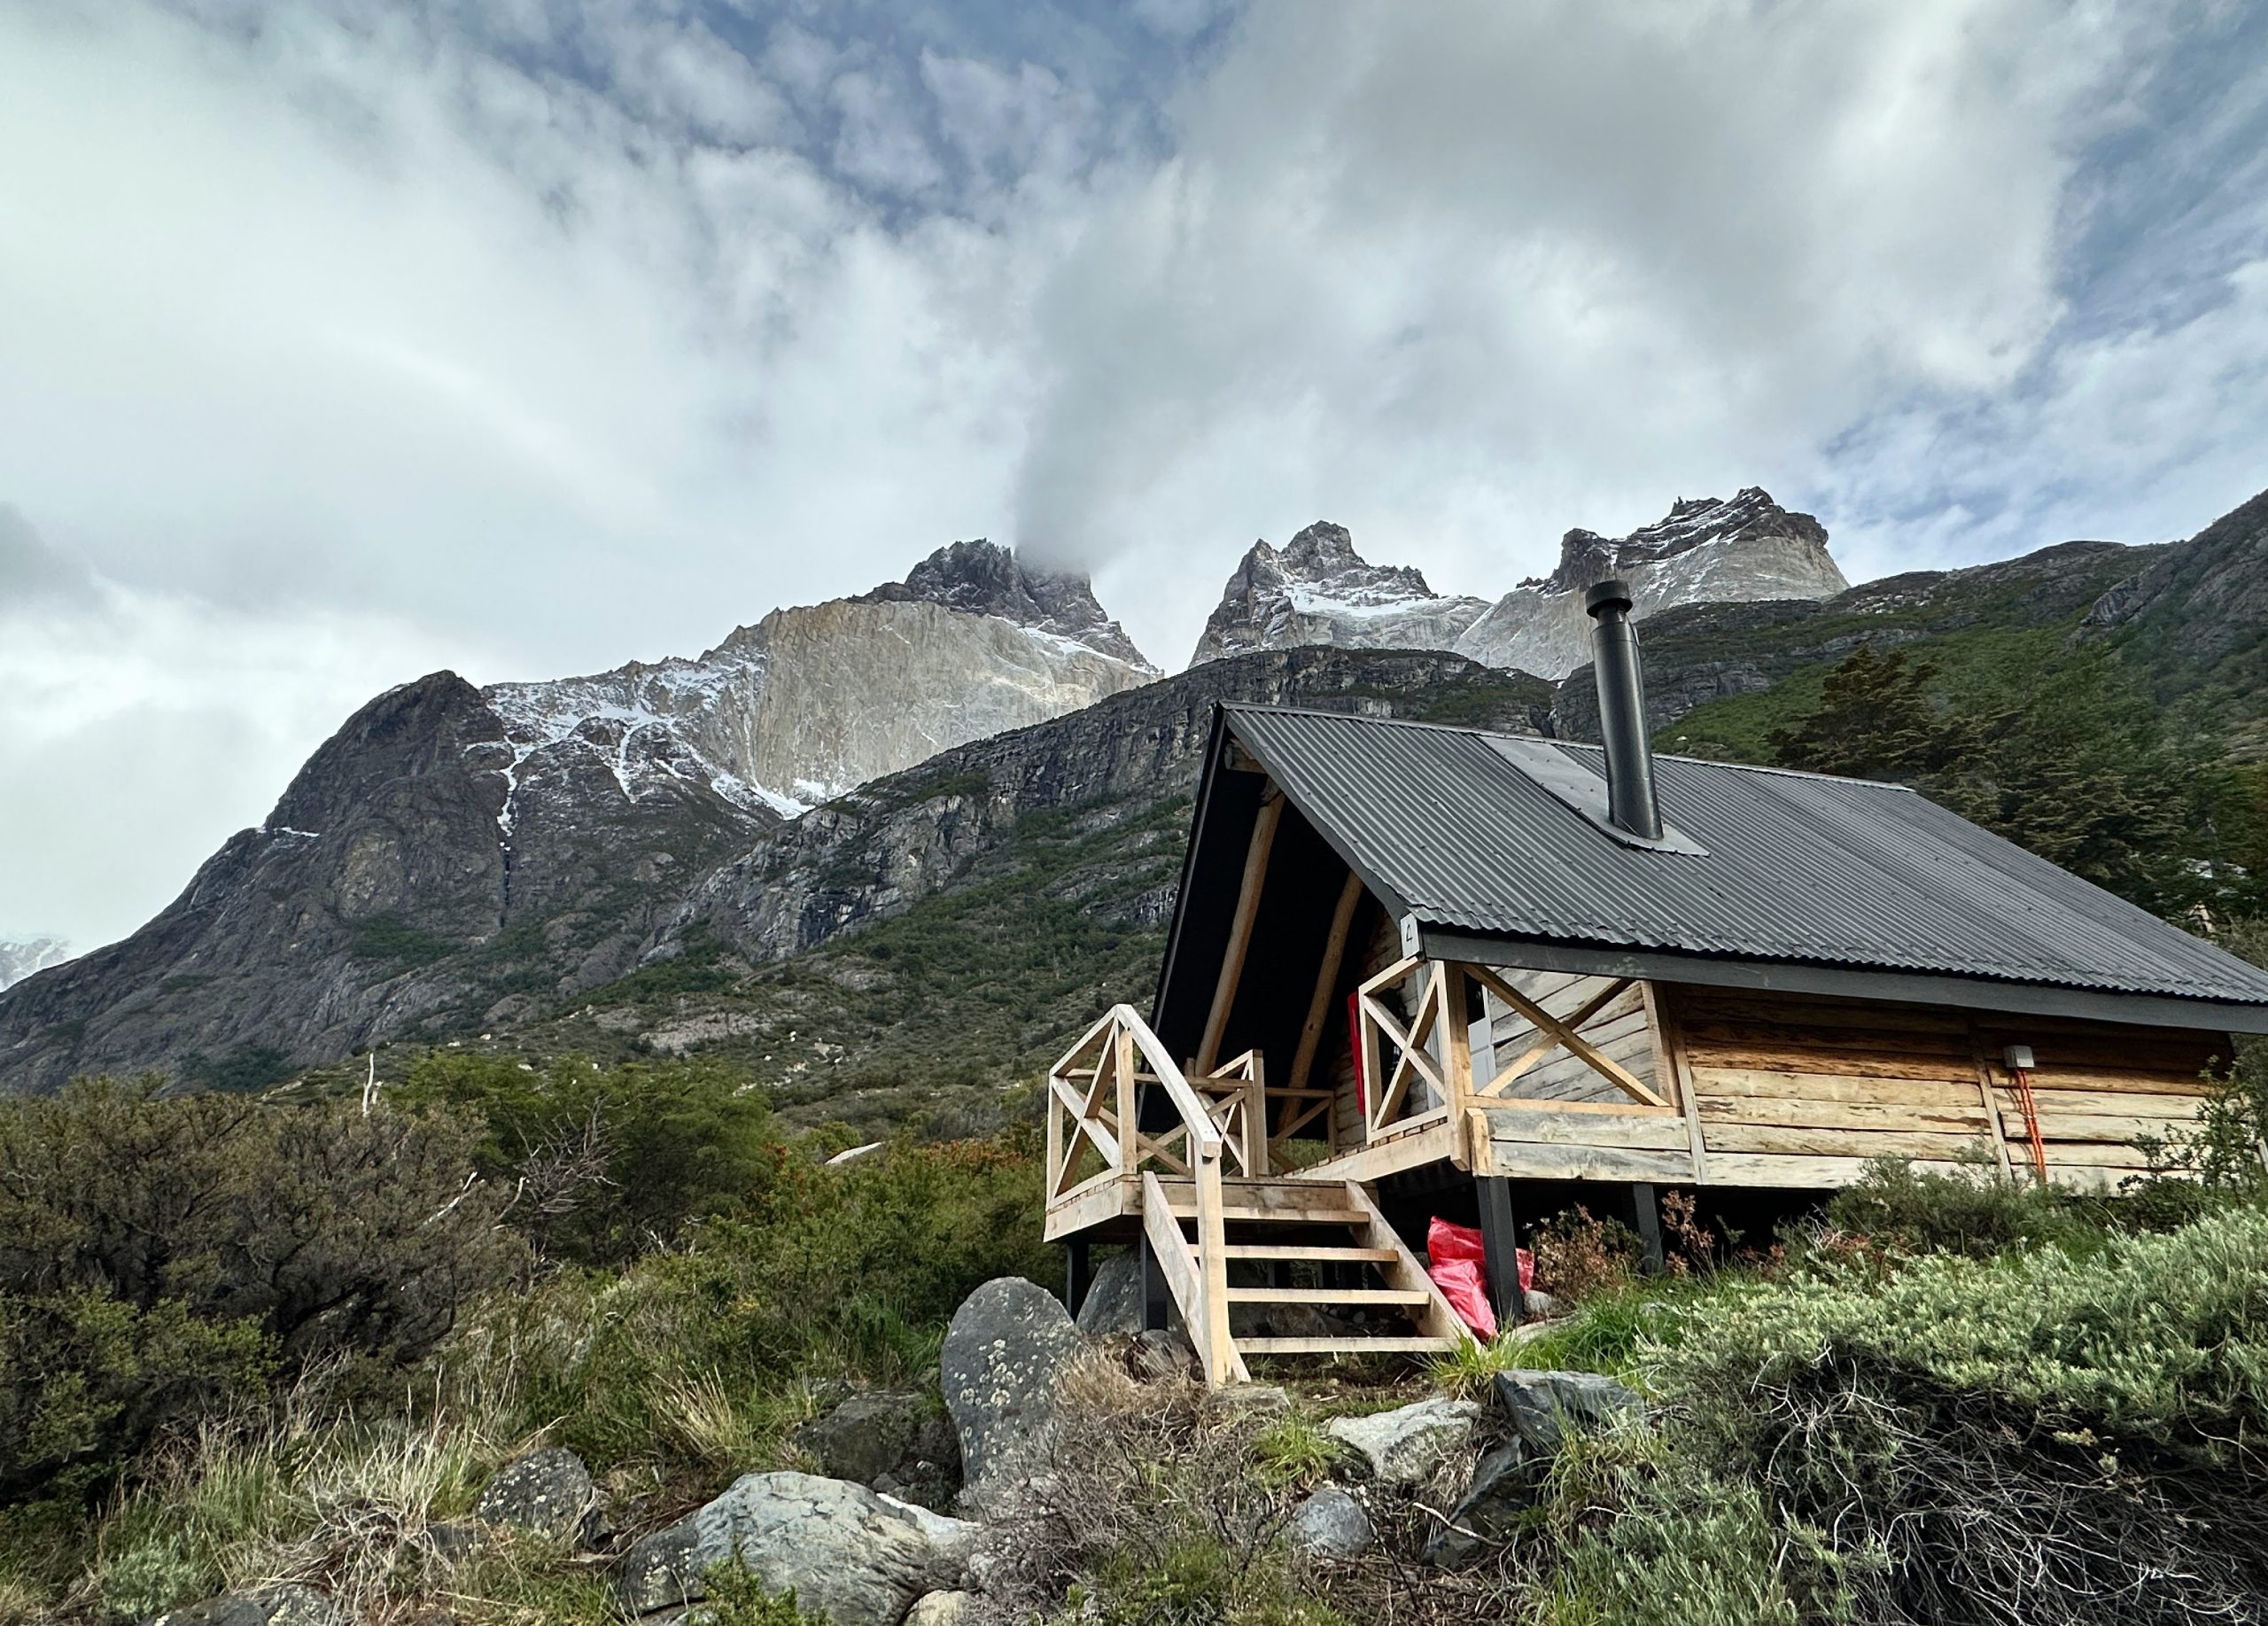
Because of the shorter distance, we made it to Chileno around 2:30pm. It was honestly really nice getting to check in early and relax for a bit before dinner – especially because we were camping this night and needed some time to get situated in our tent (Chileno doesn’t have beds or cabins). Luckily, we reserved the full-service camping with a pre-pitched and pre-prepared tent situated on a raised platform about five feet off the ground. It was honestly pretty comfortable with a cushioned bottom and high quality sleeping bags, and it was not too far from the building and shared restrooms (with actually hot showers!). Our reservation also came with a welcome drink, so we each enjoyed a beer, set up shop in the shared dining area, and watched We Have a Ghost on our phone.
For dinner, we had another sit-down meal with various courses brought to the table. Chileno is a much smaller refugio, so the dining area was a bit tight. We had plenty of opportunity / no choice but to get to know our several other dinner dates. The food was solid though (chicken with polenta and vegetables), so it was a good experience overall.
What Chileno lacks in beds and space, it makes up for in location. It is by far the closest you can stay to the Las Torres viewpoint. Given that we planned to hike to Las Torres for sunrise the next morning, this tradeoff was absolutely worth it for us. We went to bed extra early to prepare for our 3:00 AM start.
Day 5
Time for the sunrise hike! We woke up exhausted, but that’s nothing the cold morning air didn’t fix. After quickly getting ready and packing our things, we dropped our packs at the storage area and set out on the hike.
Wooded mountains at 3:00 AM are exactly as dark as you’d expect. Without our head lamps, we would have had no idea where we were going. With those though and minimal traffic on the trail, we were able to make great time.
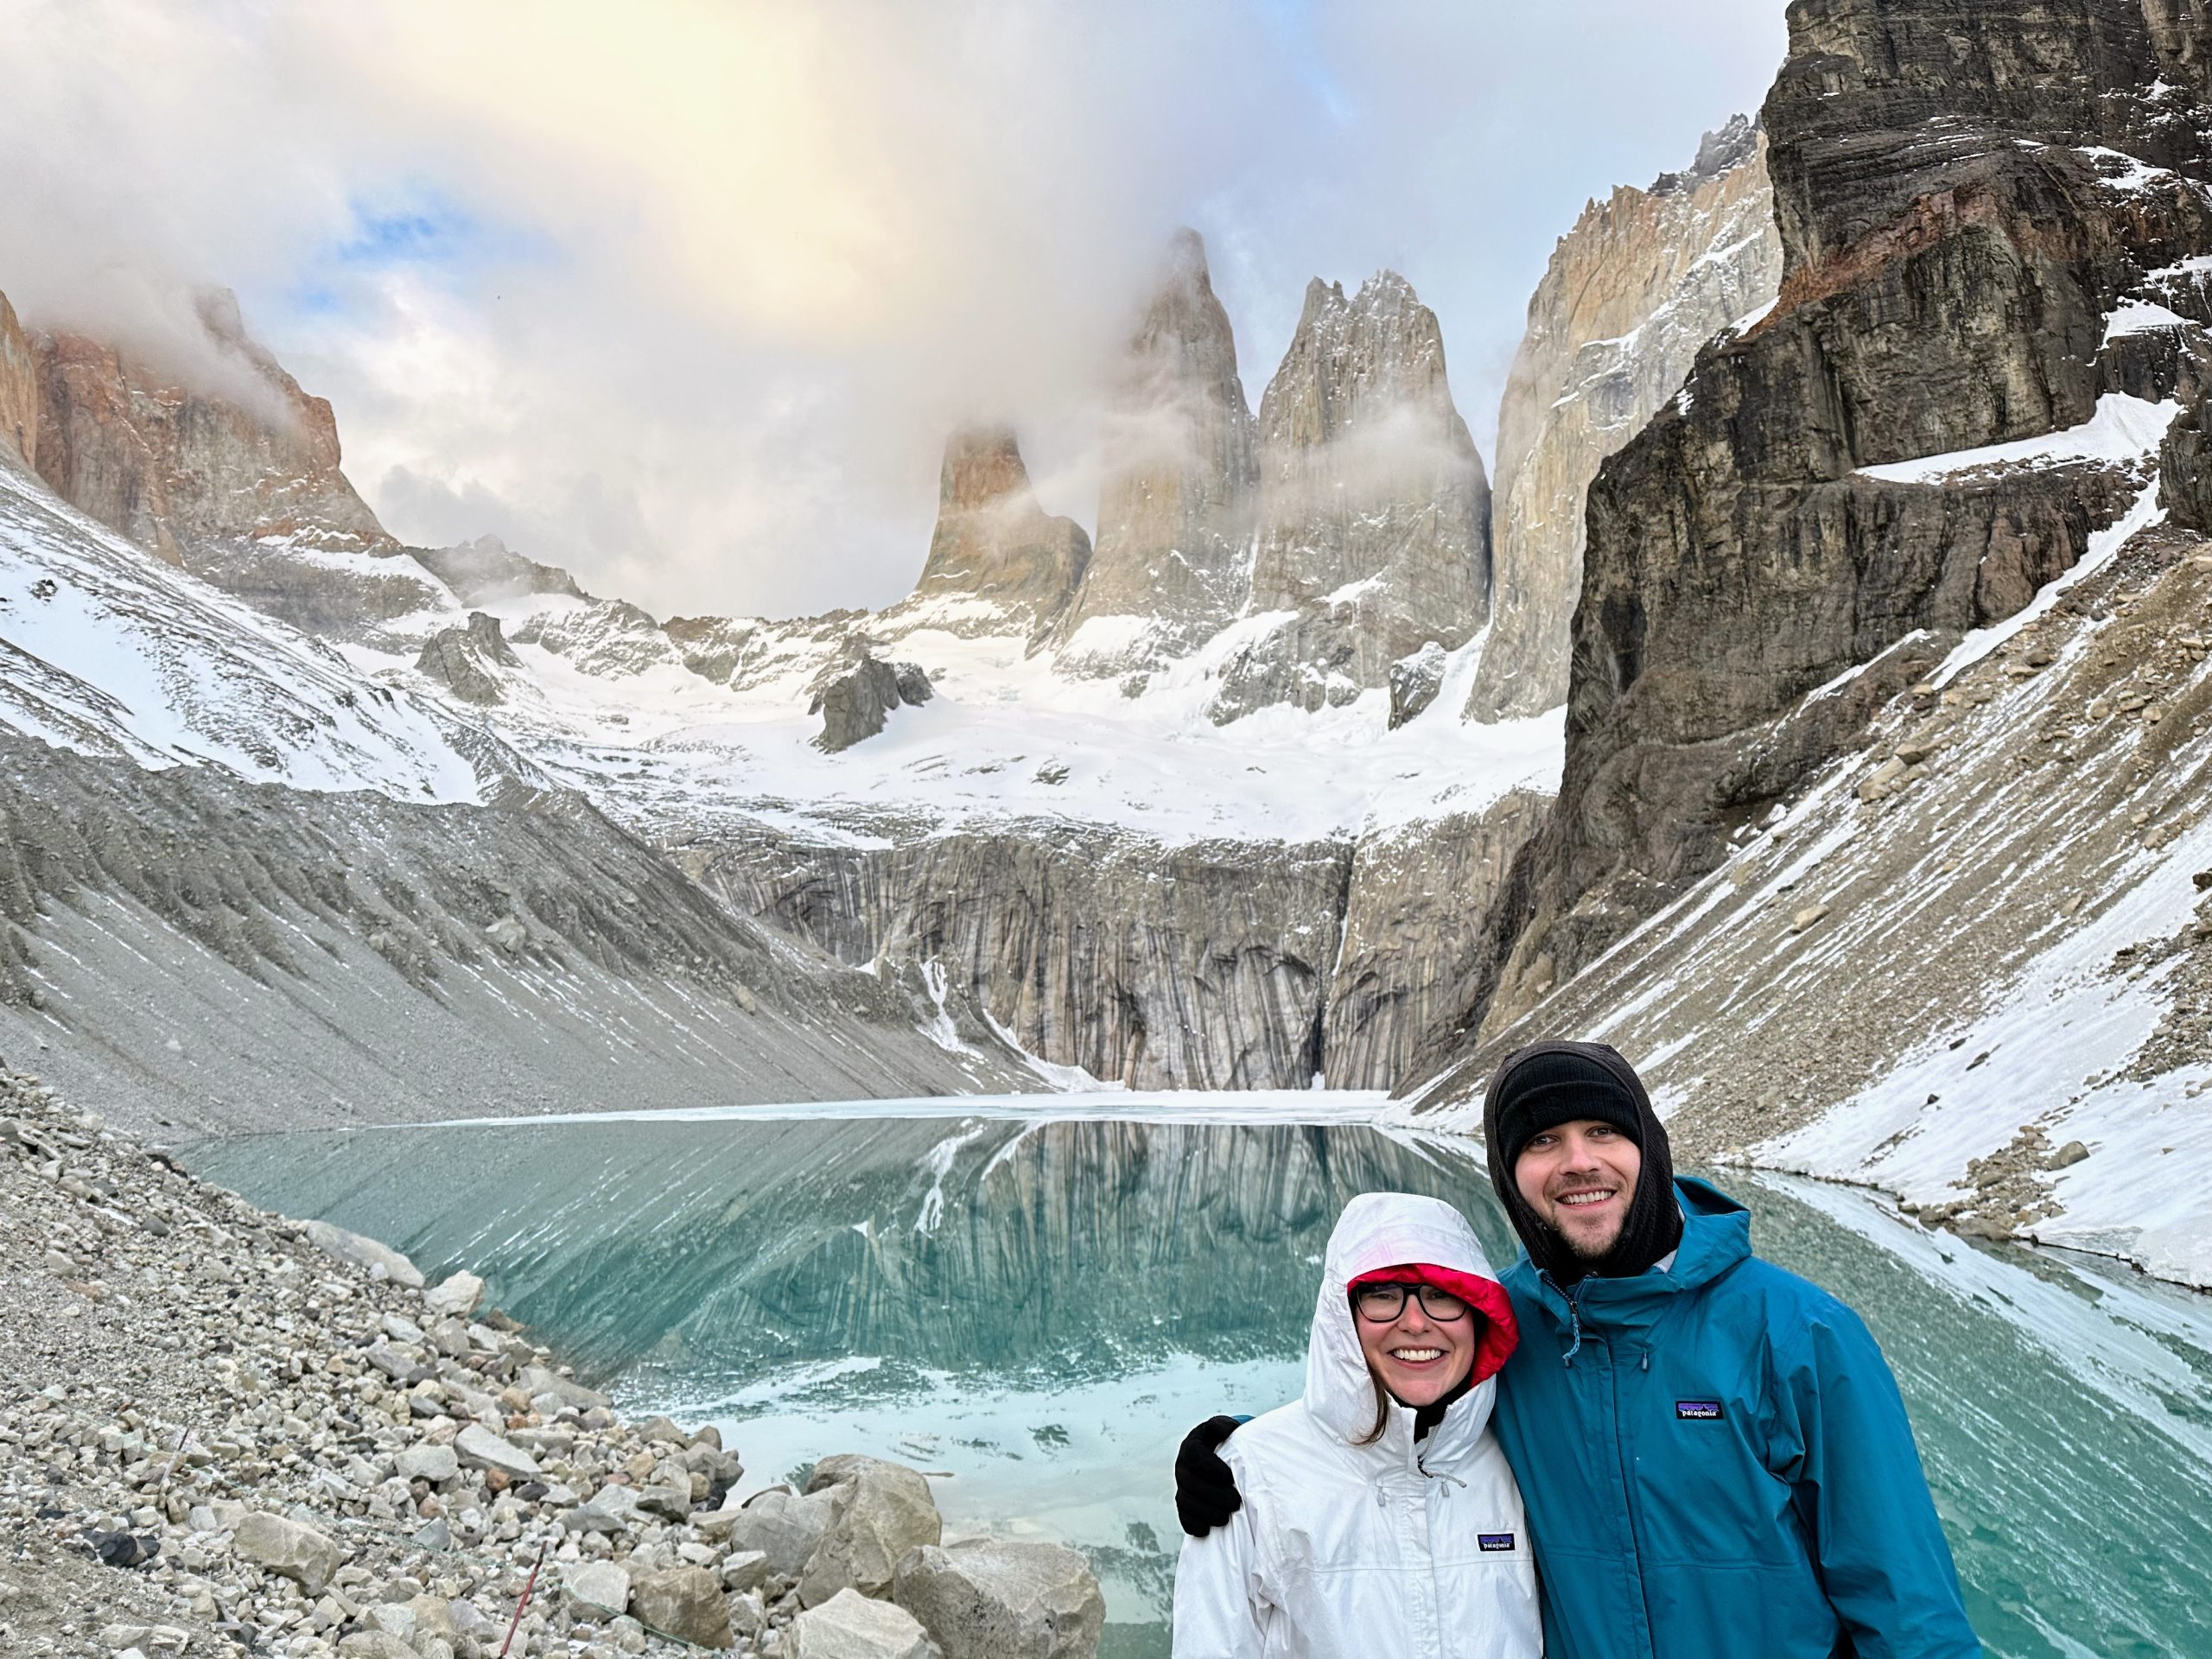
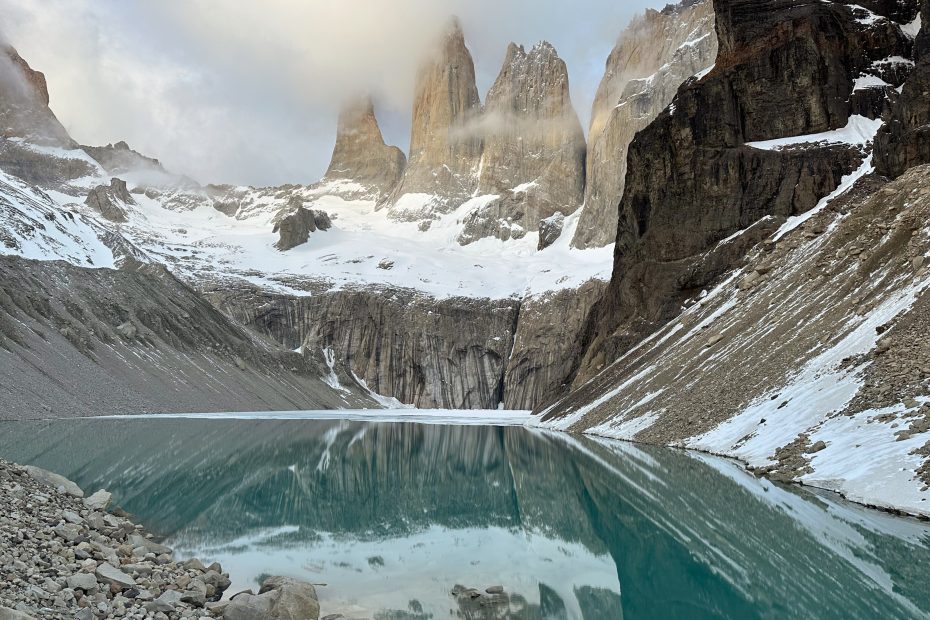
It is only 4.5 km from Chileno to Las Torres. The beginning of the trail is a nice, gradual uphill climb. The end, though, gets really steep and rocky. That kind of incline and terrain, paired with the darkness, makes taking your time and watching your step absolutely necessary.
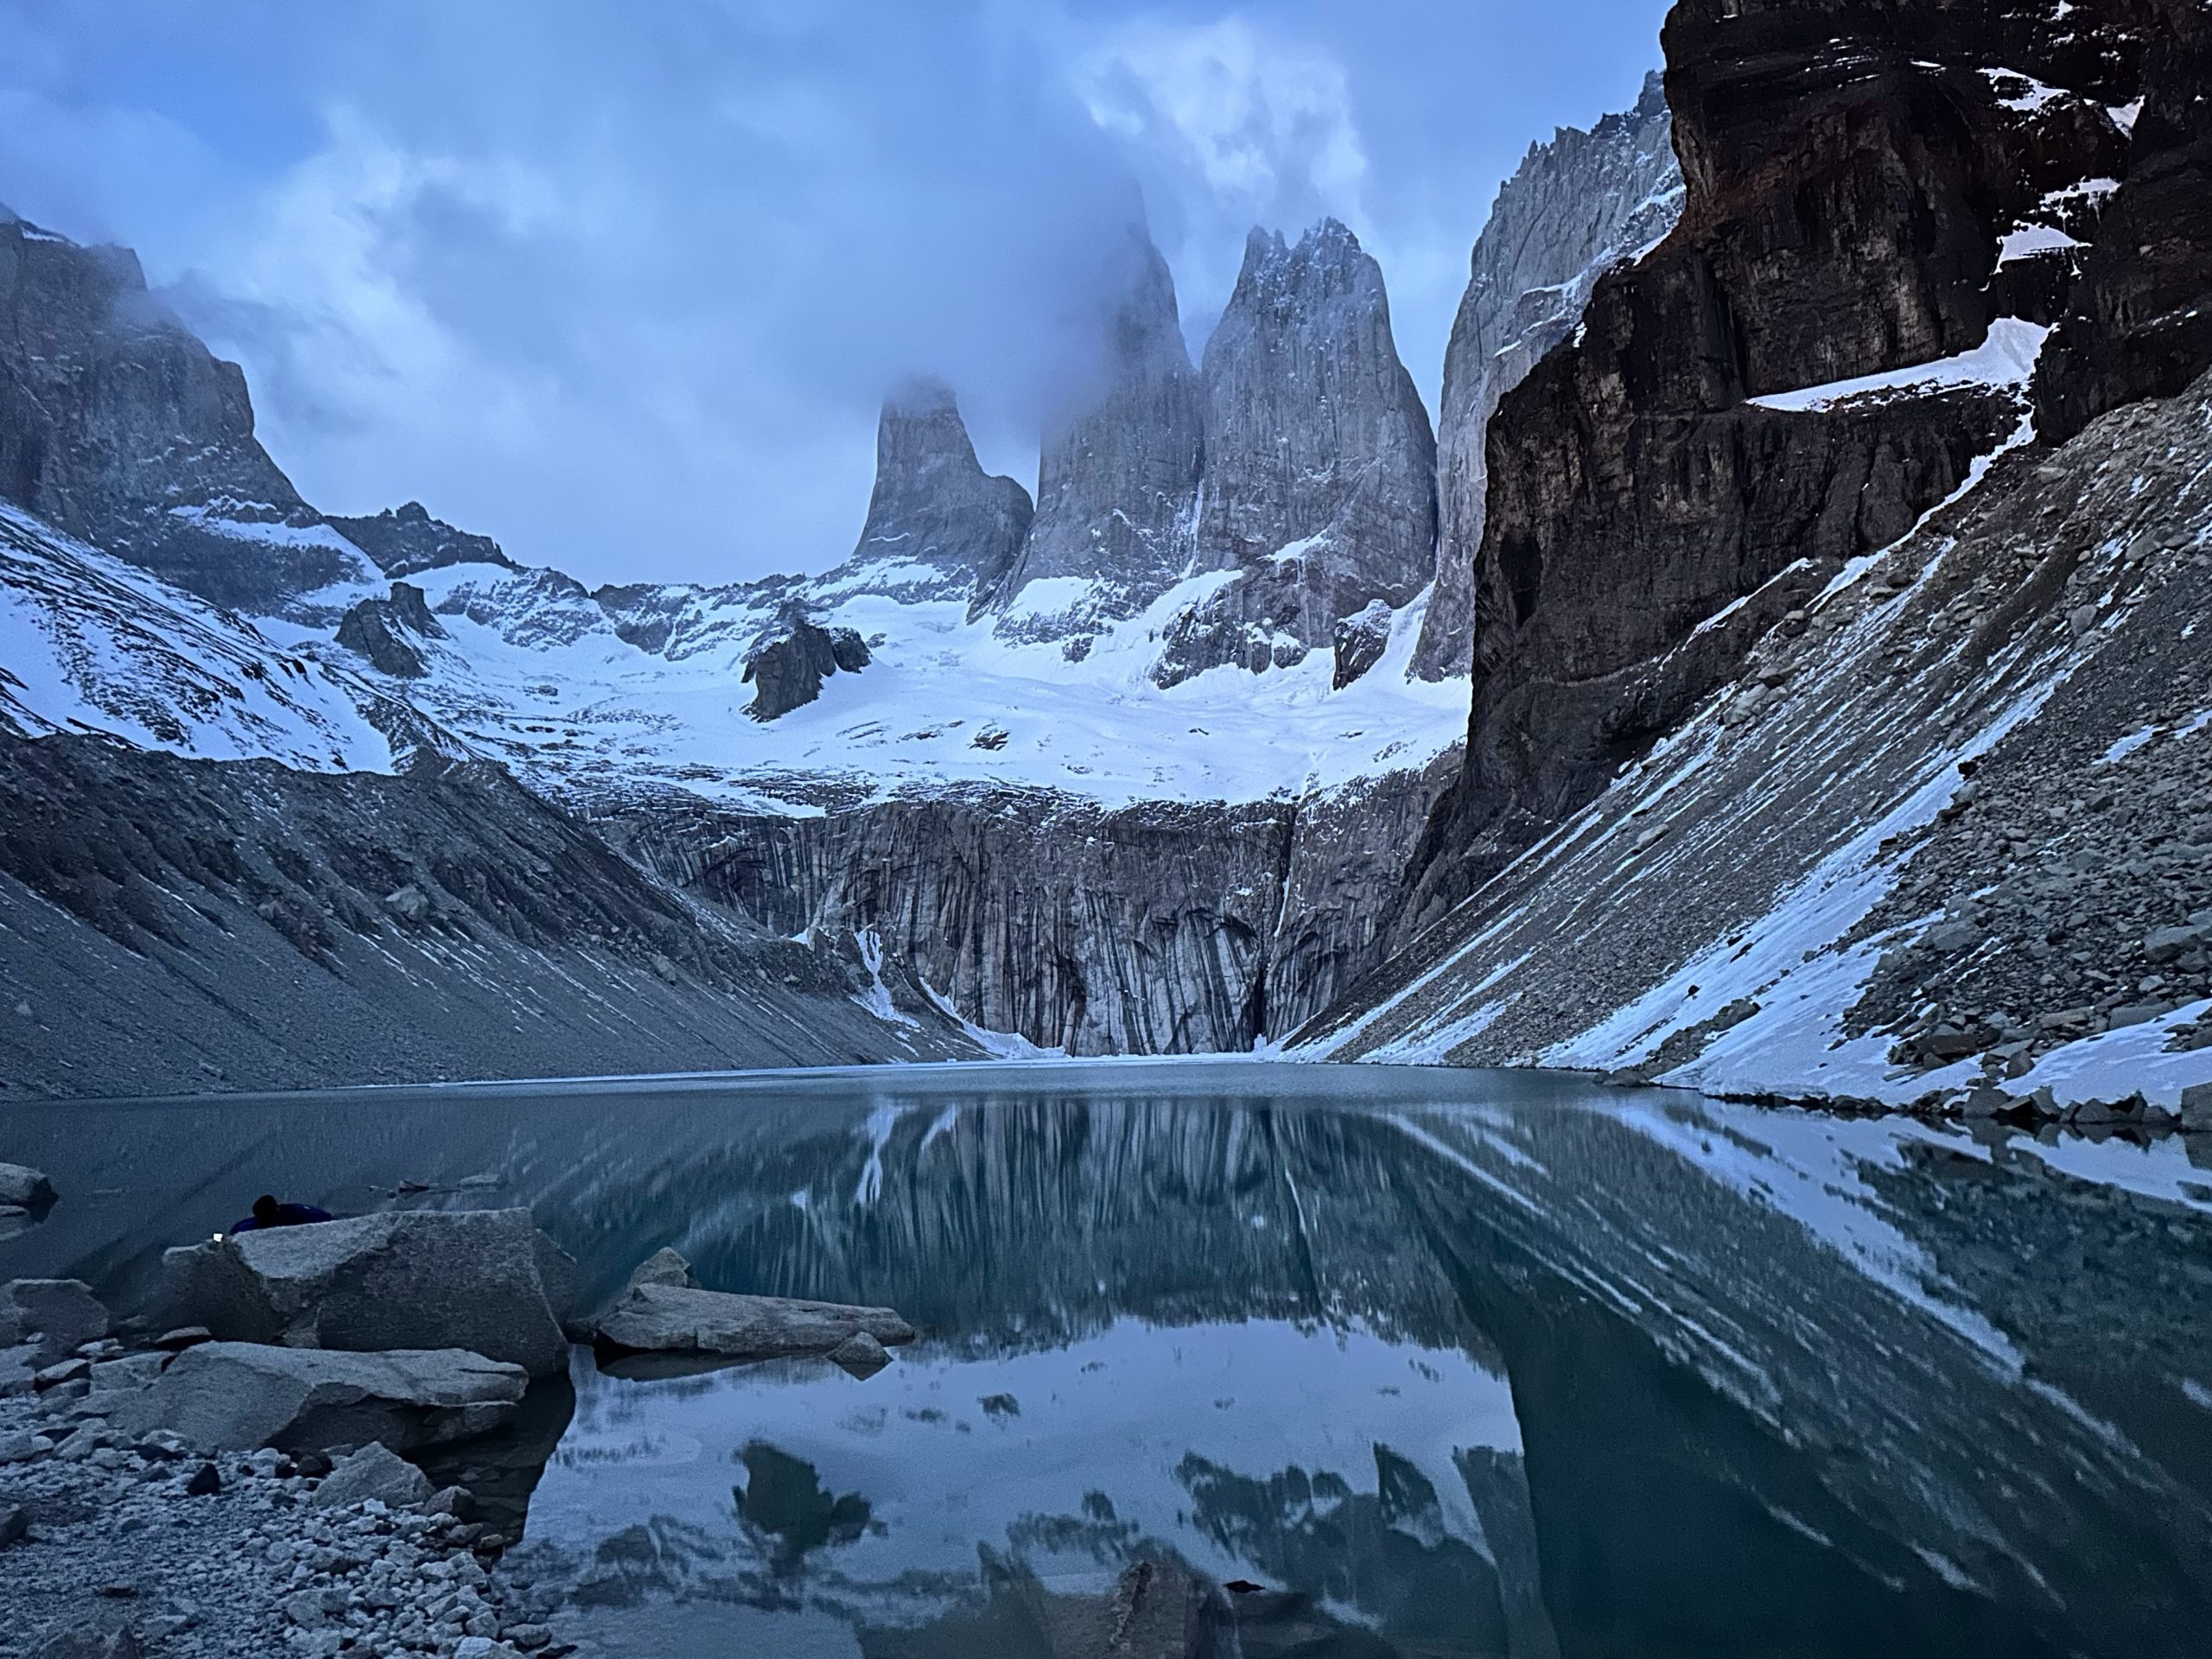
We made it to the summit just before 5:00 AM – almost an hour before sunrise. This allowed us to find a great vantage point for the photos we wanted take. After testing some spots, we claimed the top of a large rock directly in front of the lake. It was perfect, but we realized after we stopped climbing that it was really freaking cold outside. The next hour or so was spent adding back all of our layers, huddling for warmth, and chatting with our rock-mates.
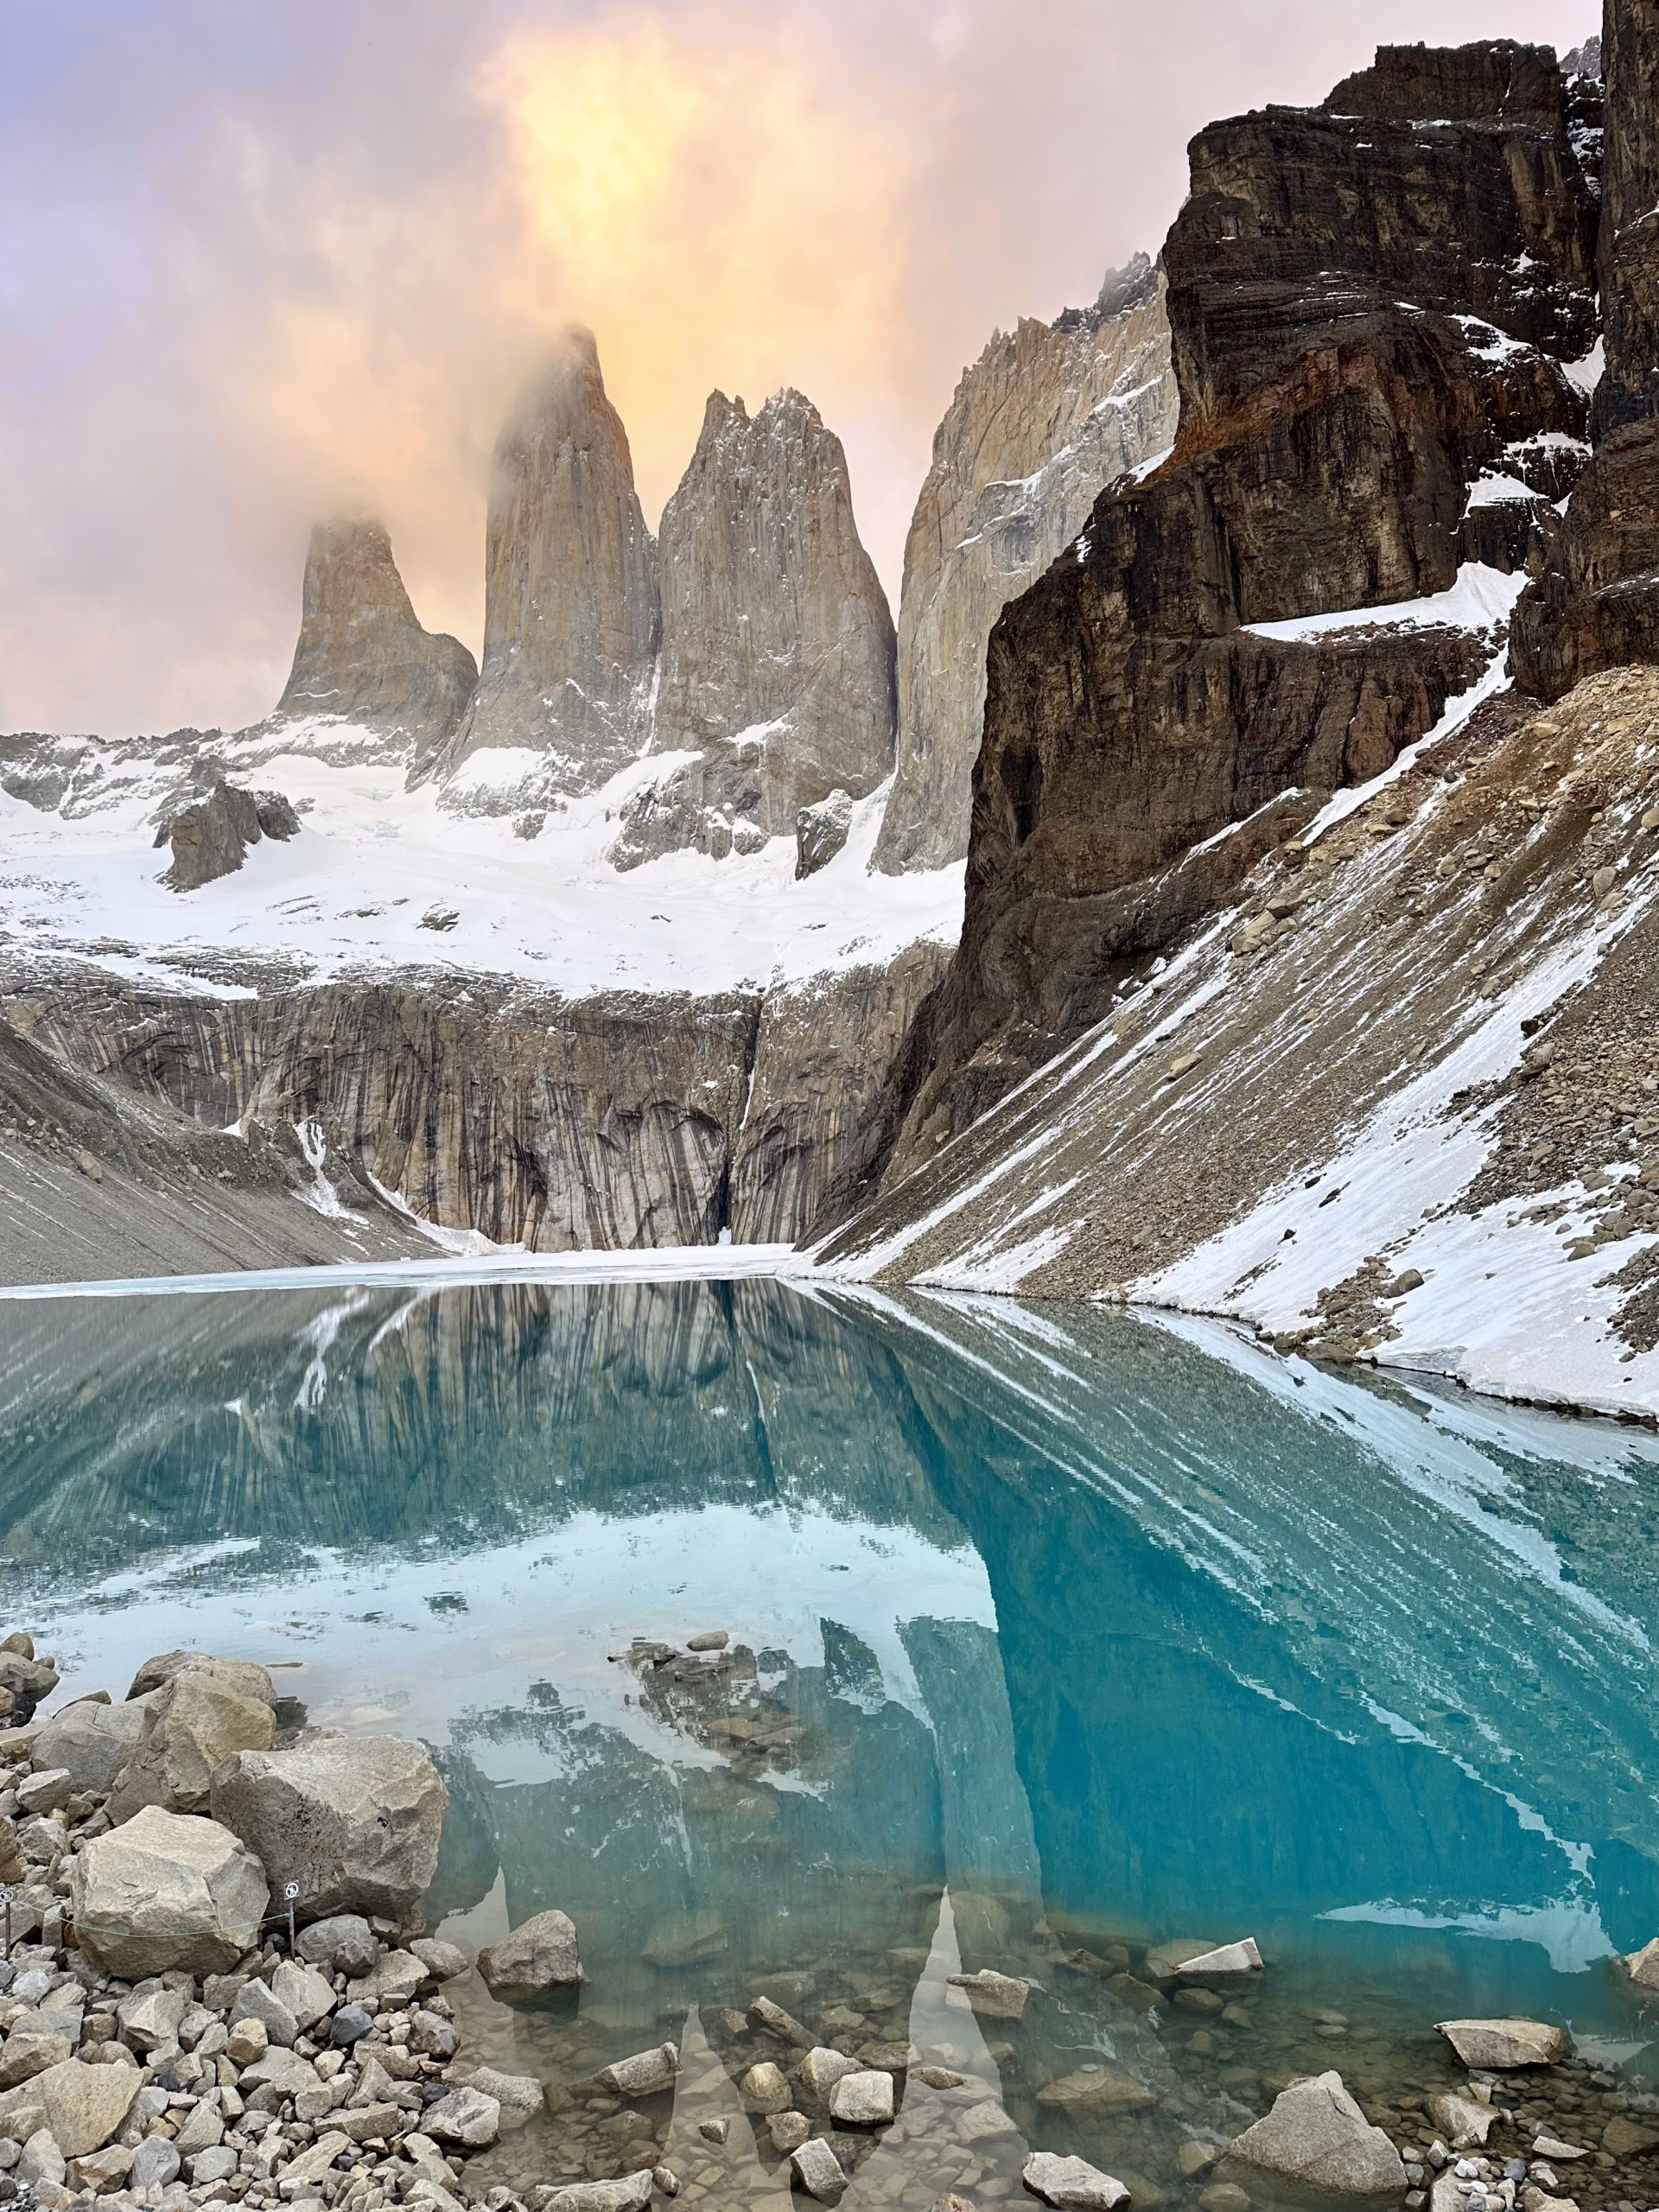
The sunrise made everything worth it. With that lighting in the morning, the mountains reflecting off the lake is truly amazing. We were fortunate to have minimal low cloud cover, but those that summited later in the day weren’t so lucky. We strongly suggest you check the forecasted cloud cover the day before to plan for a clear arrival.
After 45 minutes of watching the sunrise and taking photos, we set off back down the mountain towards Chileno. (We wanted to make it back to the refugio in time for breakfast!) This portion of the hike was super quick and easy, so we had no problem making it to Chileno in time for our seating – even with a few stops to appreciate the views in the daylight. The hot meal was exactly what we needed after spending the morning in the cold mountain air.
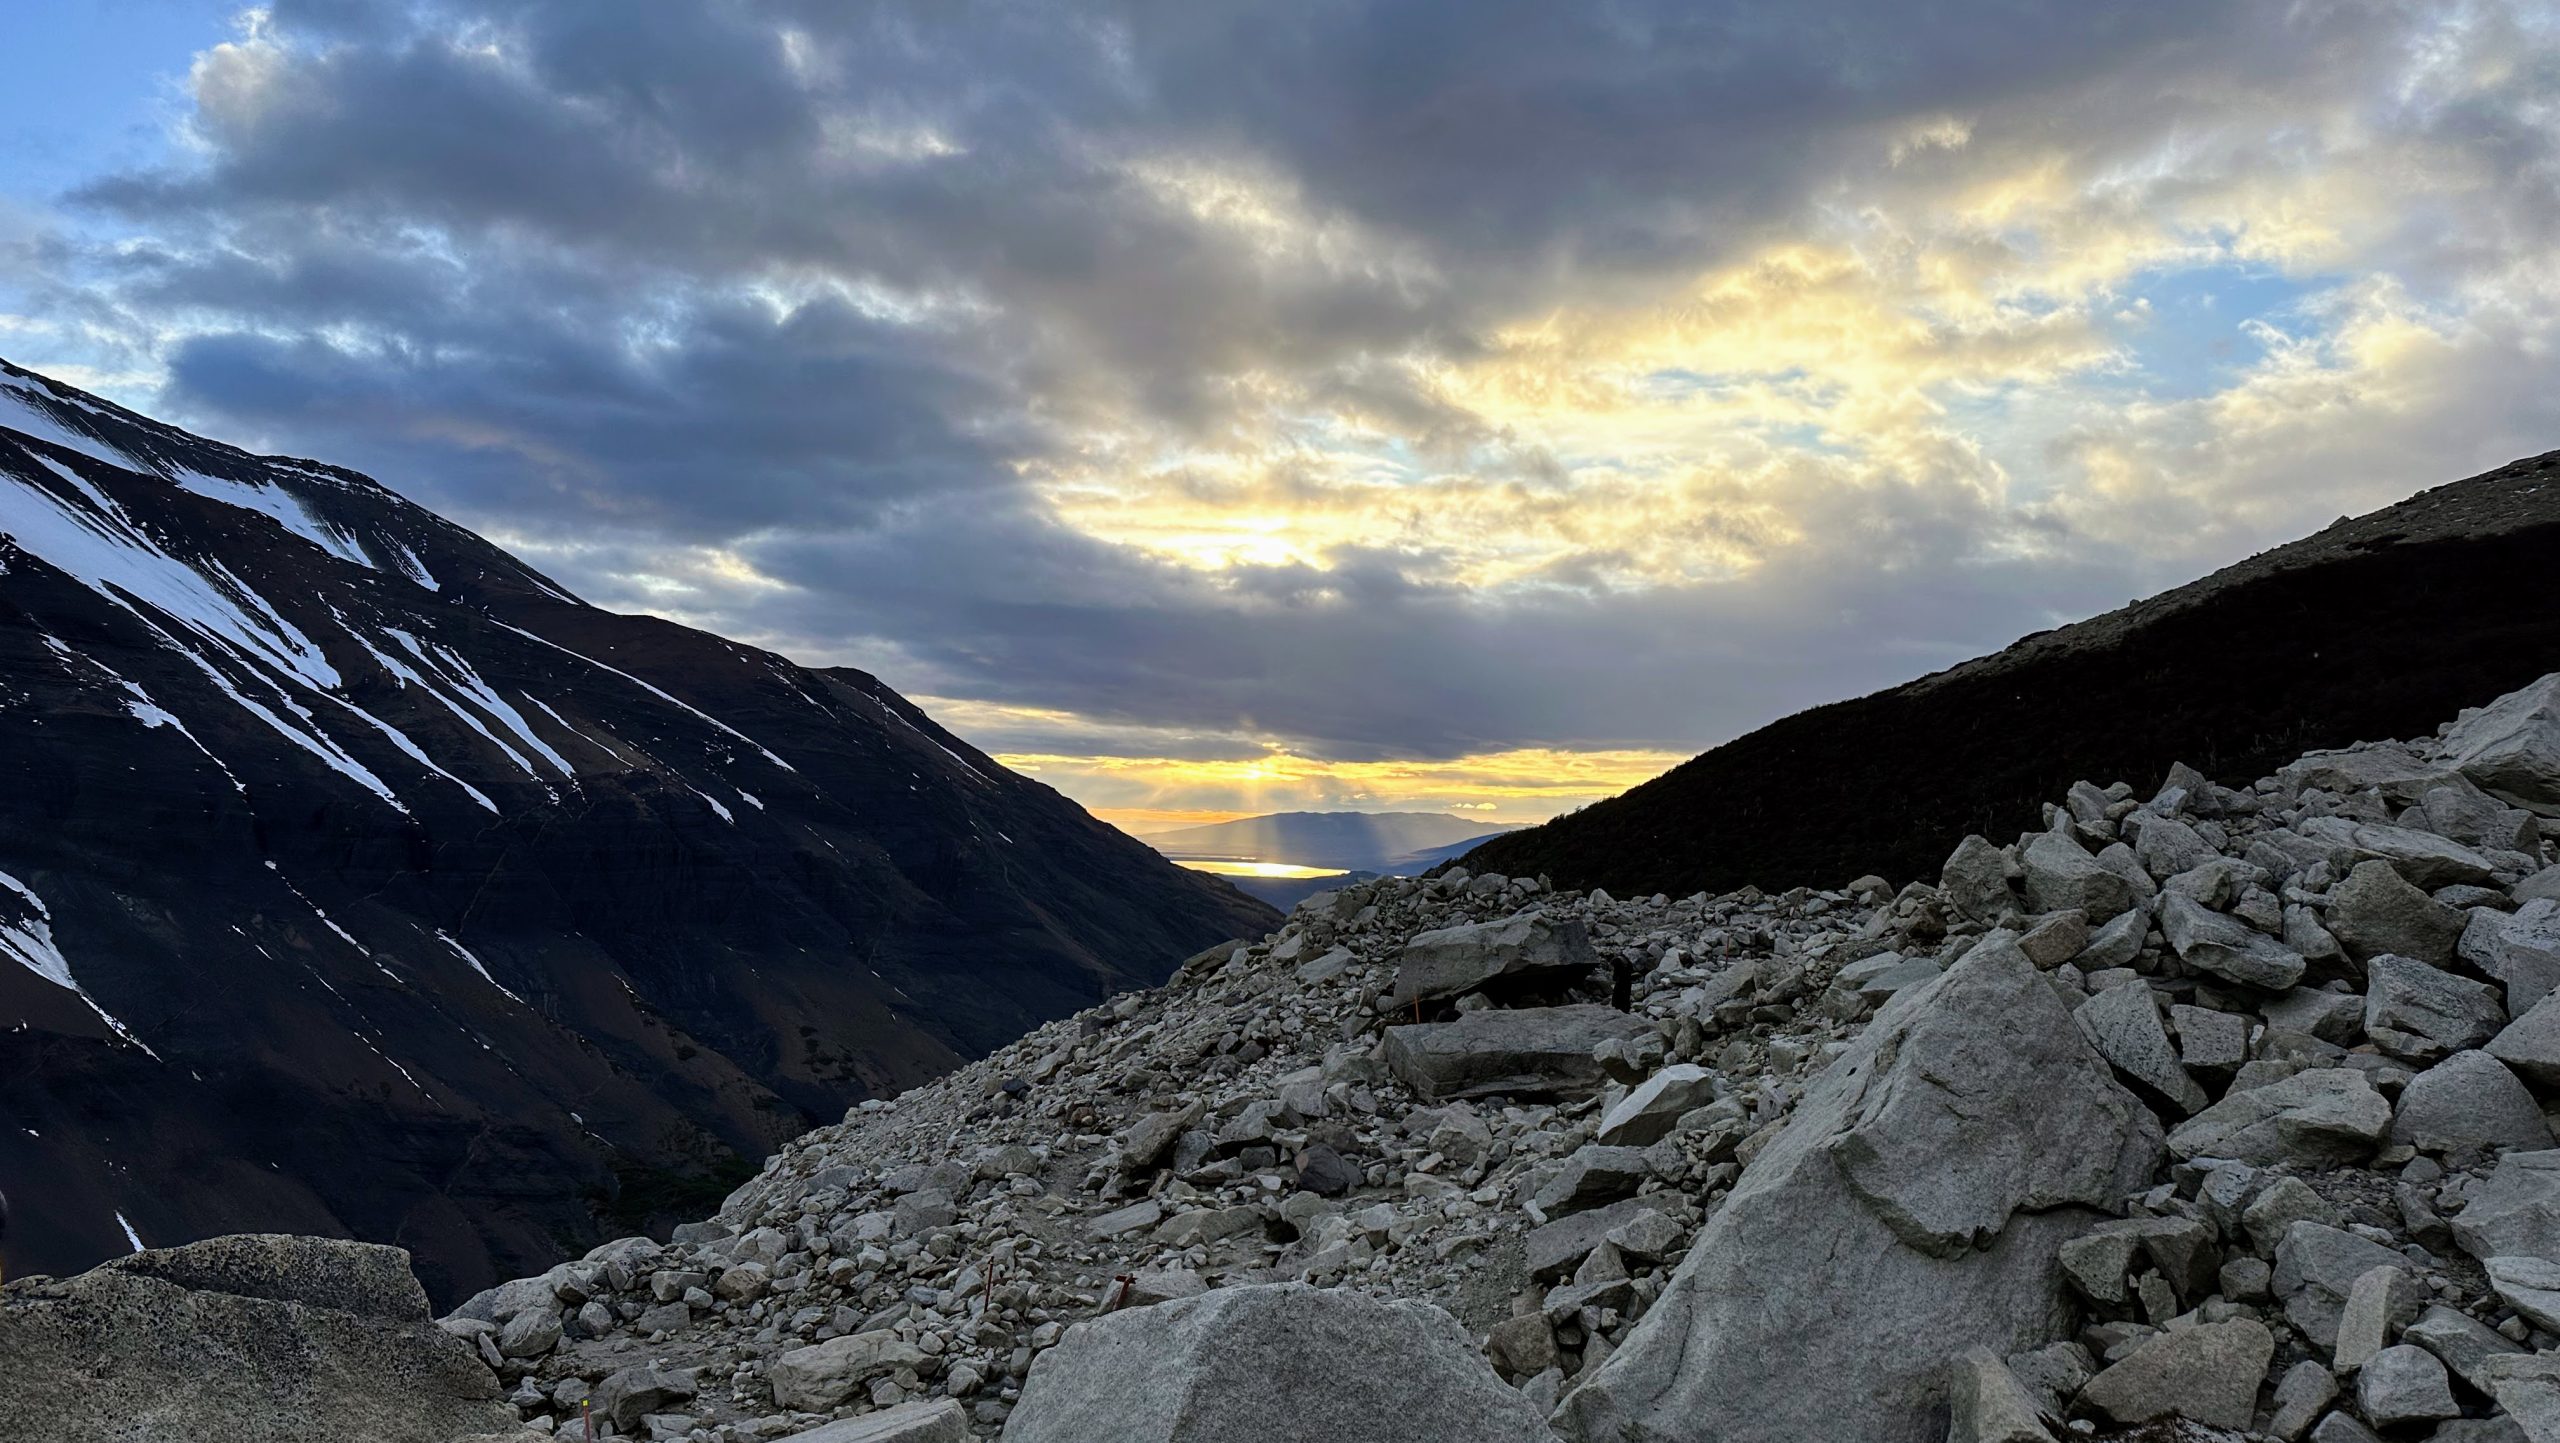
Finally, we were on to our last stretch of the trail. It is almost all downhill from Chileno to the Las Torres hotel and shuttle, but that doesn’t make the 5+ km feel any shorter when the end is so much in sight.
Once we made it to the Las Torres grounds, our first encounter was the upscale hotel. We thought the shuttle to the bus stop picked people up from the hotel, but we were sadly mistaken (it was another km or so to the visitor center, where the shuttle actually leaves from). Still, we couldn’t pass up the opportunity to use the restroom in the hotel lobby while we were there. Compared to the refugios and mountains, it was true luxury.
After we made it to the visitor center in the early afternoon, we had some time to kill before the shuttle to the bus stop. We spent the time purchasing our shuttle tickets, enjoying our packed lunches, and watching another movie on our phone. Our bus was scheduled to leave the park around 3:00 PM, and it seemed like the visitor center shuttles were timed so that they’d arrive at the bus stop immediately before departure. Don’t worry about missing the shuttle if you don’t make it on the first one – they keep on running until everyone in the long line has been picked up. We honestly didn’t mind the wait. It felt nice to sit and relax for a bit after the journey.
The shuttle to the bus stop is only 10 minutes, and then the bus ride back from Pudeto to Puerto Natales took a couple hours. We got to town just in time to check in to our Airbnb, grab dinner in town, and have a relaxing evening. It was a perfect way to cap off an incredible five-day adventure that we won’t forget.
Puerto Natales
If you are visiting Torres del Paine, you will likely spend a day in Puerto Natales before and/or after the trip. This small town has the closest airport to the national park and serves as a launching off point for the W Trek. While there isn’t much to do in Puerto Natales, we managed to fill our time there with good food and fun activities.
Where to Eat
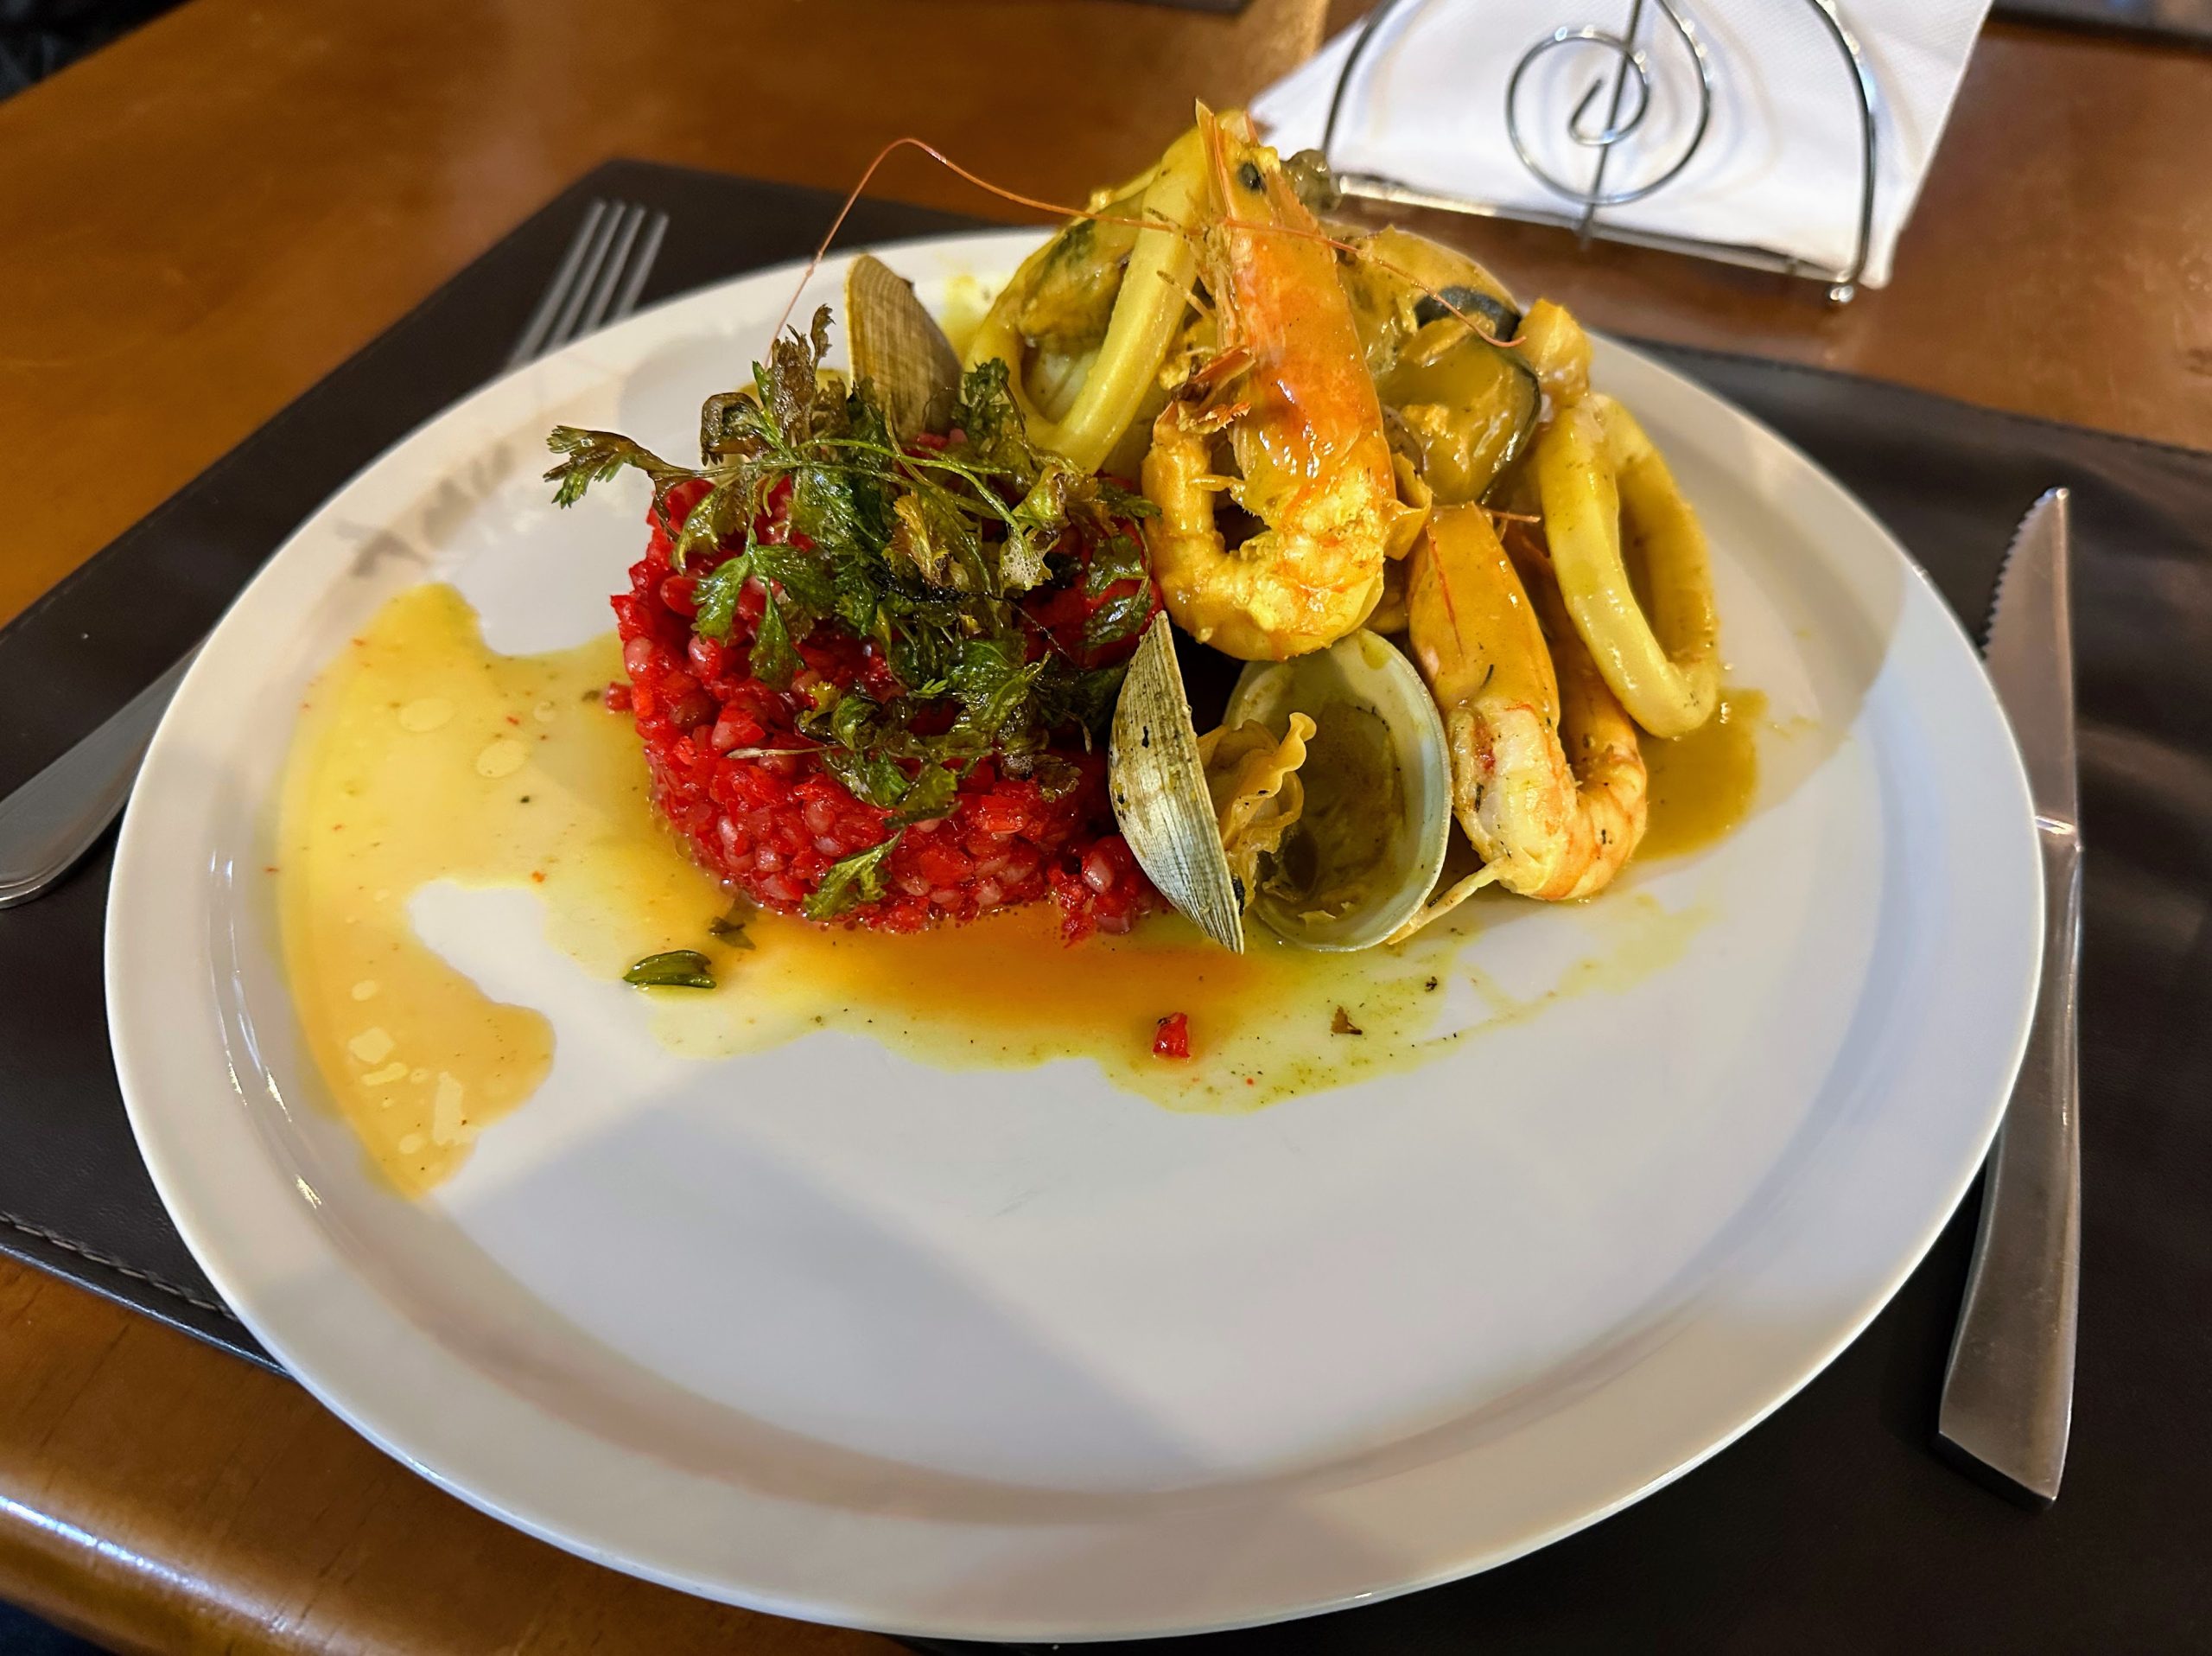
- Restaurante los coigues “jechef”: This restaurant serves higher end food but still has a laid back atmosphere. We wandered in without a reservation and really enjoyed the mixed seafood plate (white fish, calamari, and shellfish) with curry sauce.
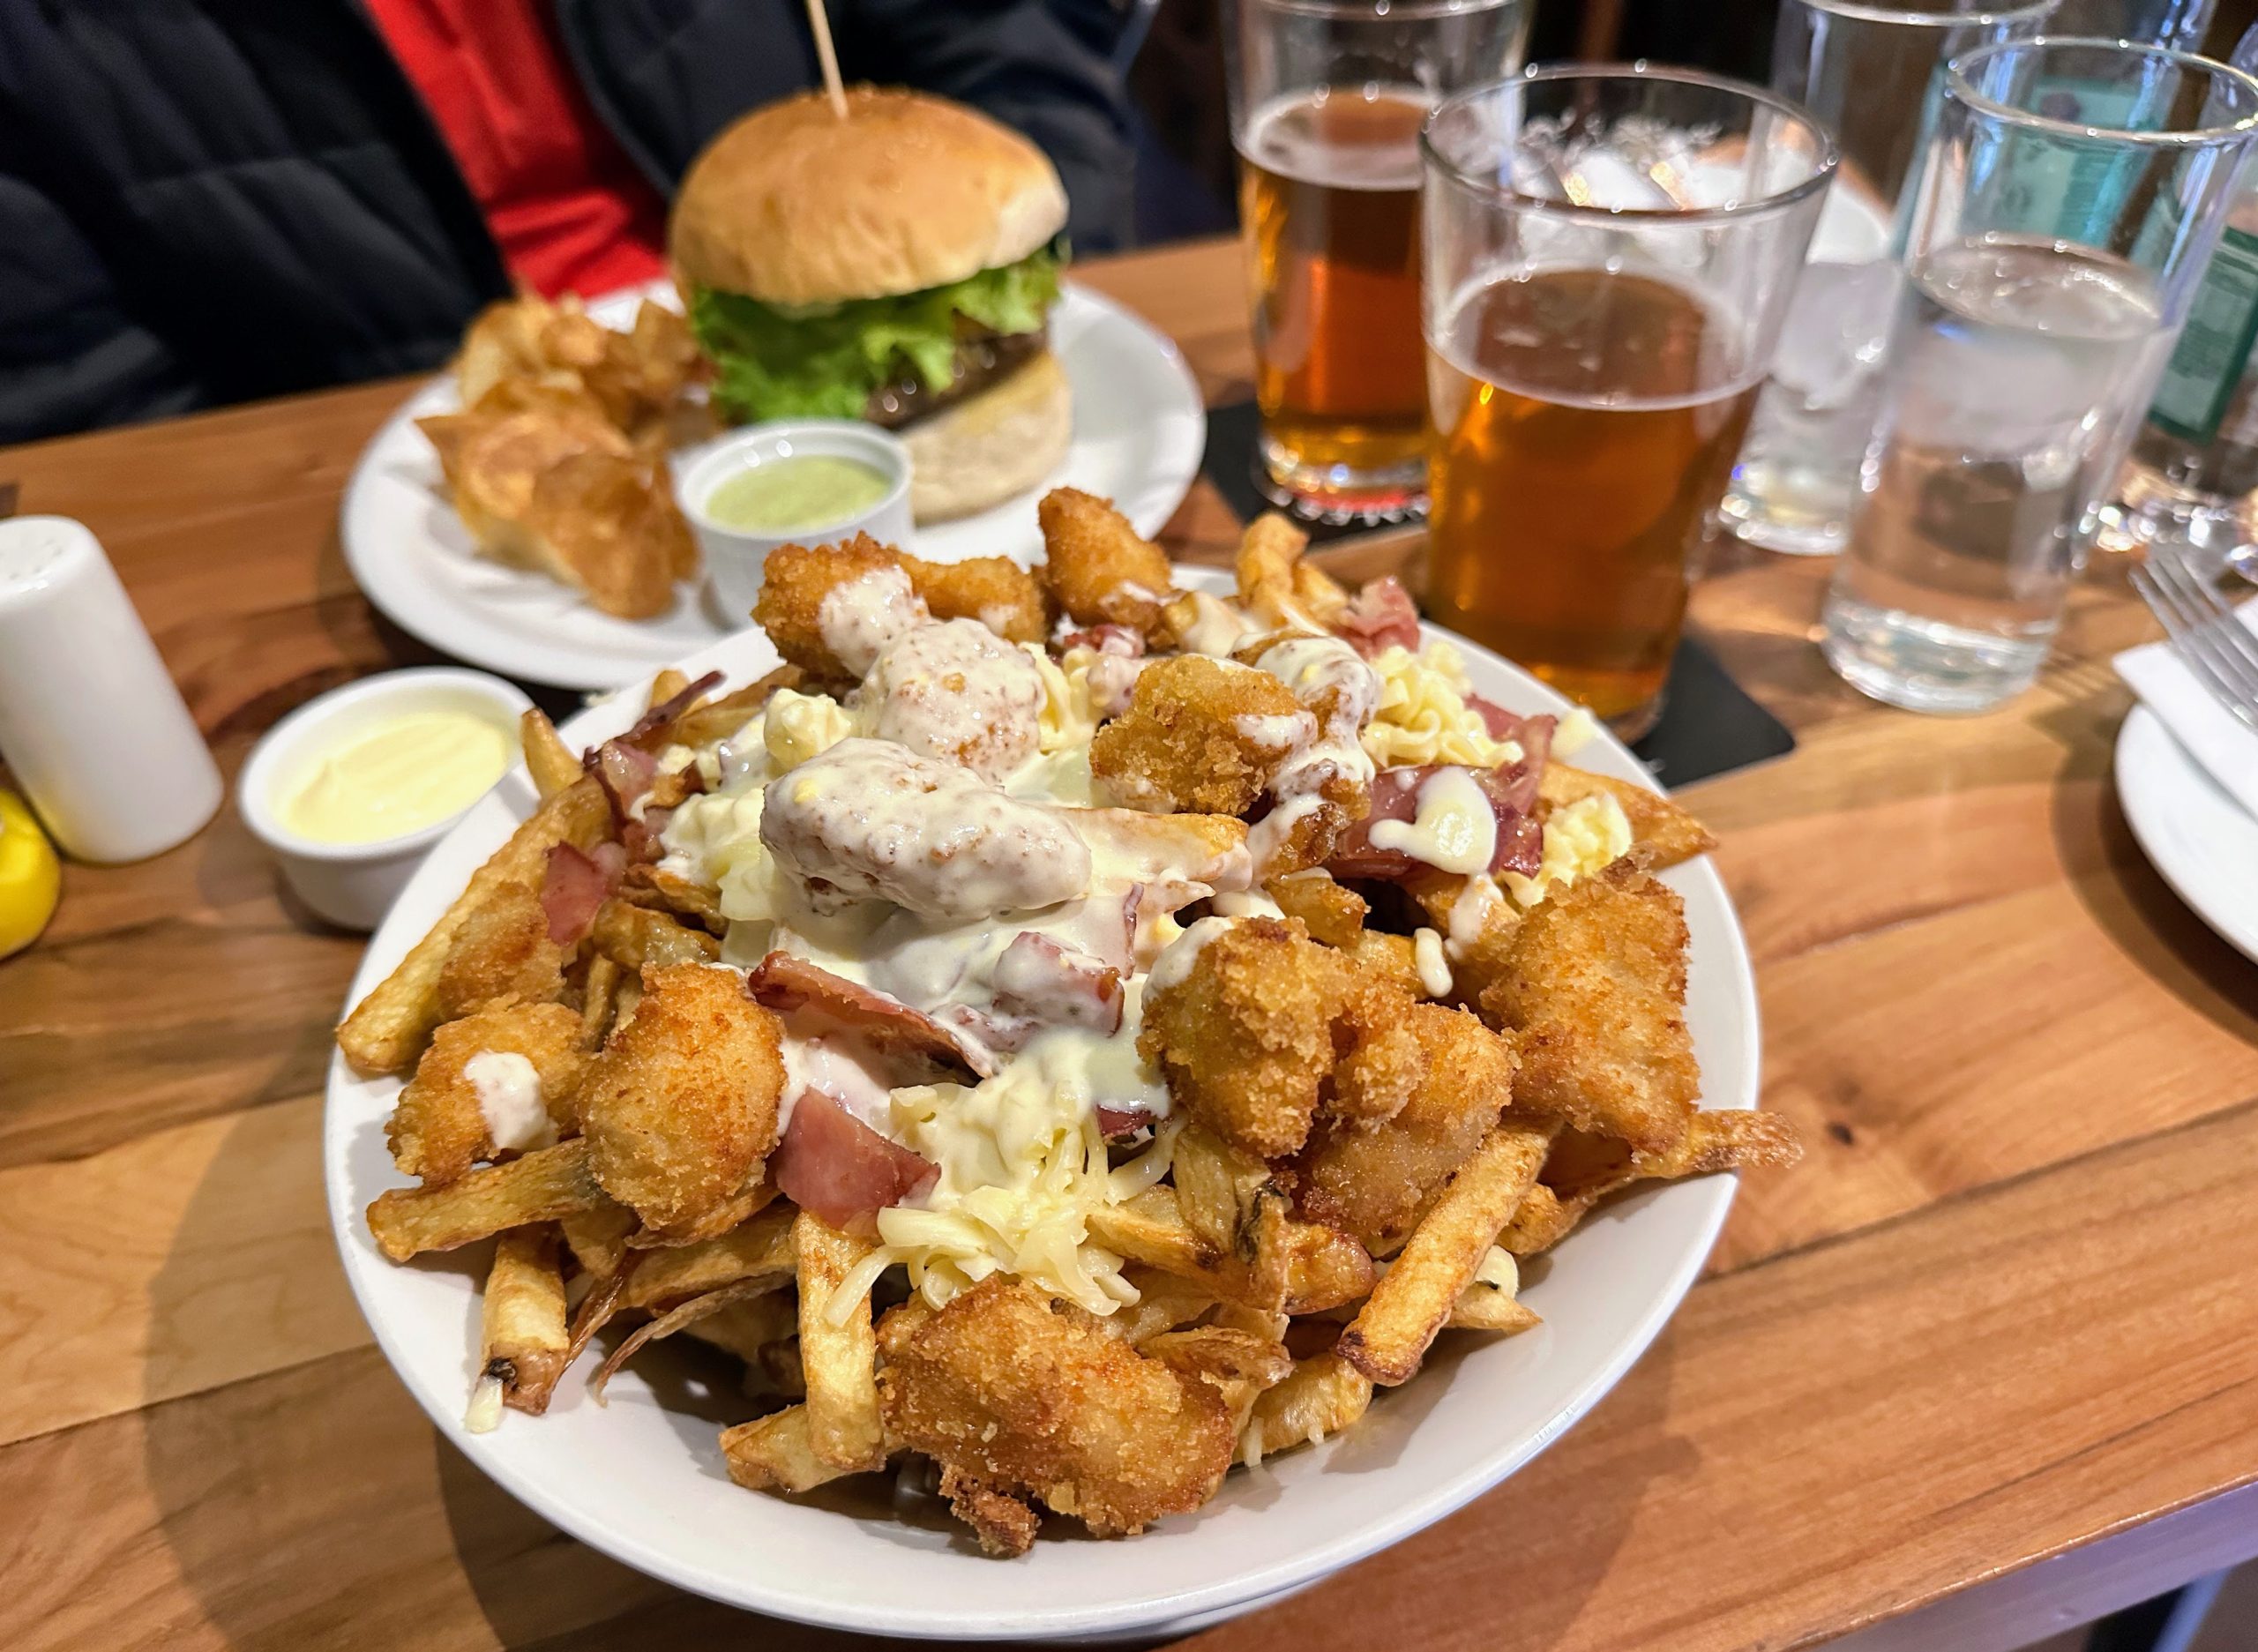
- Bagueles Brewpub: While this brewpub admittedly caters to tourists (like many restaurants in Puerto Natales), it was still delicious and had great portions for good prices. The Mega Papas were massive, and the lam-burguesa was a very tasty main course. You can also enjoy craft beer on site.
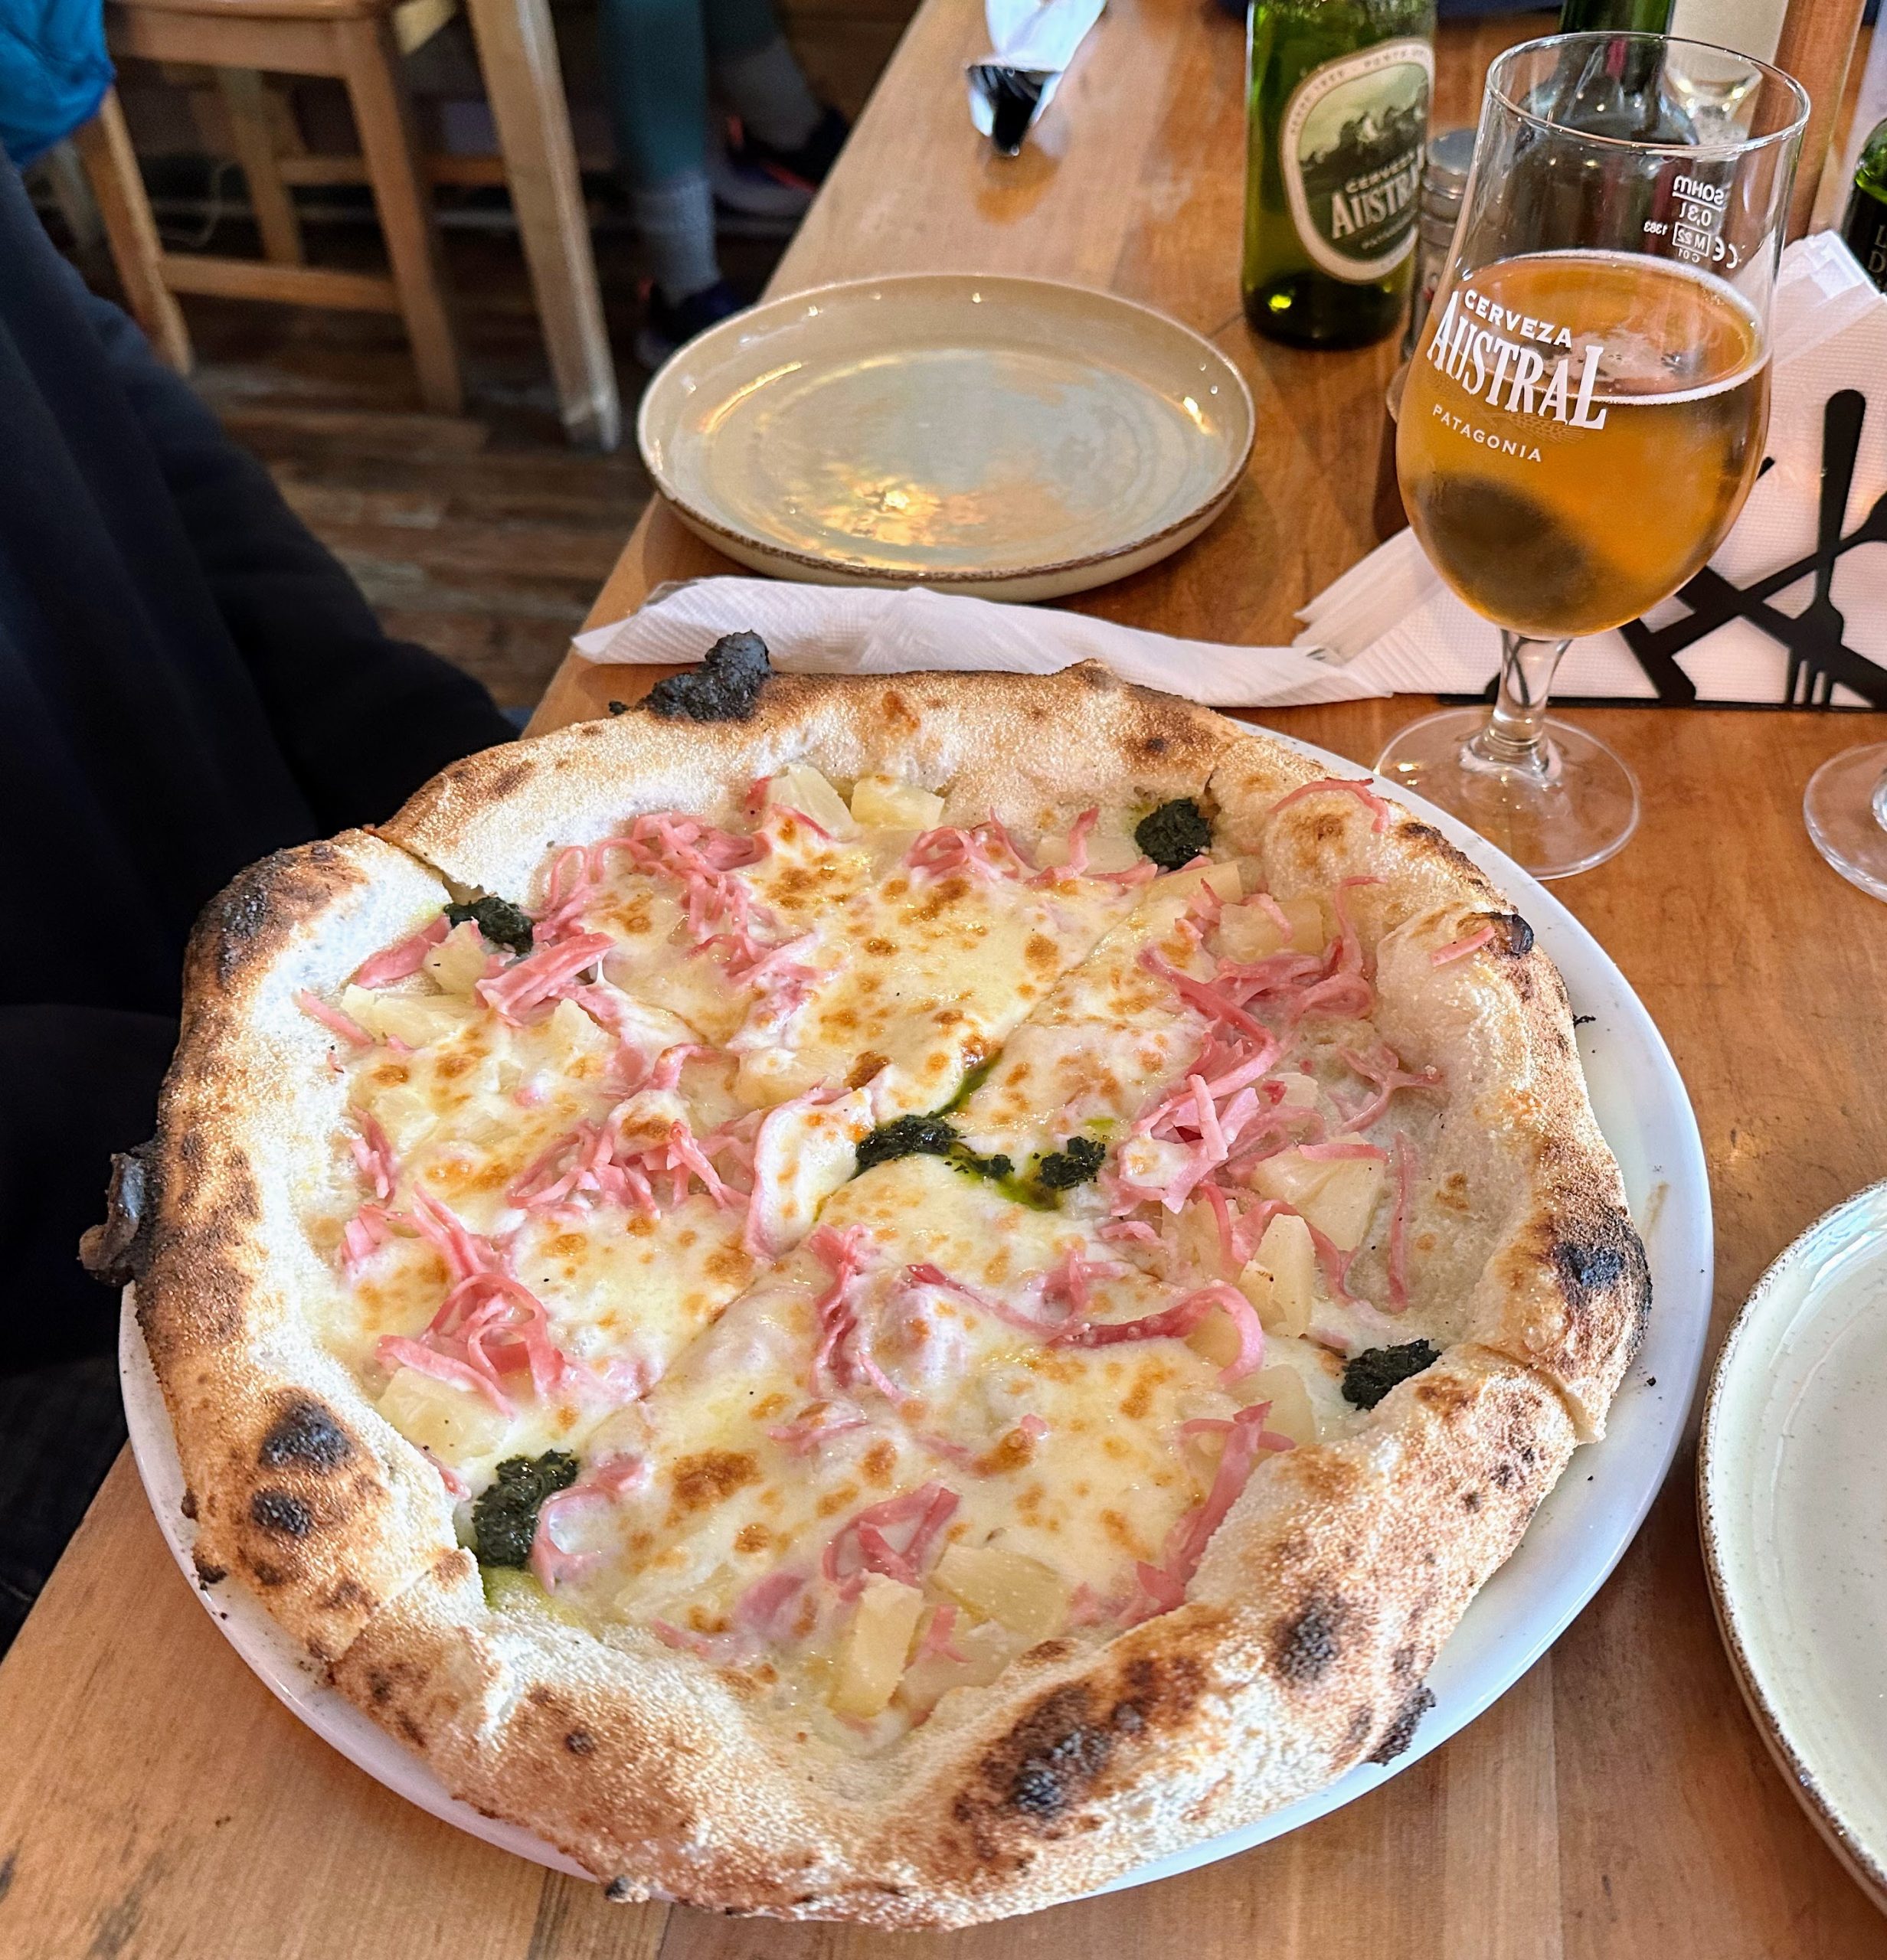
- Napoli Pizzeria: We didn’t expect to find good pizza in Puerto Natales but were pleasantly surprised by Napoli. The Hawaiian Pizza with white sauce was delicious and you’ll never convince us that pineapple doesn’t work on pizza.
- Empanada Margarita: If you need a quick bite on the go, consider stopping at Empanada Margarita. This unassuming yellow building might feel like the wrong place when you arrive (it actually is more of a shop than a restaurant), but the owner serves up great empanadas to wary travelers coming to or from the nearby bus station.

- Holaste! Specialty Coffee: This coffee shop gets a bit crowded, but it is a good choice for coffee and hot chocolate to keep you warm as you wander about town.
Things to Do
There’s not much! Honestly, apart from eating and drinking, time in Puerto Natales is best spent familiarizing yourself with the bus station location and luggage storage options. Thankfully, the bus station does have relatively affordable luggage storage on hand, so you can keep your extra belongings there while in the national park. We recommend checking when the luggage room opens the day prior to your departure, in case you have an early morning bus like us. Apart from those logistics, we did a few things to keep ourselves entertained in Puerto Natales.
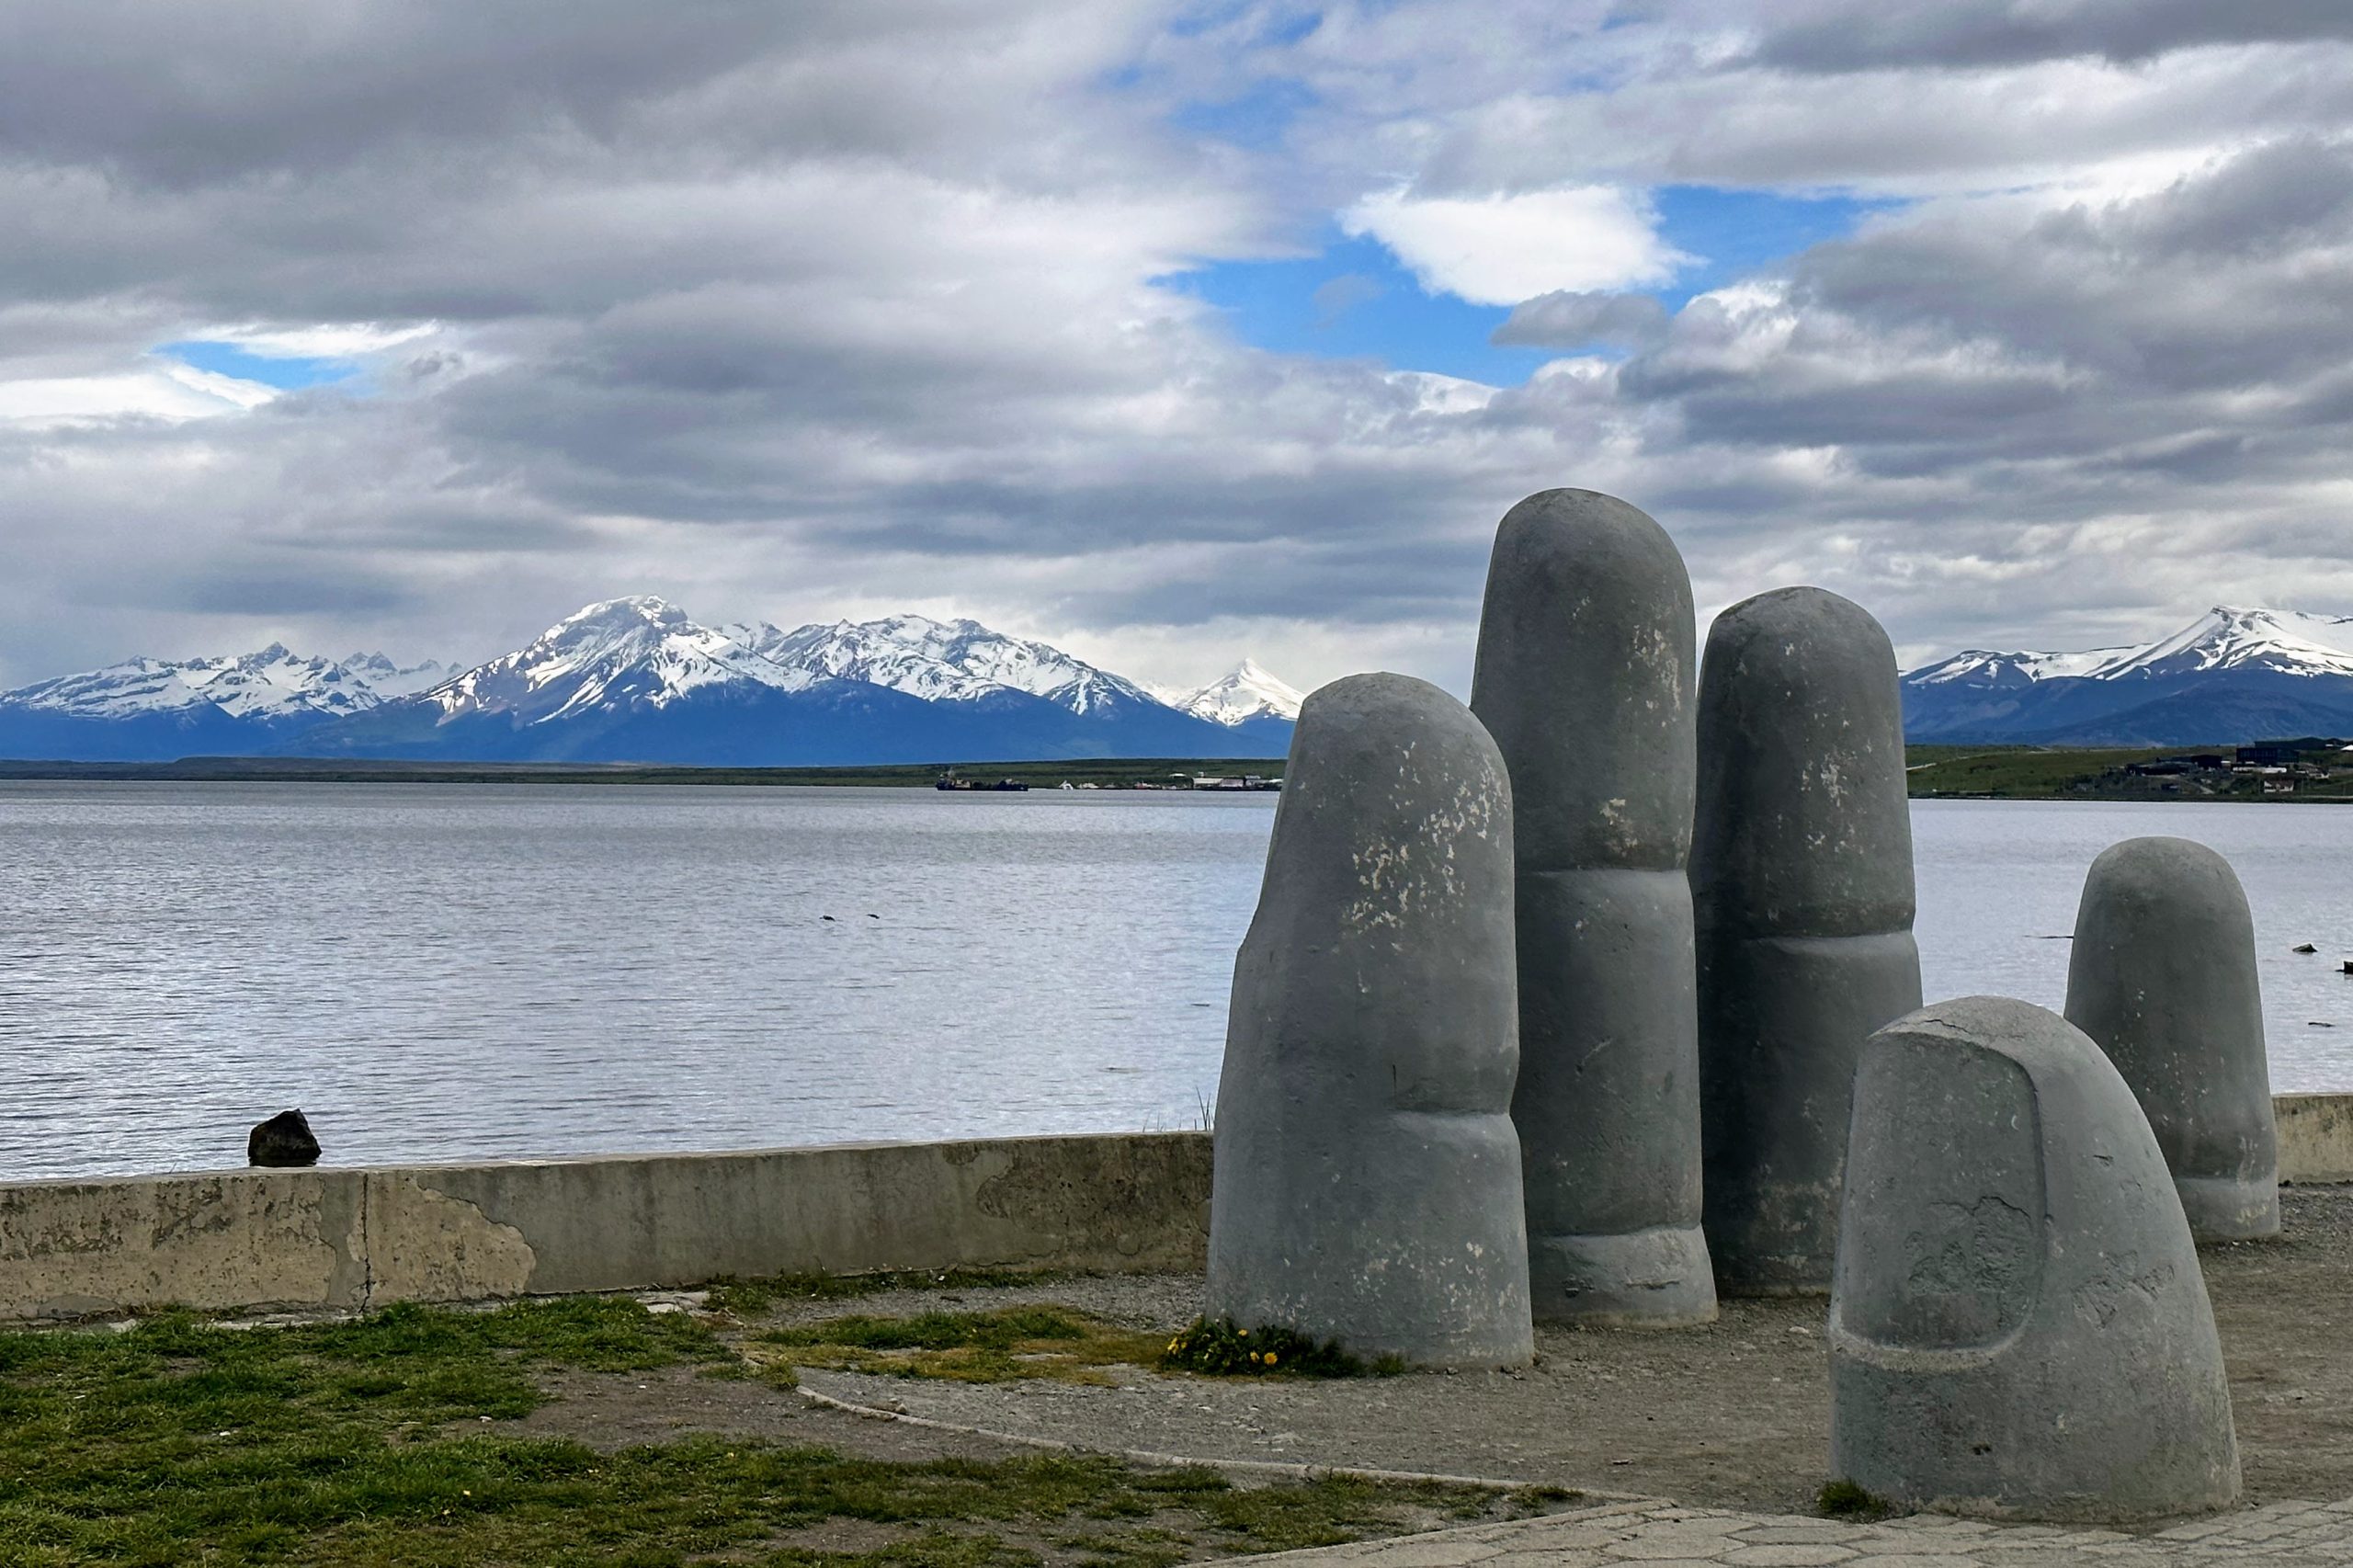
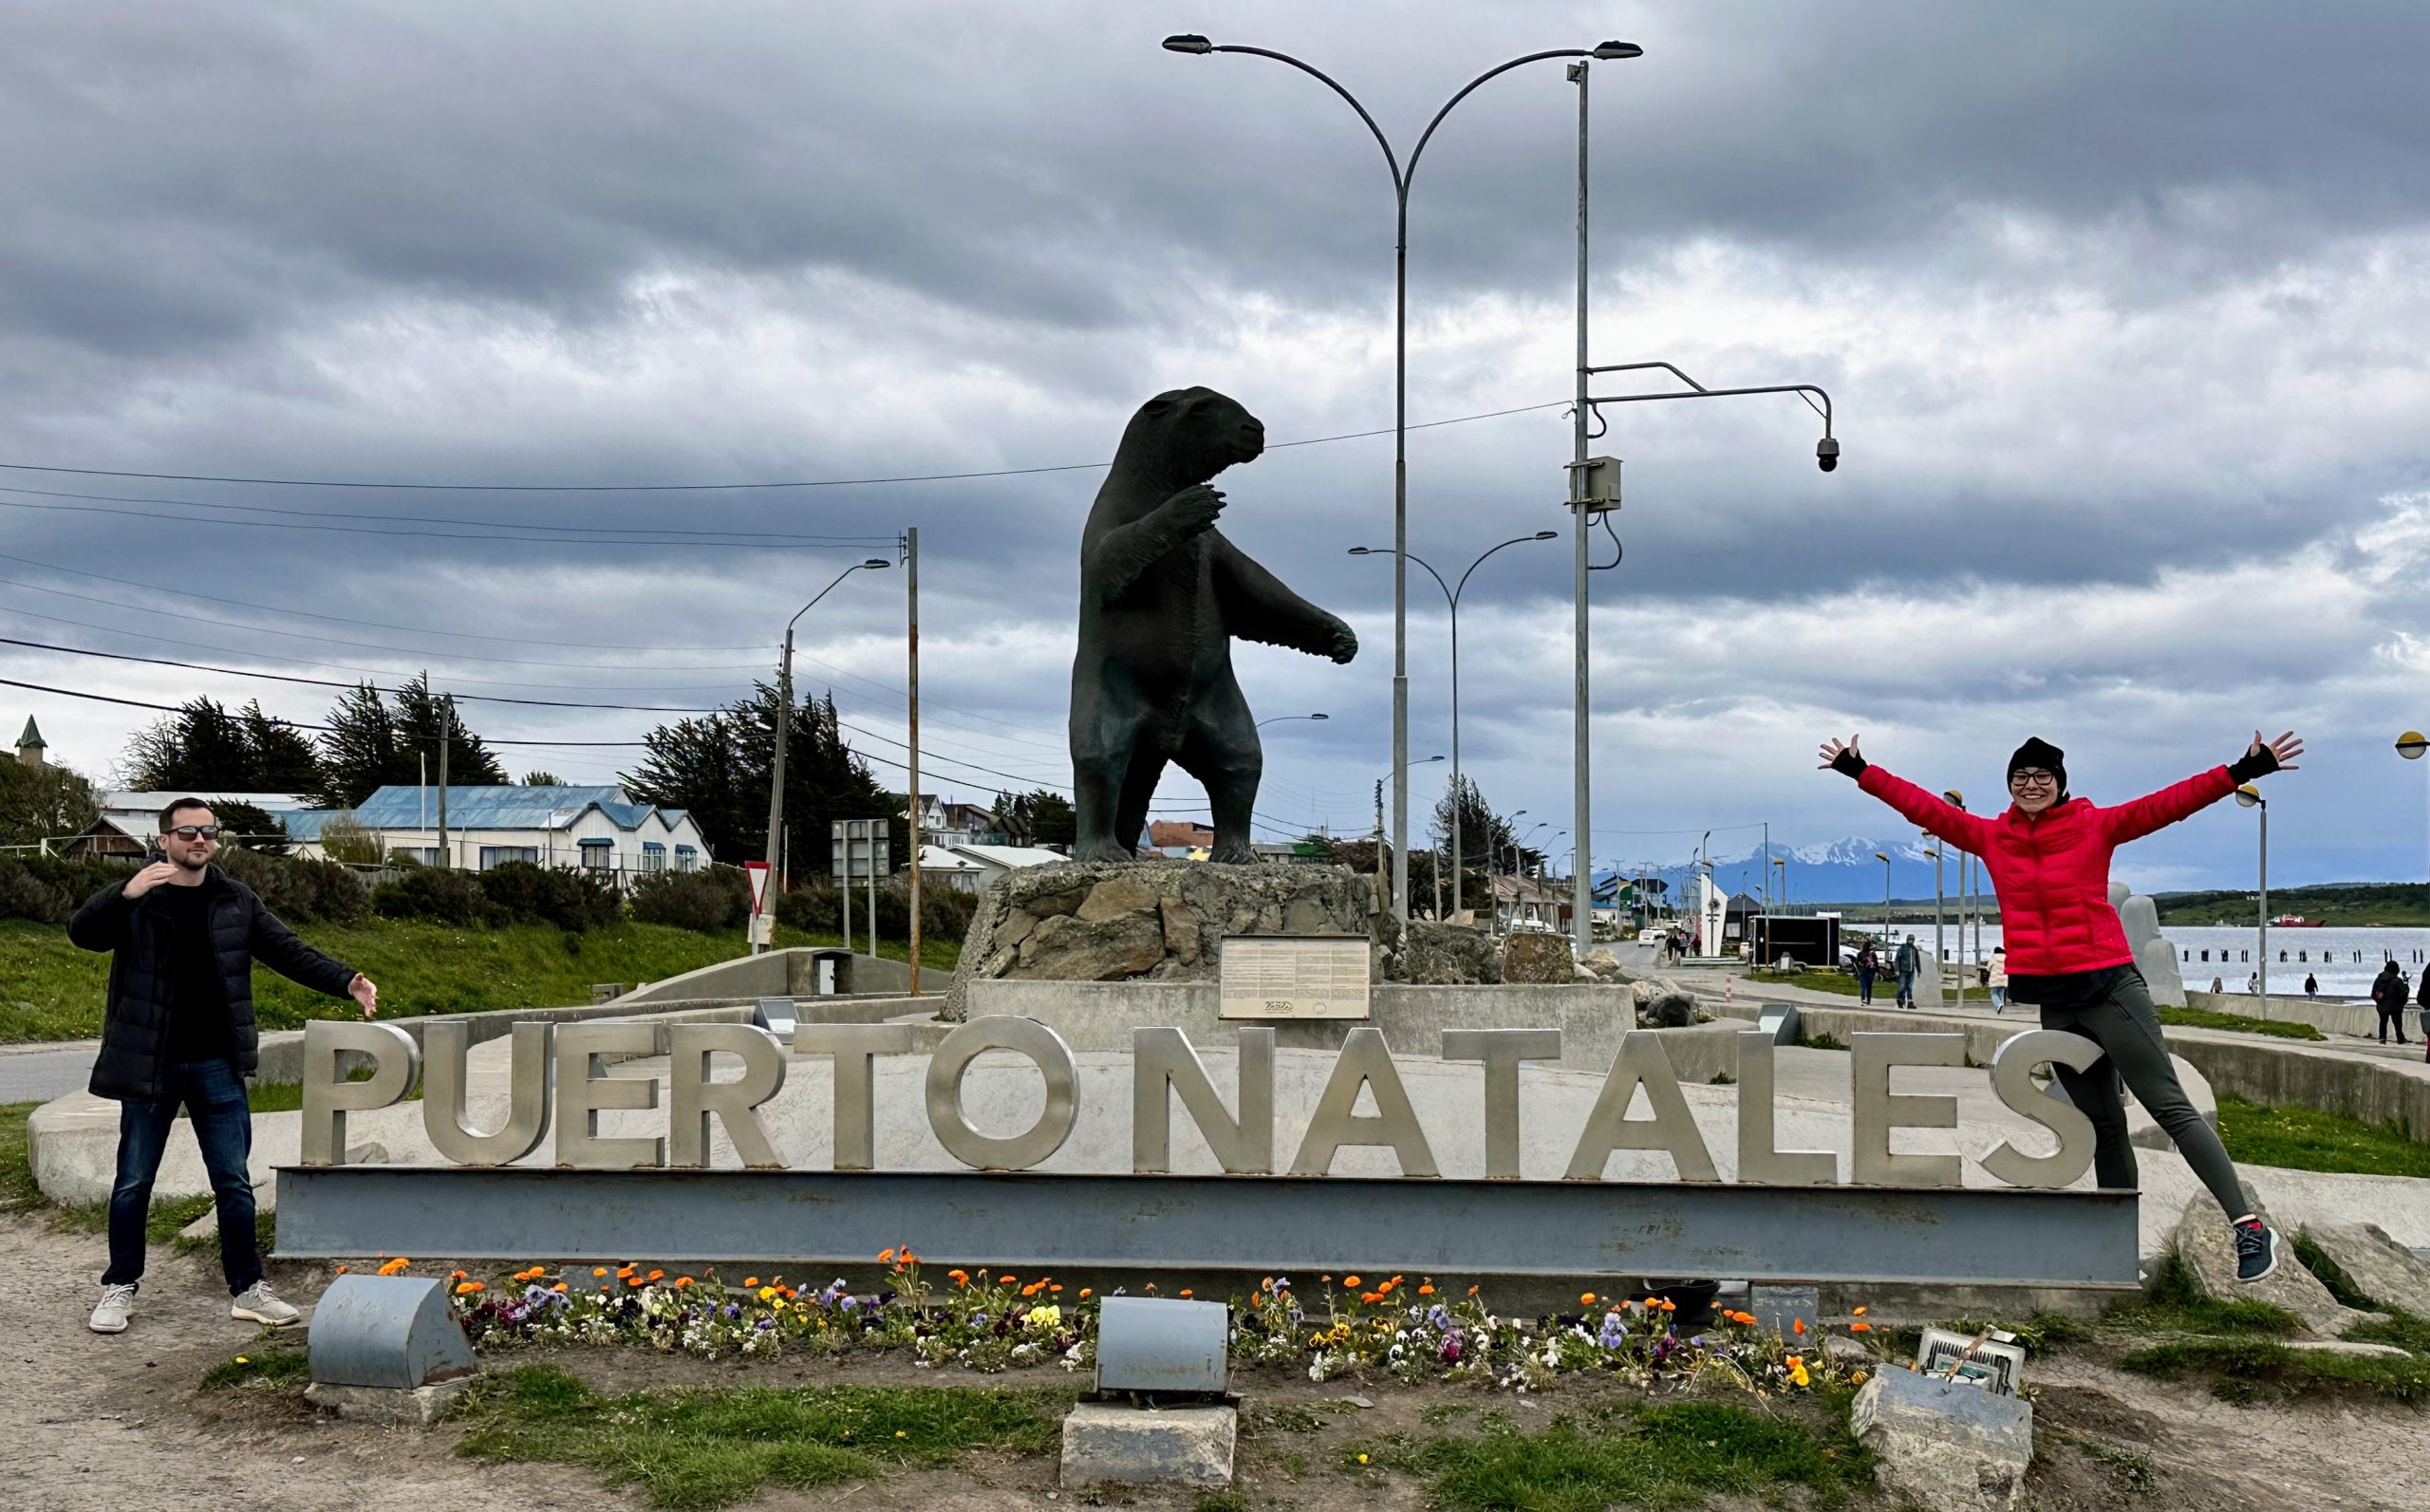
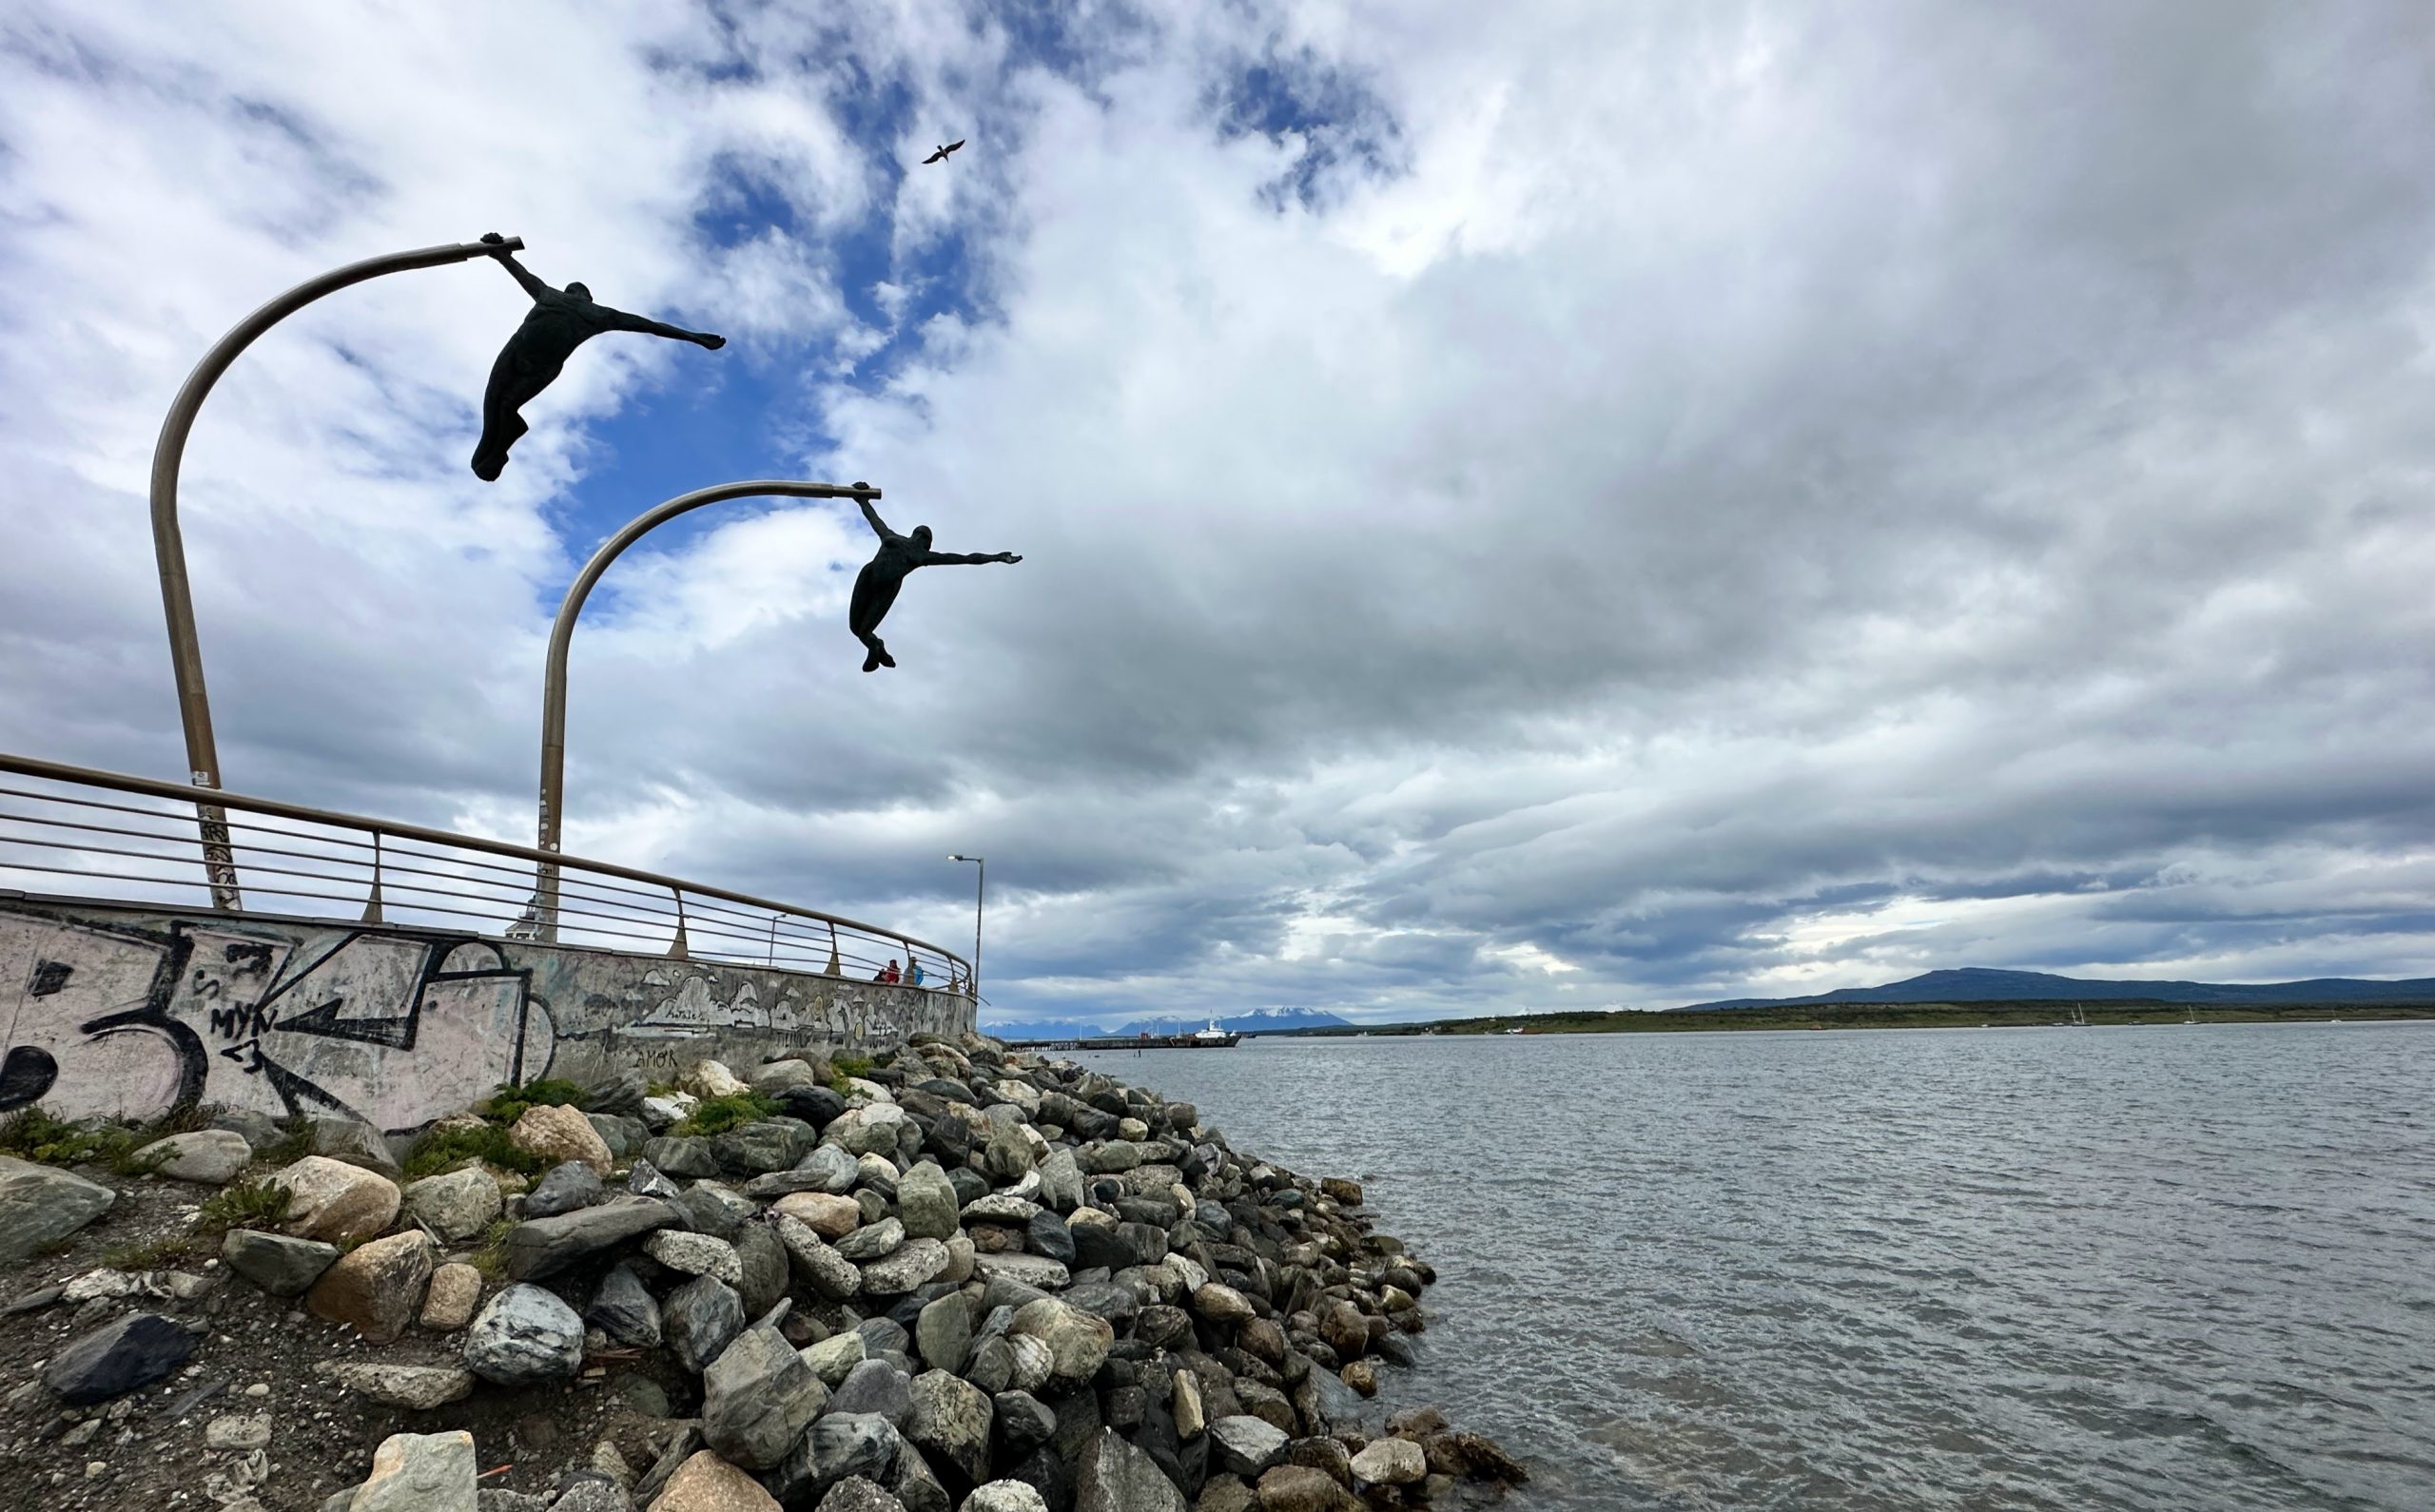
- La Mano Statue and Coastal Walk: Despite its small stature, Puerto Natales is pretty scenic. We took some time to walk along the coast, enjoy the mountain views, and check out the statues along the water for photos.
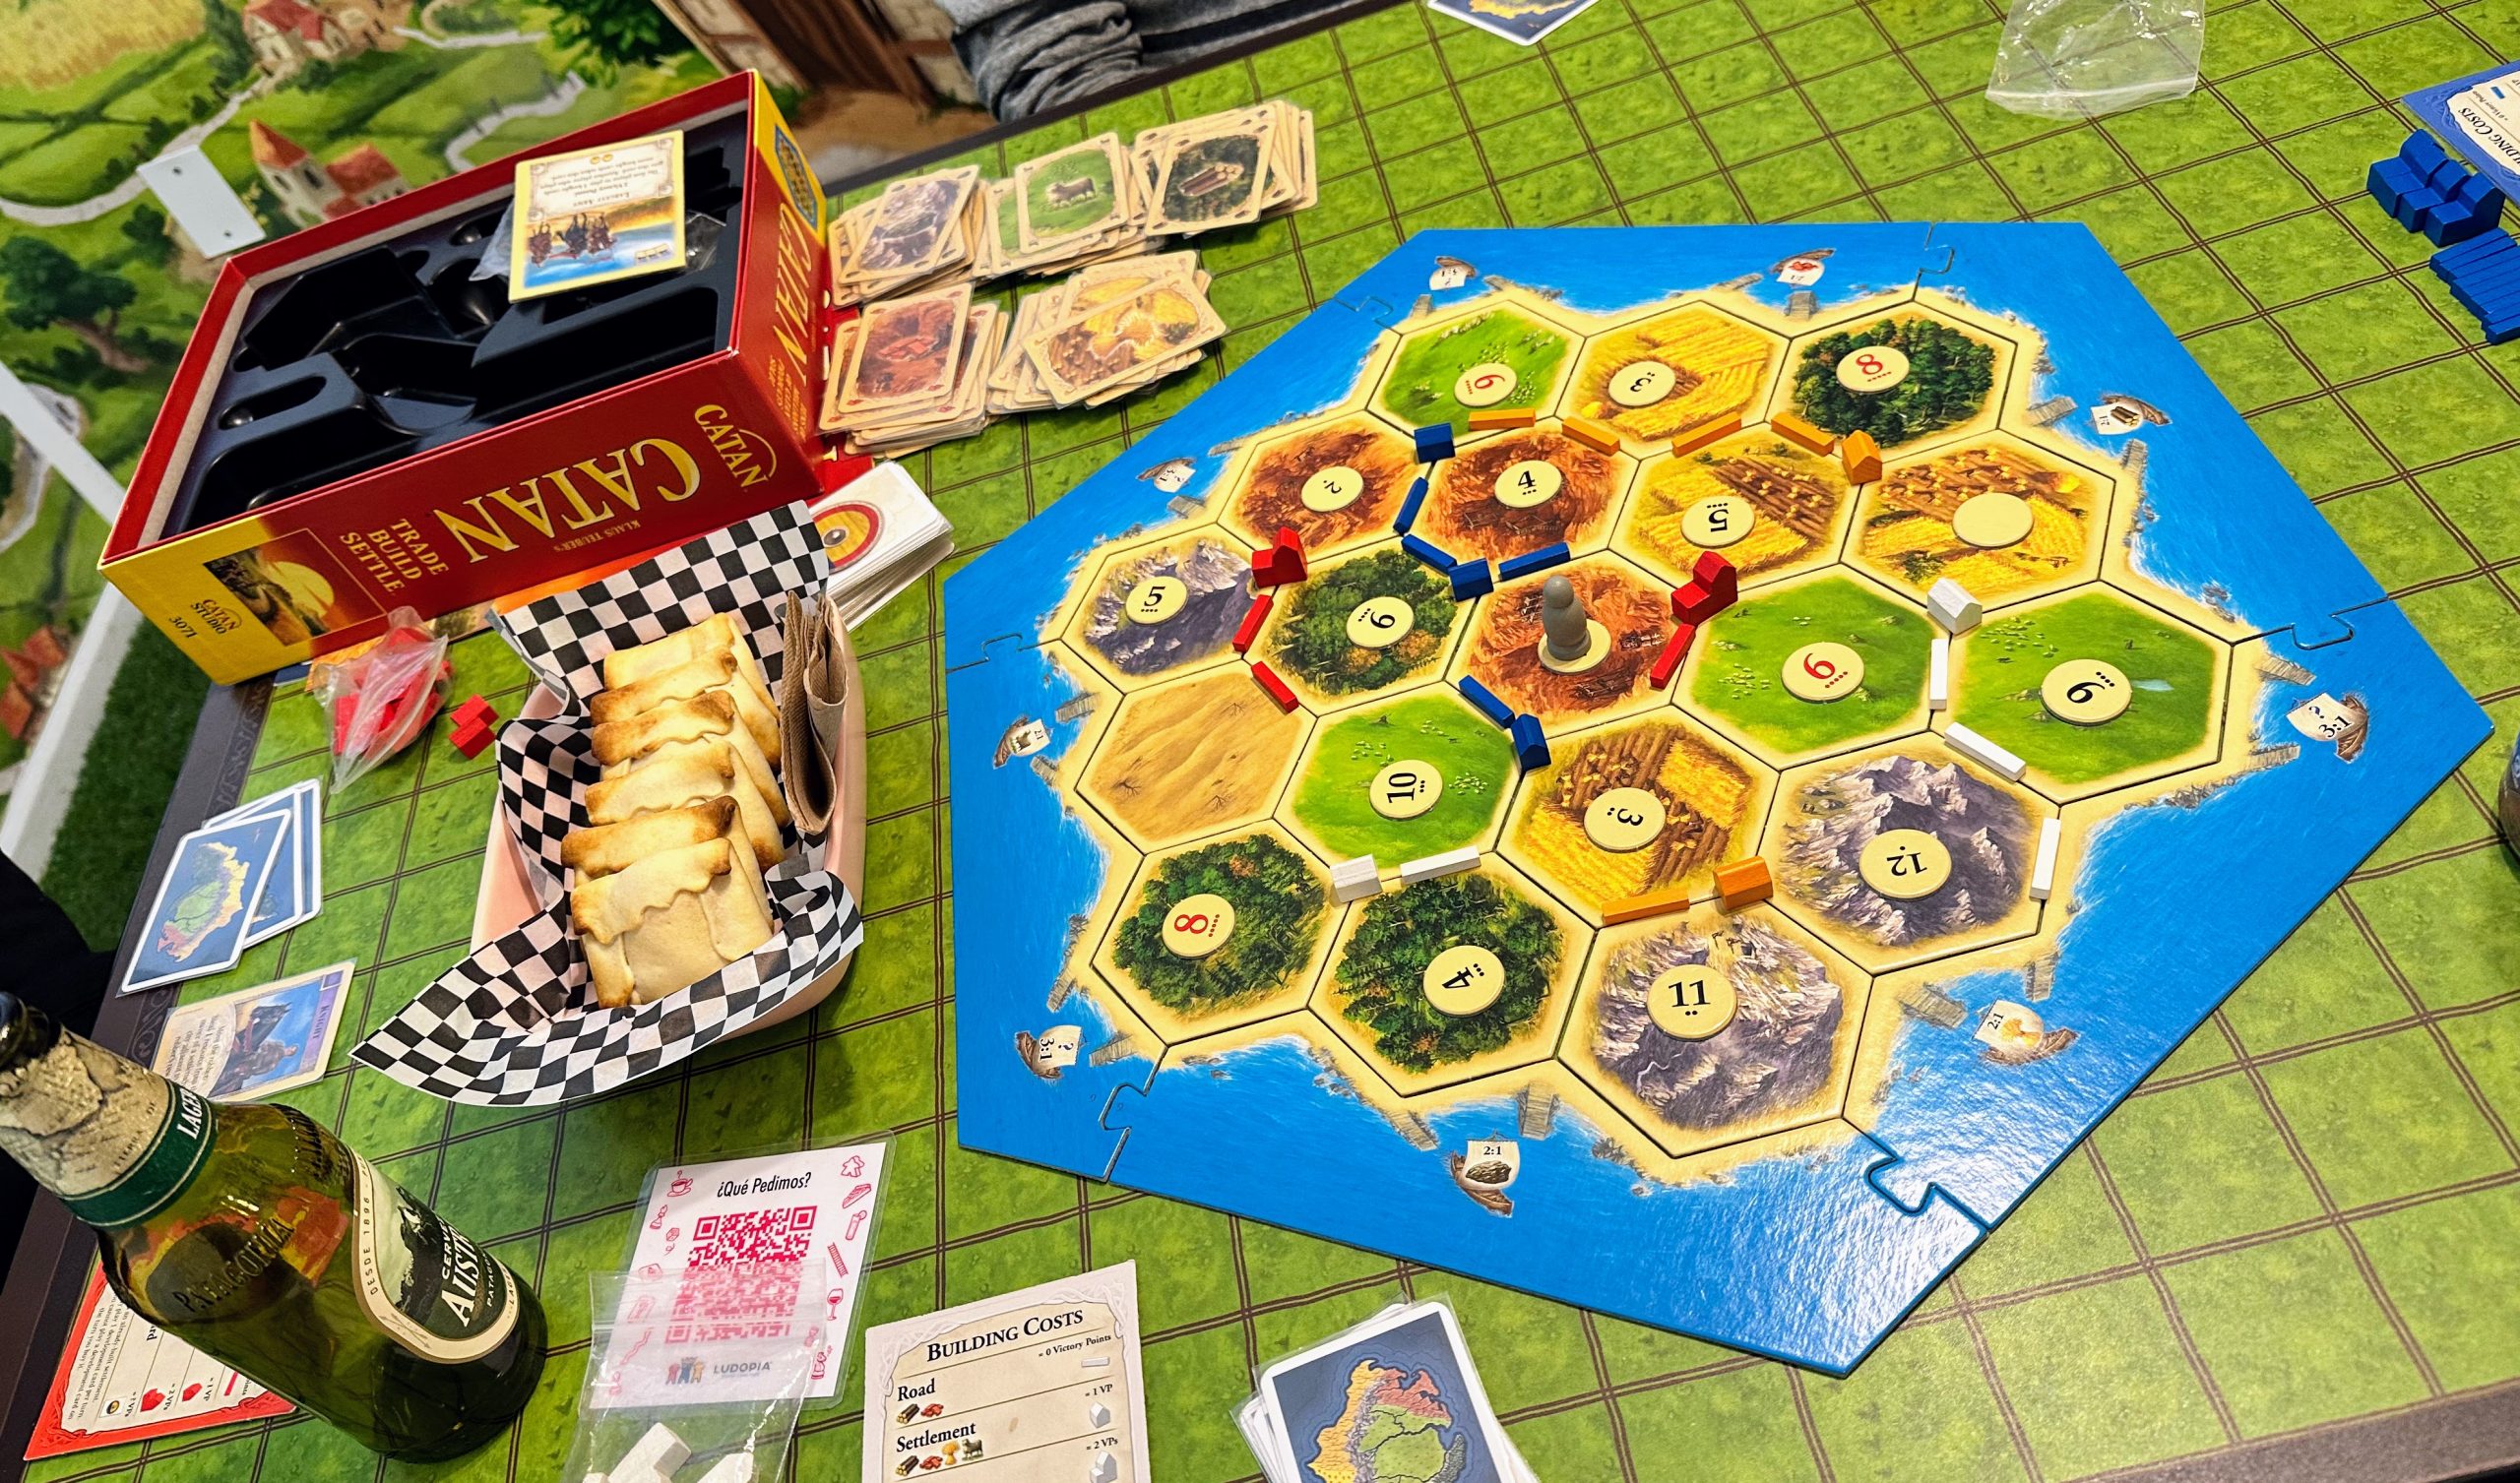
- Ludopía Board Game Café: We love board games, so we were happy to find this bar in Puerto Natales. If you order a certain amount to eat and drink, you can rent out a private room for games for free. Having a couple beers and playing Catan with friends made for a great afternoon.
- Pueblo Artesanal. Artesanías De La Patagonia: If you’re interested in shopping, there is a collection of small shops and cafes in this market right in the heart of town. It is worth walking through to see if anything catches your eye.
As far as where to stay in Puerto Natales, we booked an Airbnb the night before and the night after the W Trek. There were plenty of affordable options on the site, and we were happy with the accommodations provided.
Other Tips & Tricks
The W Trek takes a lot of advanced planning. Below are some tips to help with coordinating your trip.
- Making Reservations: Beds at the refugios sell out quickly, so make reservations as soon as they come available. When we were planning the trip in 2023, this meant monitoring the social media for Las Torres Patagonia and Vertice Travel and checking their websites daily. Unfortunately, these companies don’t announce when exactly reservations will come available, but it was around early June for us. If you are interested in camping instead of staying at the mountain hostels, then you can afford to wait longer to book (except for Chileno, which is only camping and sells out quickly given its location).
- What to Pack for the W Trek: While it may be tempting to pack a new outfit for each day, we suggest packing as little as possible. Lugging around a heavy backpack on the trail takes its toll. This means planning to re-wear everything for multiple days. Also, make sure to pack the right layers (i.e., top and bottom base layers, midweight fleece, rain jacket, hiking pants) and accessories for cold and wet weather (i.e., waterproof gloves, buff, beanie, rain pants, rain cover for your backpack). You may encounter all four seasons in a single day. Other necessities to bring include good hiking shoes and socks, a good hiking backpack, a collapsible daypack (to use for segments where you can leave your larger bag behind), hiking poles, a headlamp (for the sunrise hike), separate warm clothes for sleeping, sunglasses, a hydration bladder, a phone charger (there are shared outlets at the refugios, and you’ll want to make sure you can still take photos on the final days), hand sanitizer, a fast-drying towel, and the necessary toiletries. We recommend using compression packing cubes to keep everything organized. Some other items that aren’t necessities but we were glad we brought: slides for evenings at the refugios, headphones for phone entertainment at night, and ear plugs for noisy shared rooms. If you arrive to Puerto Natales and find there is something you forgot, the One Aco Outdoorshop has everything for sale that you could possibly need.
- Getting Around: Within Puerto Natales, you can walk everywhere except for to and from the airport. For that trip, you will need to take a taxi. If the weather is bad in town and you don’t feel like walking to shops or restaurants, Uber is available. To get from Puerto Natales to Torres del Paine (or another Patagonia town), you will take a bus from the main station. We recommend reserving your tickets well in advance through Bus-Sur.
- Where Else to Visit in Patagonia: We loved the Argentinian Patagonia – you can read more about our adventures in El Chaltén and El Calafate here. If penguins are more your thing, you can read about our trip to Punta Arenas and Magdalena Island here.
Happy traveling!
Kitrina & Jordan